Jump to
Step 1. Getting Started With Single User Scenarios
Step 3. Activating Your ChatMapper License Key
Step 4. Creating Your Scenario In Chatmapper
Introduction to characters (“Actors”)
Step 5. Launching Your New Scenario
Step 6. Personalizing Your Space
Locking an item in place and using the “All items” list
Step 7. Inviting Your Learners
Welcome to your first lesson on how to get up and running with Single User Scenarios, or what some people refer to as Micro-Learning Experiences!
Step 1. Getting Started With Single User Scenarios
Our goal is to help you build a simple Scenario that will walk you through the basics of how the tools work together to bring your creations to life. Once you’ve completed this crash course (30-45 minutes), you’ll not only have the knowledge you need to get started building more complex experiences, but also a template that you can use to jumpstart your future projects.
Here is a preview of the Scenario you’re about to build.
The first thing we have to do is install the branching dialogue creator that is going to power all of your AI bots. This is the engine that drives every Scenario and will allow you to create experiences ranging from the simple (which we will be focusing on in this course) to the very complex (which you can learn about through our library of standalone tutorials at learnbrite.com/academy).
Let’s start with the simple stuff: Click here to download ChatMapper
ChatMapper is Windows software, but it can be used on macOS as well with Parallels |
Step 2. Installing ChatMapper
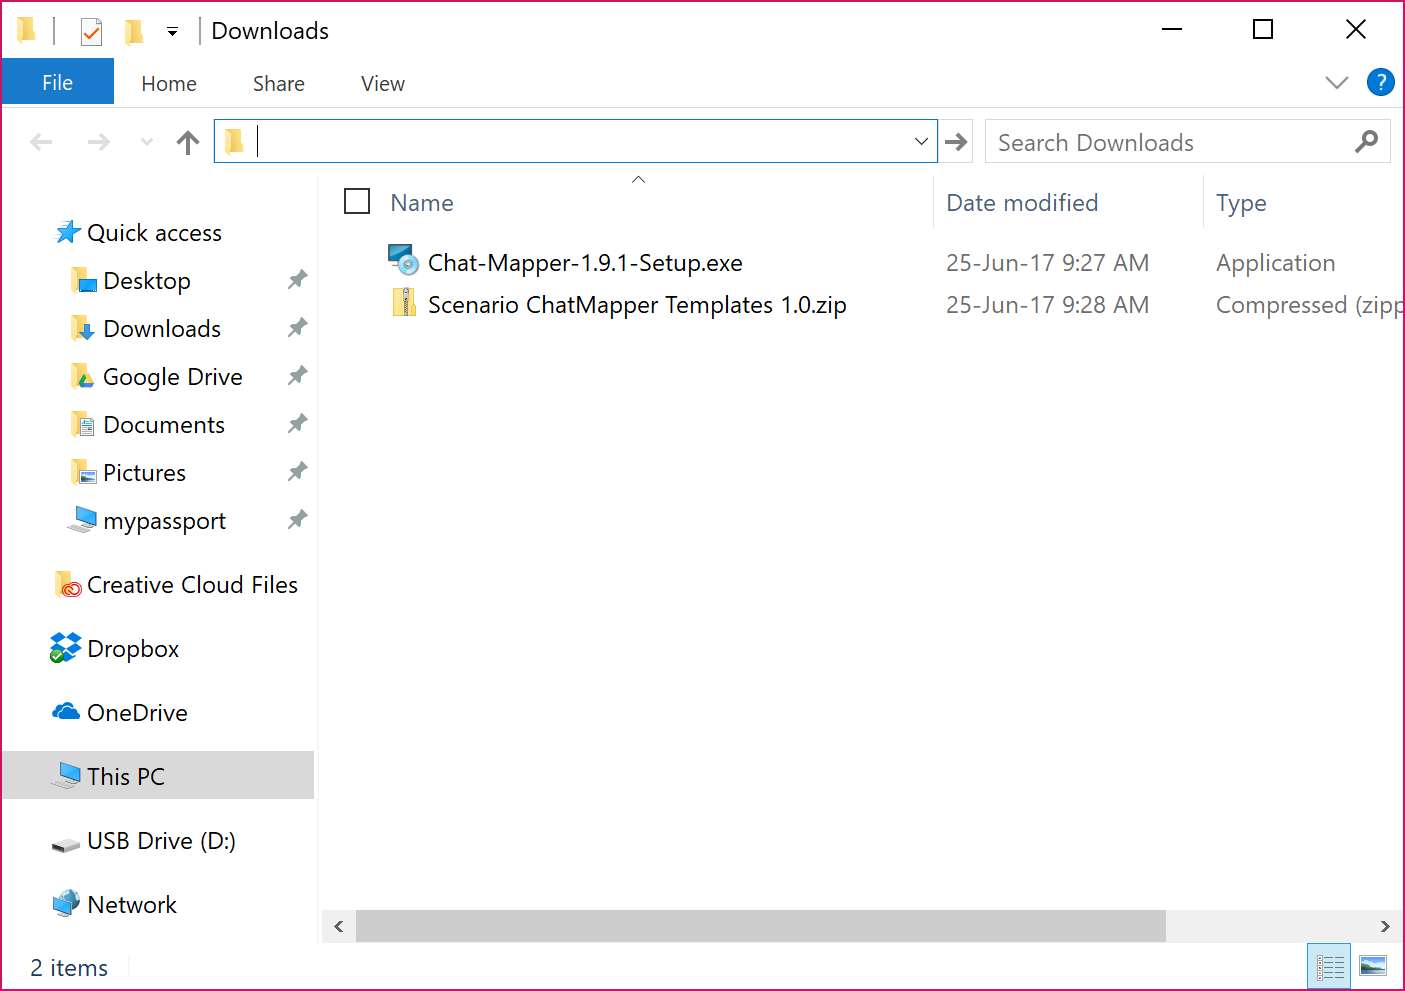
The first step to install ChatMapper is finding the location where you downloaded it – for most people this will be on their desktop or downloads folder, but yours may be different.
Once you’ve located it, double-click on the Chatmapper Setup file to begin the installation process.
Choose “Run” when the dialogue box appears.

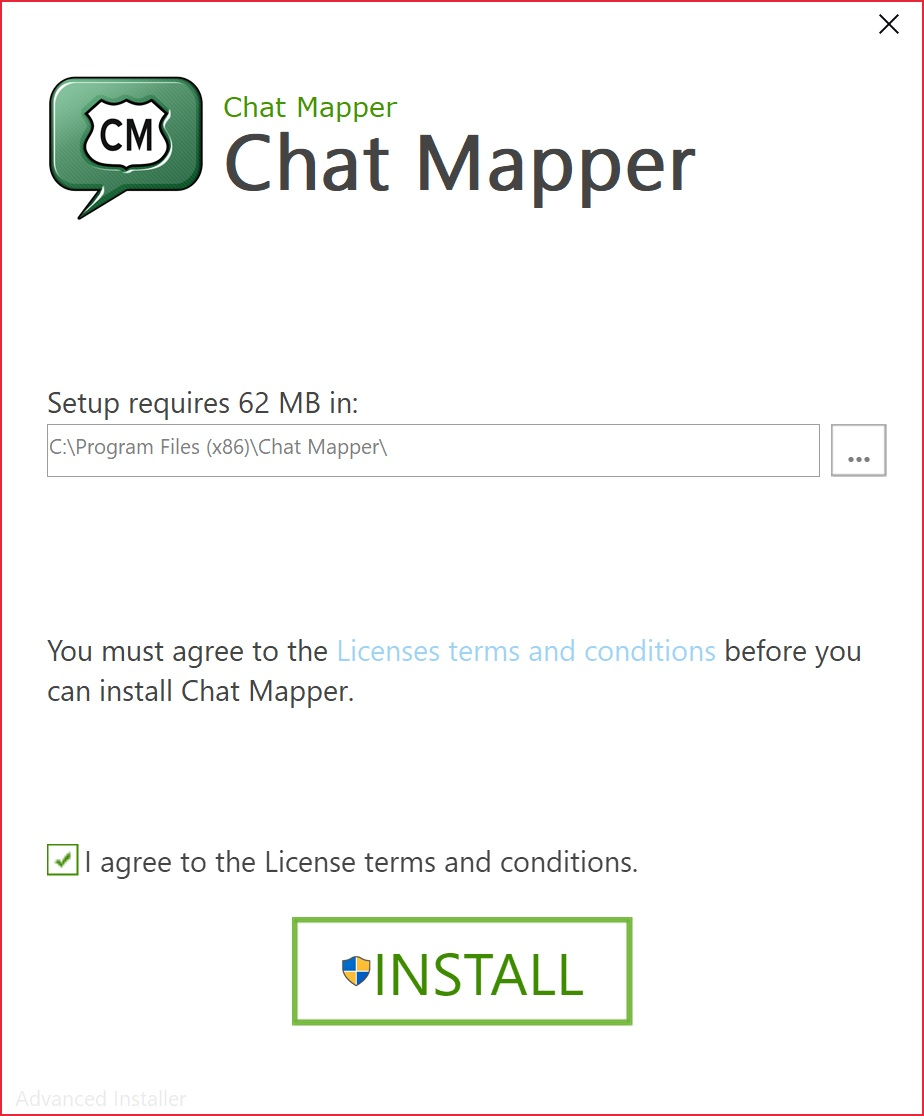
Now click “Install”.
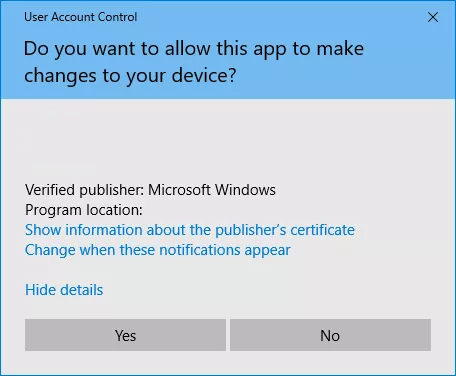
If prompted to allow the app to make changes to your device, choose “Yes”.
Finally click “Run” (not finish) once the installer is done, so that we can jump into the next step directly.

Step 3. Activating Your ChatMapper License Key
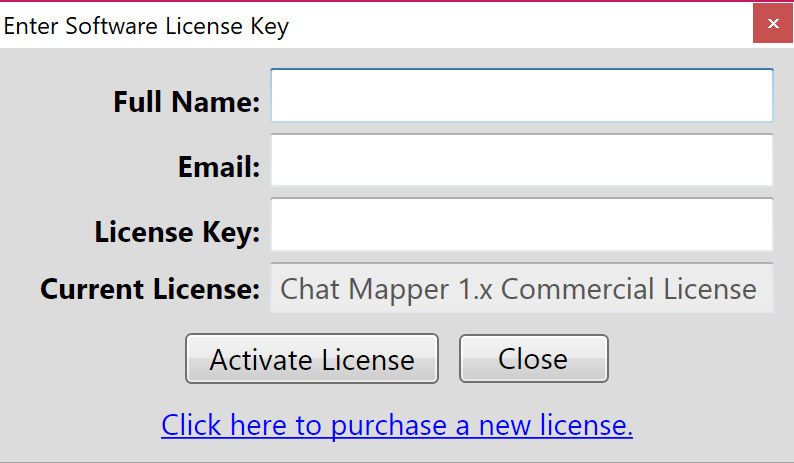
Here we are inside of the ChatMapper application. Before we can get into the building phase, we need to activate the license to unlock all features.
Click on the “Help” menu and then choose “Enter License Key”.

Enter the Commercial License Key along with your Name and Email exactly as they were entered when purchasing, then click the “Activate License” button and you’ll see a confirmation message verifying that you’ve successfully activated ChatMapper.
You should have received an email with all of this information when you first signed up, but if you need us to send it to you again, no problem, please contact lbhelp@learnbrite.com and we’ll resend it to you.
OK. Enough with the admin stuff! Let’s get on to the fun part… actually building your first Scenario! To get yourself ready, download the ChatMapper starter file now!
Step 4. Creating Your Scenario In Chatmapper
The starter file is a special format, called “CMPKG” or “ChatMapper Package”, that includes all assets in a single file, and is very useful to e.g. move the Scenario from one computer to another, as you simply need to share the CMPKG file.
Import the starter file by double-clicking on it, which will open it in ChatMapper.
When importing packages, all files will be extracted to Documents/ChatMapper/Imported Packages |
Introduction to characters (“Actors”)
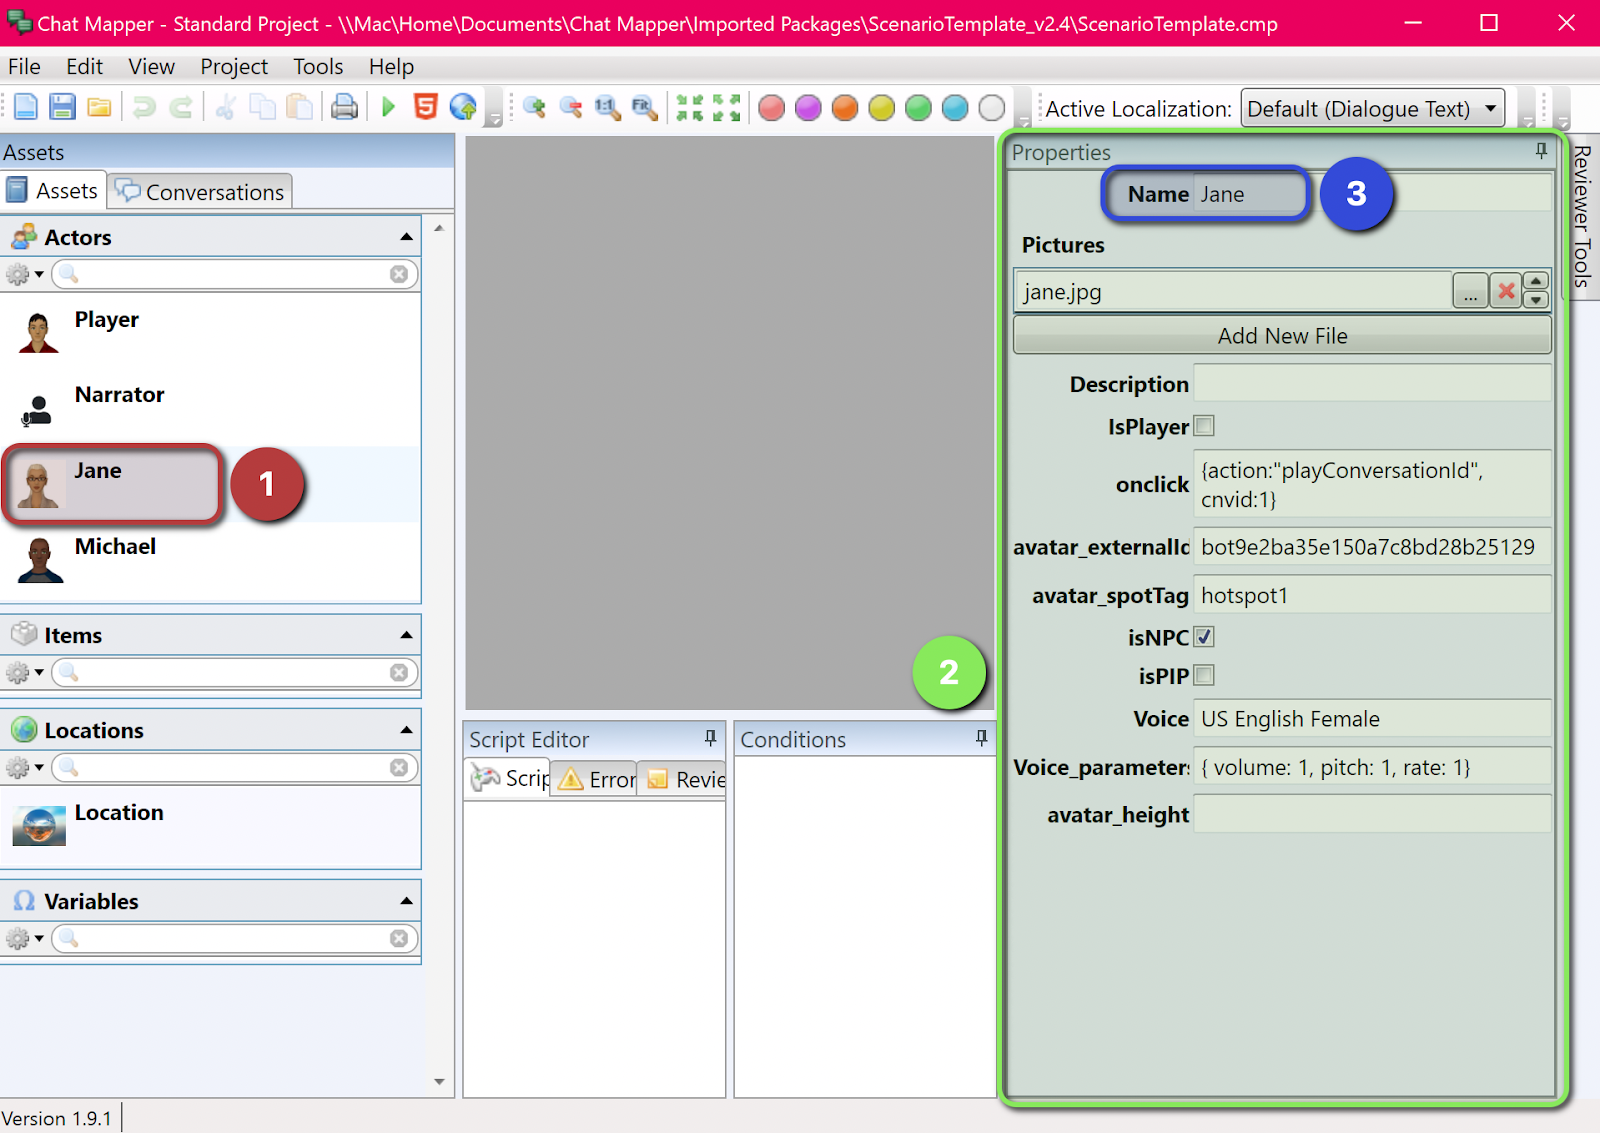
The template file already has some Actors defined, but in case you want to change anything about them you can do so by selecting an Actor (on the left pane, highlighted in red), and then modifying values on the right-hand panel (in green). For example, if you want to change the name of an Actor you can see the field highlighted in blue in the image below.
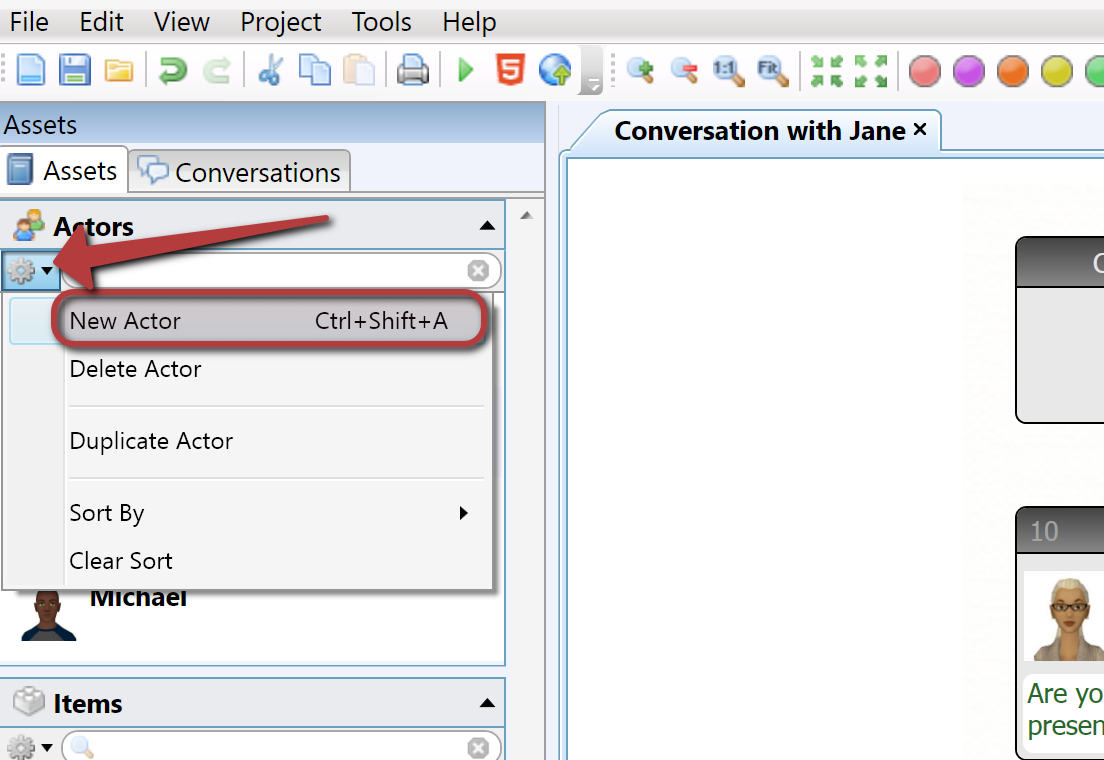
Our current Actors are Player (the user’s own avatar), Narrator (a special Actor without a body), Jane, and Michael, but we will need an additional one – Erica. To create Erica, click on the cog icon right below “Actors”, and select “New Actor”
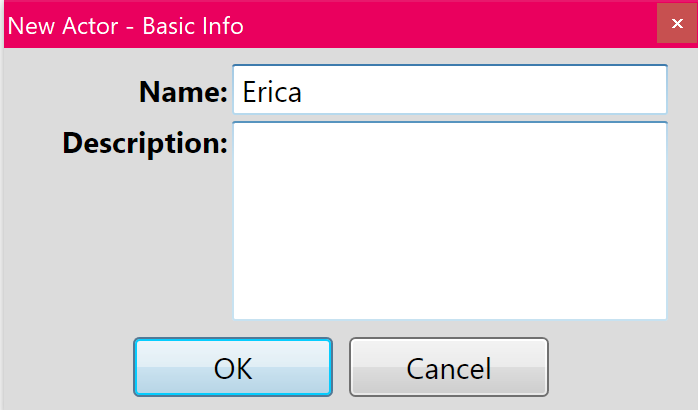
In the pop-up, write “Erica” in the name field, and click “OK”
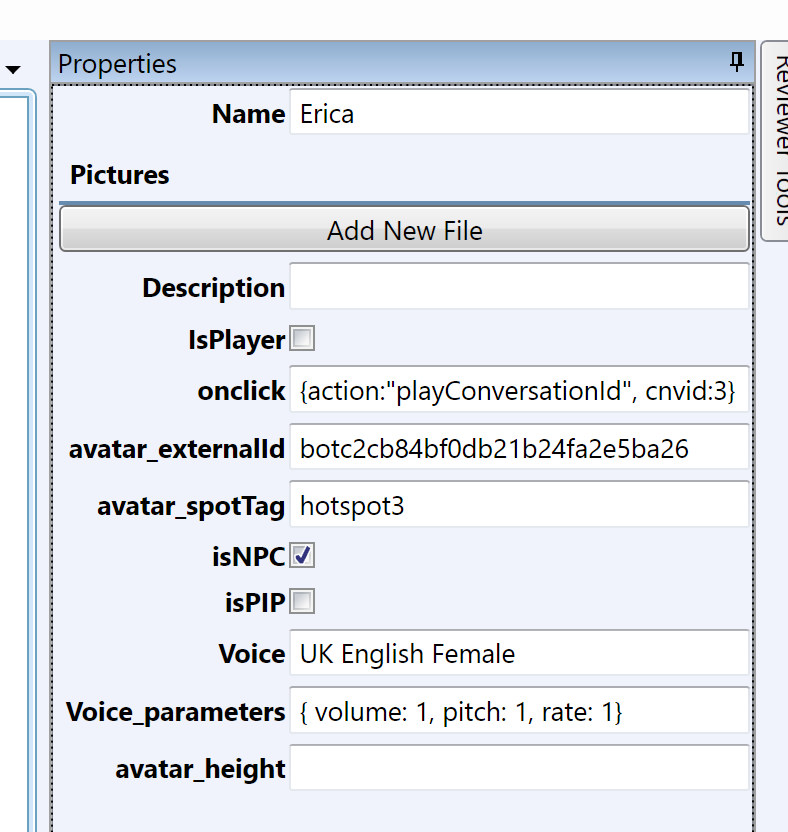
Then, click on her in the Actor’s list, and fill in her properties like in the screenshot below. You should only need to modify two fields:
- avatar_externalId: botc2cb84bf0db21b24fa2e5ba26
- avatar_spotTag: hotspot3
- onclick: {action:"playConversationId", cnvid:3}
To delete an Actor, first delete any reference to them in conversations (as Actor/Conversant of both Dialogue Nodes and Conversations). If you do not do this, ChatMapper will alert you. Afterward, select the Actor, click on the cog icon in the “Actors” section, and select “Delete actor” |
Creating our first dialogue
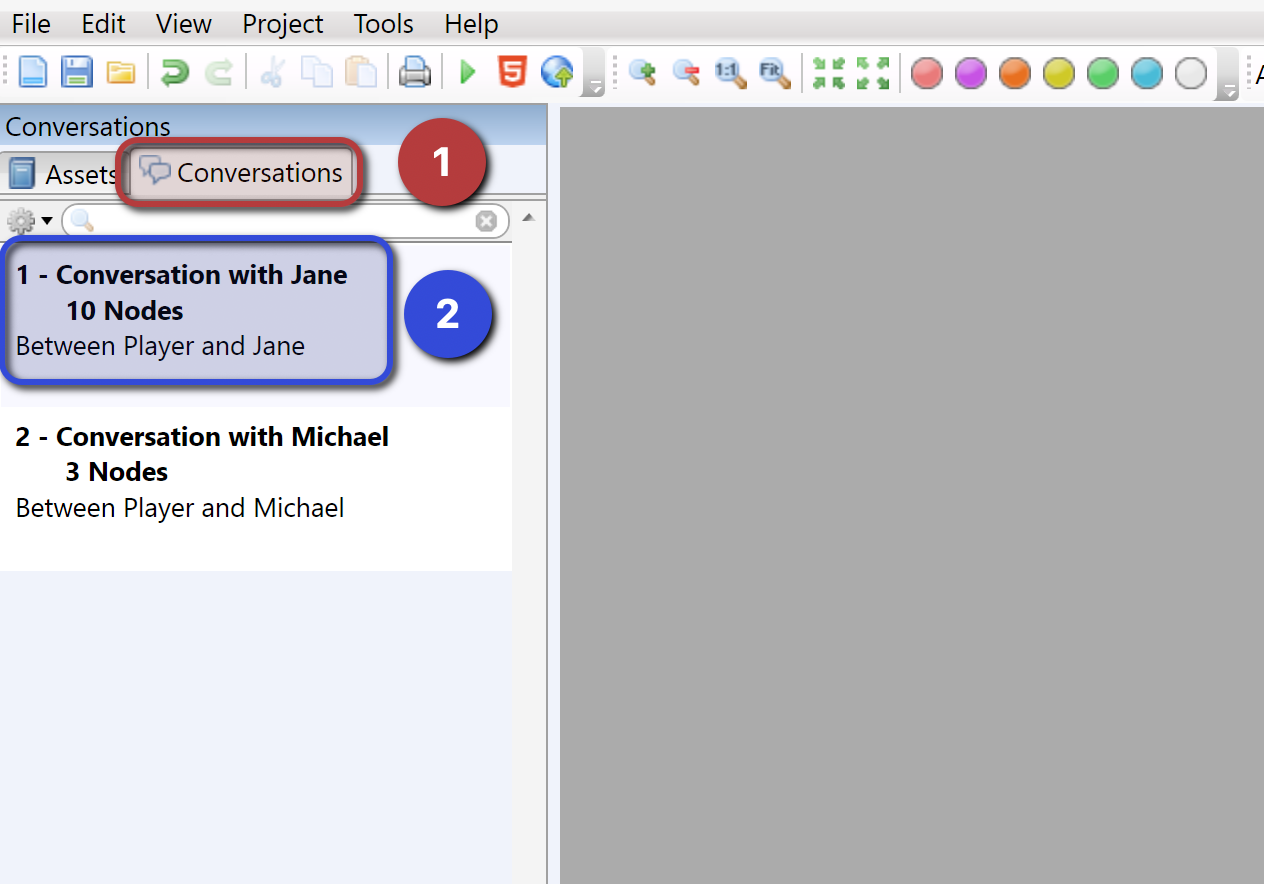
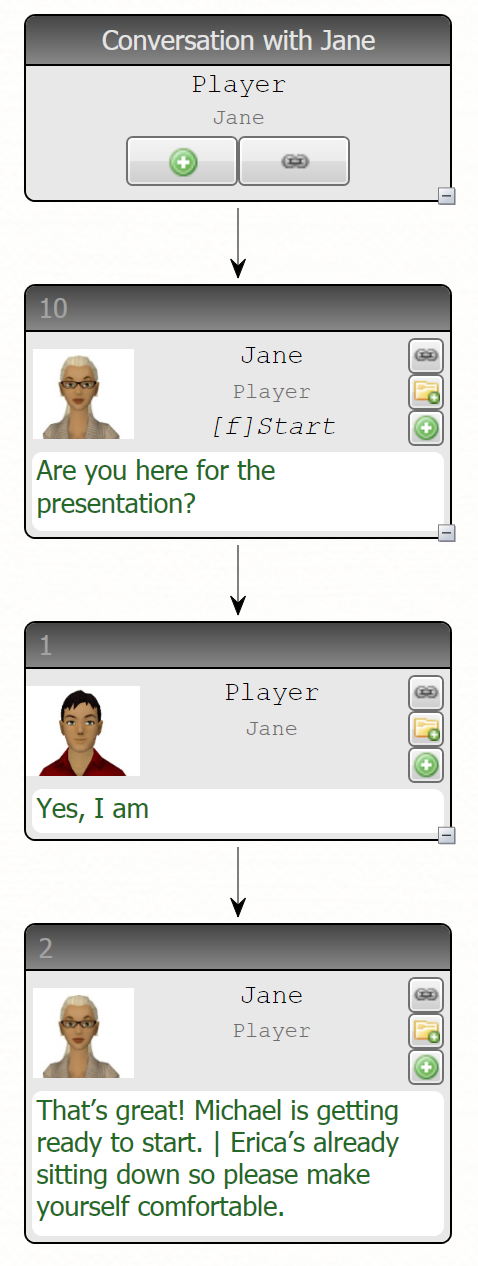
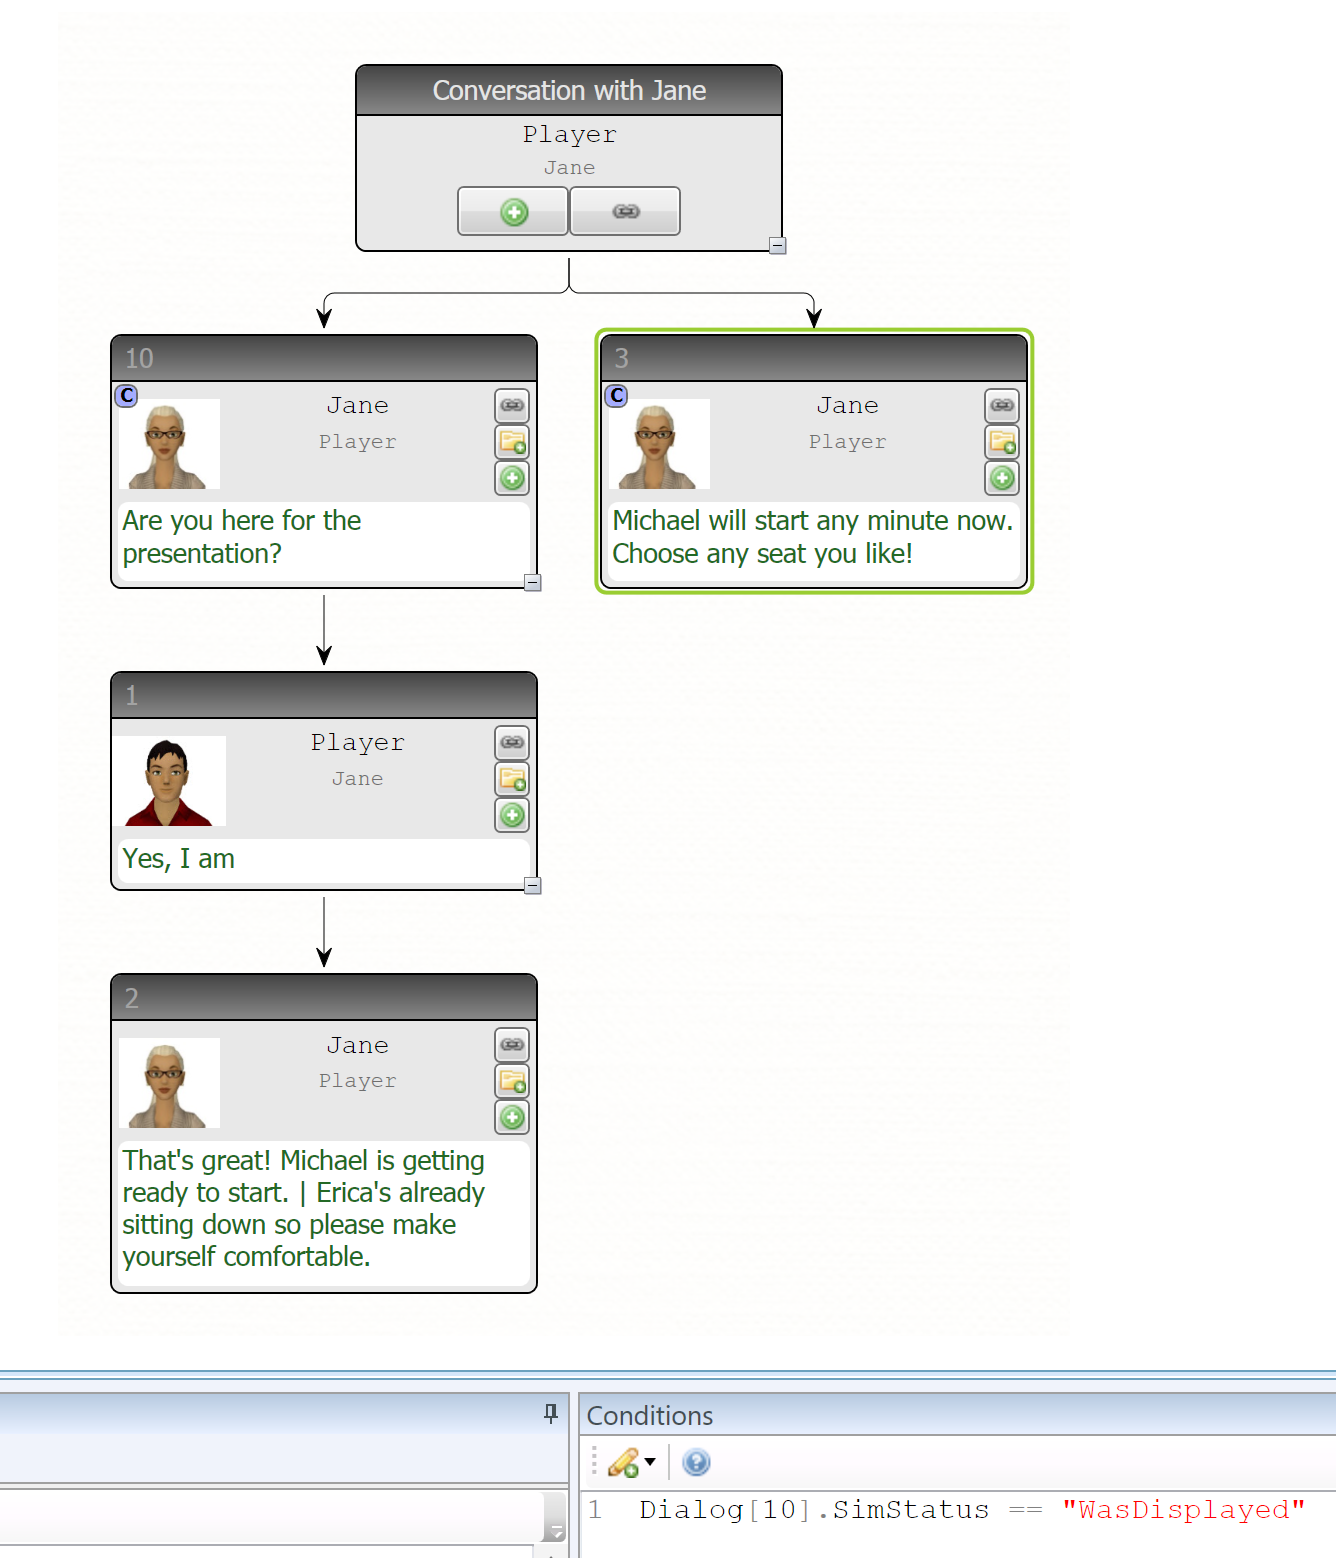
The central pane is currently grey and empty – that’s because no conversation has been opened yet. To open one, simply click on the “Conversations” tab (highlighted in red) and double click on “1 – Conversation with Jane” (in blue). This will open up the conversation in the center.
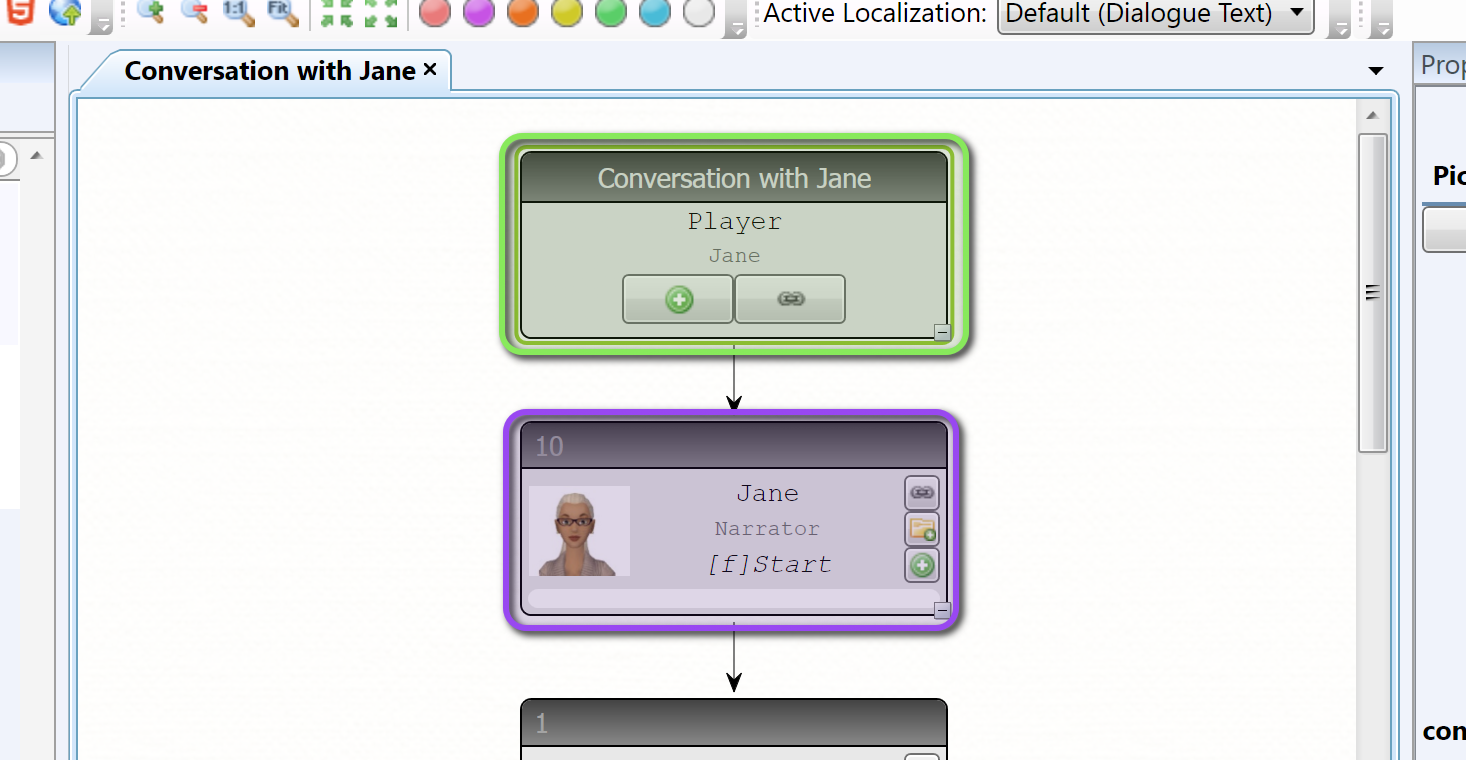
In this conversation, you will see a few dialogue boxes (“Dialogue Nodes”) linked by arrows.
For every conversation there is one “Root node” (highlighted in green in the screenshot below), which marks the beginning of any conversation and cannot be deleted. It does not have any text but acts as an anchor to attach all future dialogue nodes to. All other nodes are normal dialogue nodes (highlighted in purple), which is where the conversation takes place – there can be as many of these as needed in any conversation. Finally, there is another type of node called “Group node”, but we will encounter those later on so you can forget about them for now.
For now, delete all dialogue nodes except the first one by clicking on them and then pressing the “Delete” button on your keyboard, or by right-clicking on them and selecting “Cut”. As with other software, you can select multiple nodes by clicking on them while keeping “Ctrl” pressed, or select a sequence of them by clicking on the first, and then Shift-clicking on the last of the sequence.
Having cleaned up the conversation, we can now focus on building our module. When clicking on a dialogue node, there are 3 key elements in the Properties window:
- the Actor (red)
- the Conversant (green)
- the Dialogue Text (blue)
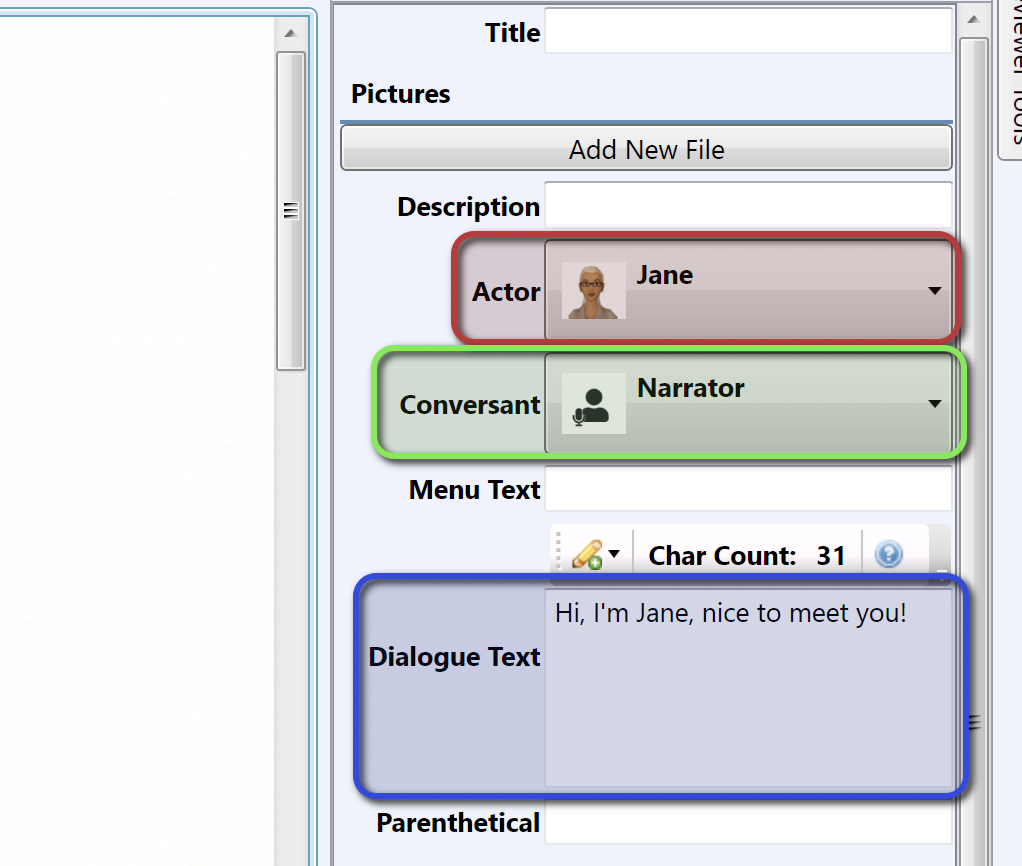
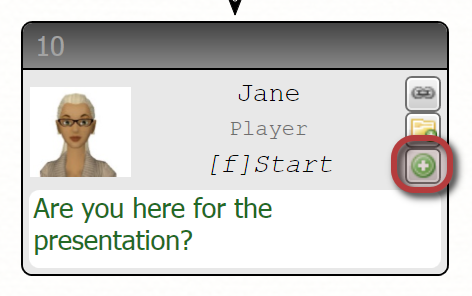
In short, Actor is the speaker, Conversant is the listener, and Dialogue Text is what is being said. Go ahead and write “Are you here for the presentation?” in the first node, and change the Conversant to “Player”
Adding a new Dialogue Node
To add a new dialogue node, click on the green plus circle within an existing dialogue node.
This will cause a window to pop-up in the center. It has all the same fields at the Properties window in the bottom right corner, and effectively they are the same thing: you can edit the dialogue here or in the Properties window, whatever is easiest for you.
Notice that in this new dialogue node, ChatMapper has automatically swapped the Actor and Conversant around, in order to mimic the normal back-and-forth of a conversation.
Paste the following into the Dialogue Text field: “Yes, I am”
Now, add another node and paste in: “That's great! Michael is getting ready to start. | Erica's already sitting down so please make yourself comfortable.”
You’ll have noticed the “|” characters in that last sentence – adding | creates a line break to subdivide the conversations into smaller chunks/phrases. Given that each phrase is displayed in closed captions, it’s generally a good idea to split paragraphs with | so that there’s never too much text on display, which on smaller screens like mobile can end up taking a lot of space.
The dialogue should now look like this:
Adding in a branch
Adding branches to the conversation allows users to choose responses or questions and become an active part of the scene.
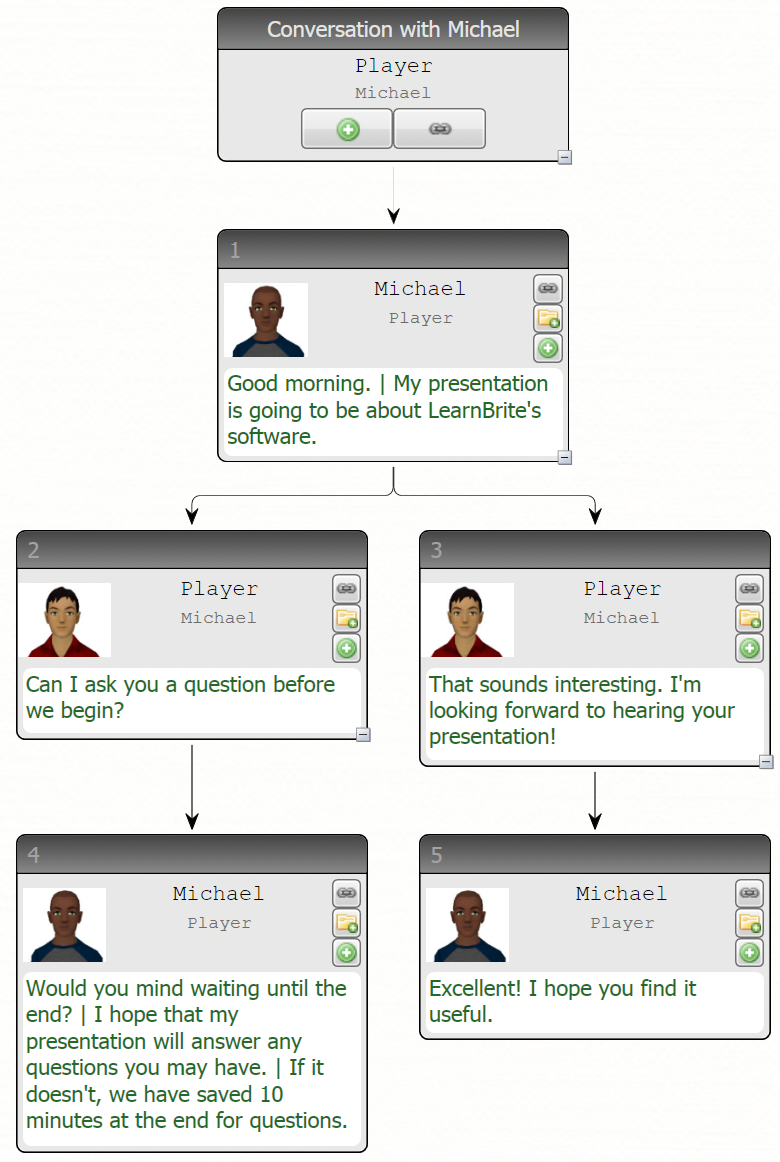
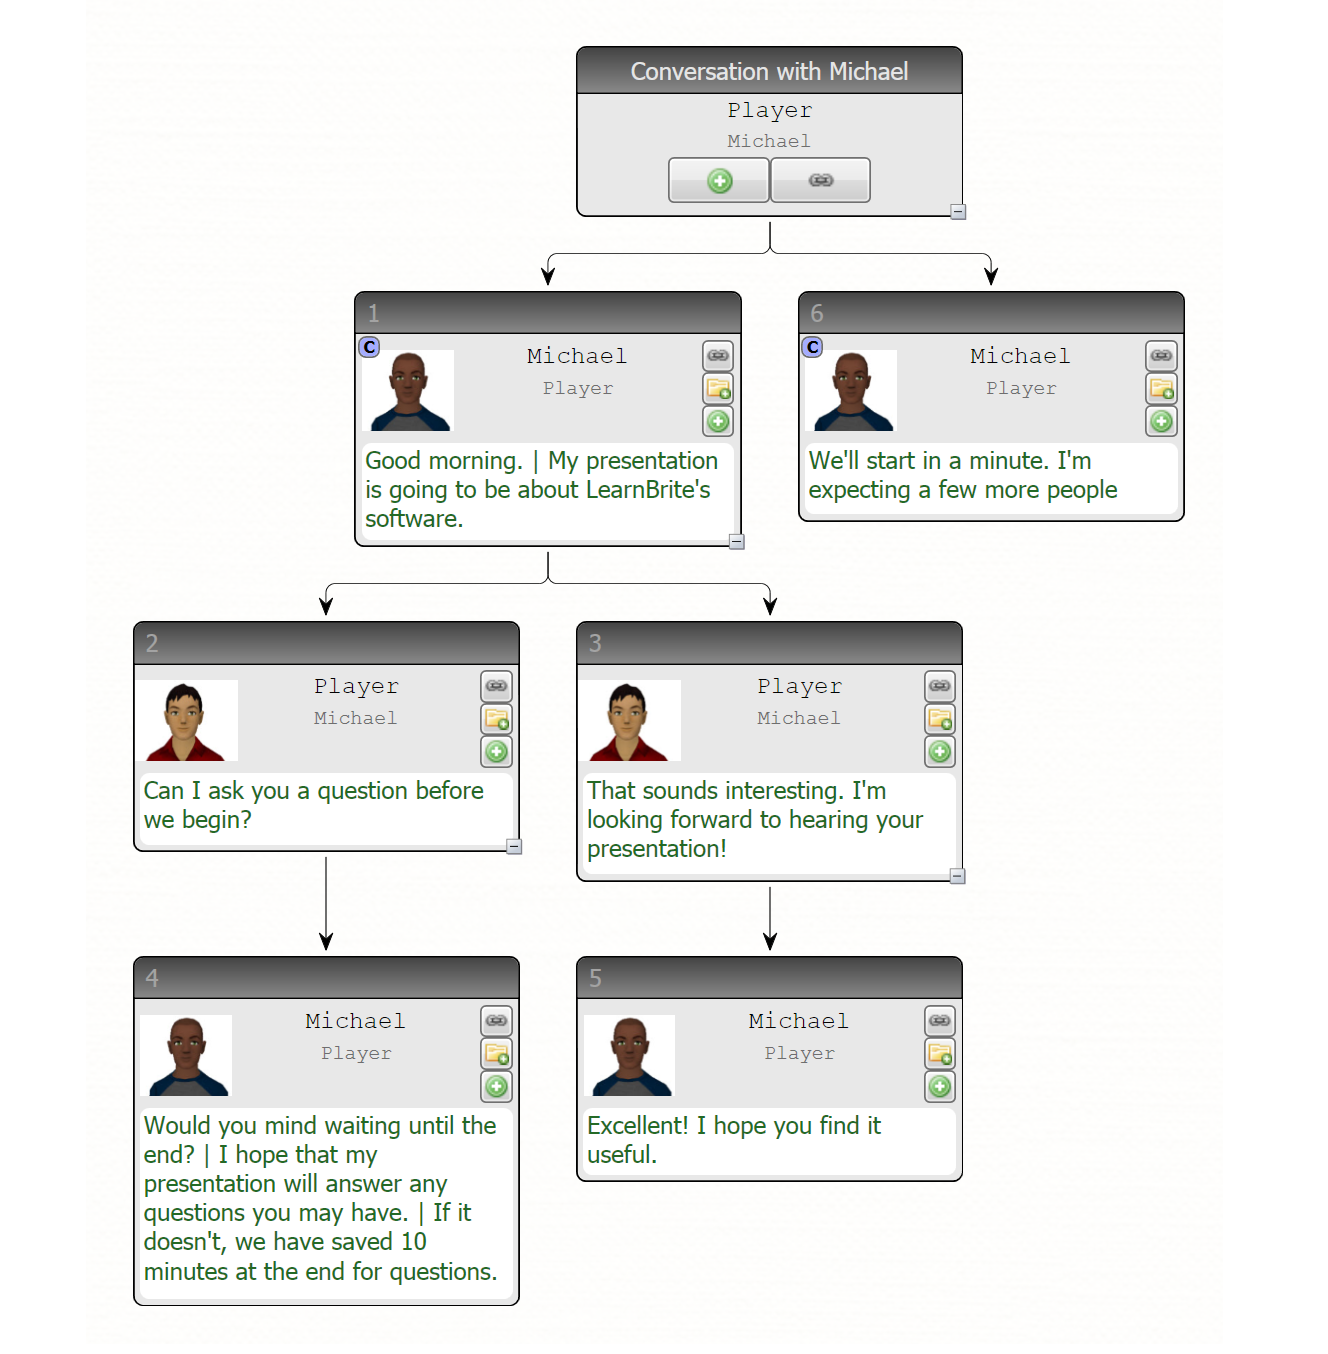
Start by opening conversation “2-Conversation with Michael” (Go to the Conversations tab and double click on it). Clean it up like before by removing every node except the first one, in this case nodes [2] and [3]
Click on Dialogue Node [1] to select it, then change its Conversant to “Player” and Dialogue Text to “Good morning. | My presentation is going to be about LearnBrite's software.”
Now it’s time for our first branch! Click on the green plus icon again on node [1] to add a child dialogue node, and paste in the text “Can I ask you a question before we begin?”. Then add another child node to [1] with the text “That sounds interesting. I'm looking forward to hearing your presentation!”.
Nodes [2] and [3] need different responses so let’s add those next.
Add a new child to node [2], click the plus sign to add a new node and paste in, “Would you mind waiting until the end? | I hope that my presentation will answer any questions you may have. | If it doesn't, we have saved 10 minutes at the end for questions.”
For node [3], add instead a child that says “Excellent! I hope you find it useful.”
Here is how our dialogue tree looks right now:
Adding in simple conditions
If we try to talk to Michael, the first time runs really smoothly. However, if we go back and speak to him a second time, he will repeat his welcome, because that’s the only thing we programmed him to say, which sounds strange and would break the atmosphere for the learner. How can we change it so that he says something new?
Let’s start by adding in a new branch to the root node by clicking on the plus sign and writing “We'll start in a minute. I'm expecting a few more people” in the node. This is better because it means we can have a welcome one time, and a more suitable secondary conversation every other time; ChatMapper however views both of these nodes as having the same “priority”, and since it’s not able to decide which path it should follow, it will offer both as a choice when you speak to Michael.
Luckily, we can use conditions to activate and deactivate nodes! To set a condition, click on a node to select it, then click on the pencil icon at the bottom of the screen in the “Conditions” pane, and choose one of the available options (described below).

Display Node Only Once
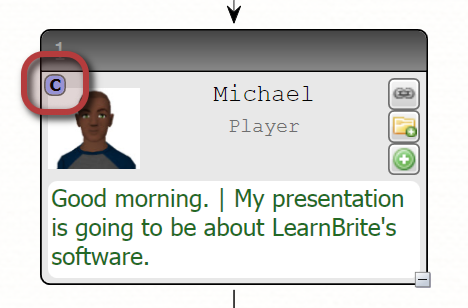
This condition will only show our node once in the conversation. If we return to the conversation in the future, it will not be shown again. This is the condition we want in node [1], so select it, click on the pencil icon, and click on “Display Node Only Once”. Notice that the code that appears in the conditions window – now this node will show itself once and then deactivate.

Dialogue SimStatus Condition
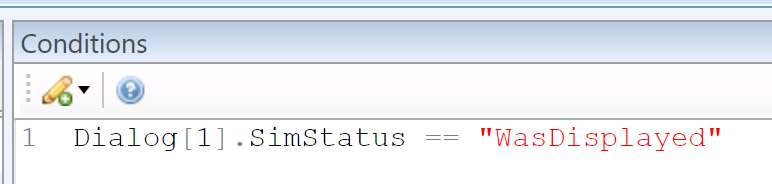
This allows a node to only be shown after a specified node has been shown. We want to display node [6] only when node [1] has already been shown, so this is the condition we need to add to node [6]. As before, click on the pencil button in the conditions window and select the second option: “Dialogue SimStatus Condition”. Notice again the code that appears in the conditions window – in this case it needs the ID of the node we want to “watch”. All you need to do is change “id” for the number of node you need (in this case node 1), so you should change it to
Dialog[1].SimStatus == "WasDisplayed" |
Now, node [1] must be shown before this one is shown, which creates a sort of “seesaw” effect:
- The first time the conversation is played, node [1] is activated and node [6] is deactivated (because it is waiting for node [1] to be activated).
- The 2nd time the conversation is played, node [1] has deactivated itself and node [6] has activated itself.
You might notice that a small “C” has appeared on the two nodes we have just modified. This symbol indicates that the node has a condition.
This is how the conversation tree for Fred should look now. Don’t worry, it may seem complicated the first time but it quickly becomes second nature! 🙂
Updating Jane’s conversation
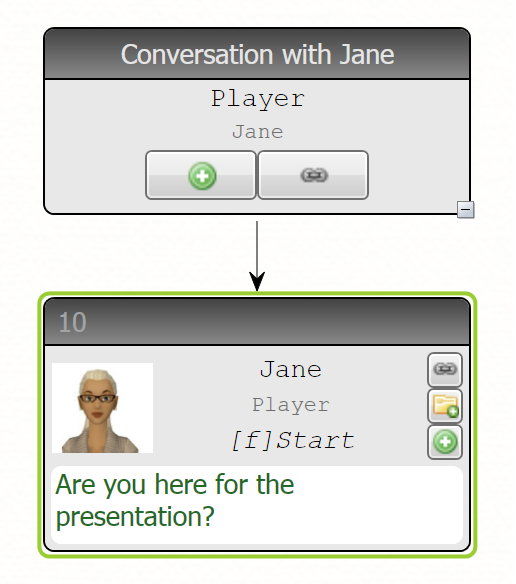
If we go back to Jane’s conversation, we have a similar issue (she will keep asking if you are here for the presentation, never remembering your last answer). Now we can make the same seesaw effect to “unlock” a new conversation branch. Click on the root node, add a new child dialogue node, paste “Michael will start any minute now. Choose any seat you like!”
You might notice that the first node in this conversation is not [1], but [10], why is that? This is a “safety” measure: for example, if you had a bunch of conditions referencing node [10], but the ID of node [10] changed to e.g. [9] because you deleted another node, all those conditions would break! Instead, ChatMapper will never change a node’s ID so that this doesn’t happen.
In node [10], add a “Display this node only once” condition, and in node [3], add a “Dialogue SimStatus” condition as we did in the other conversation, changing “id” to 10.
Creating Erica’s conversation
Let’s put everything together now to make a new conversation! Create a new one by selecting the “Conversations” tab on the top left, clicking on the cog icon, and then selecting “New Conversation”
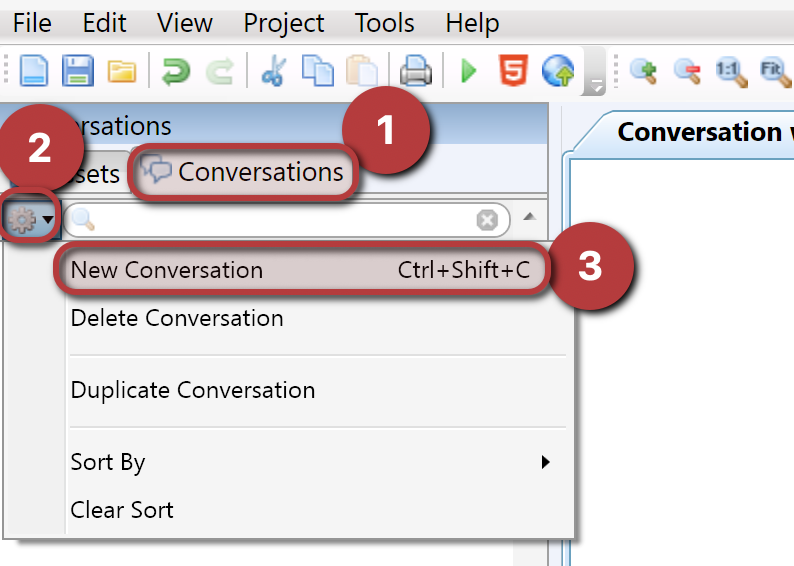
In the popup, fill in the name and change the Conversant to “Erica”

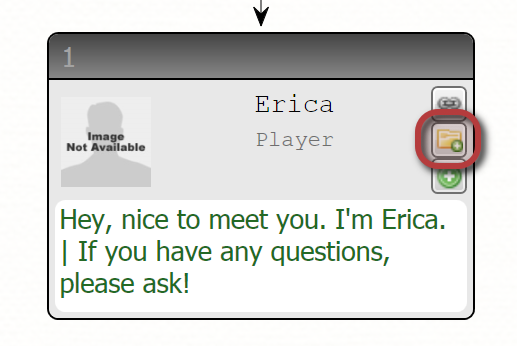
Create the first dialogue node by clicking on the green plus in the root node, and paste in “Hey, nice to meet you. I'm Erica. | If you have any questions, please ask!”.
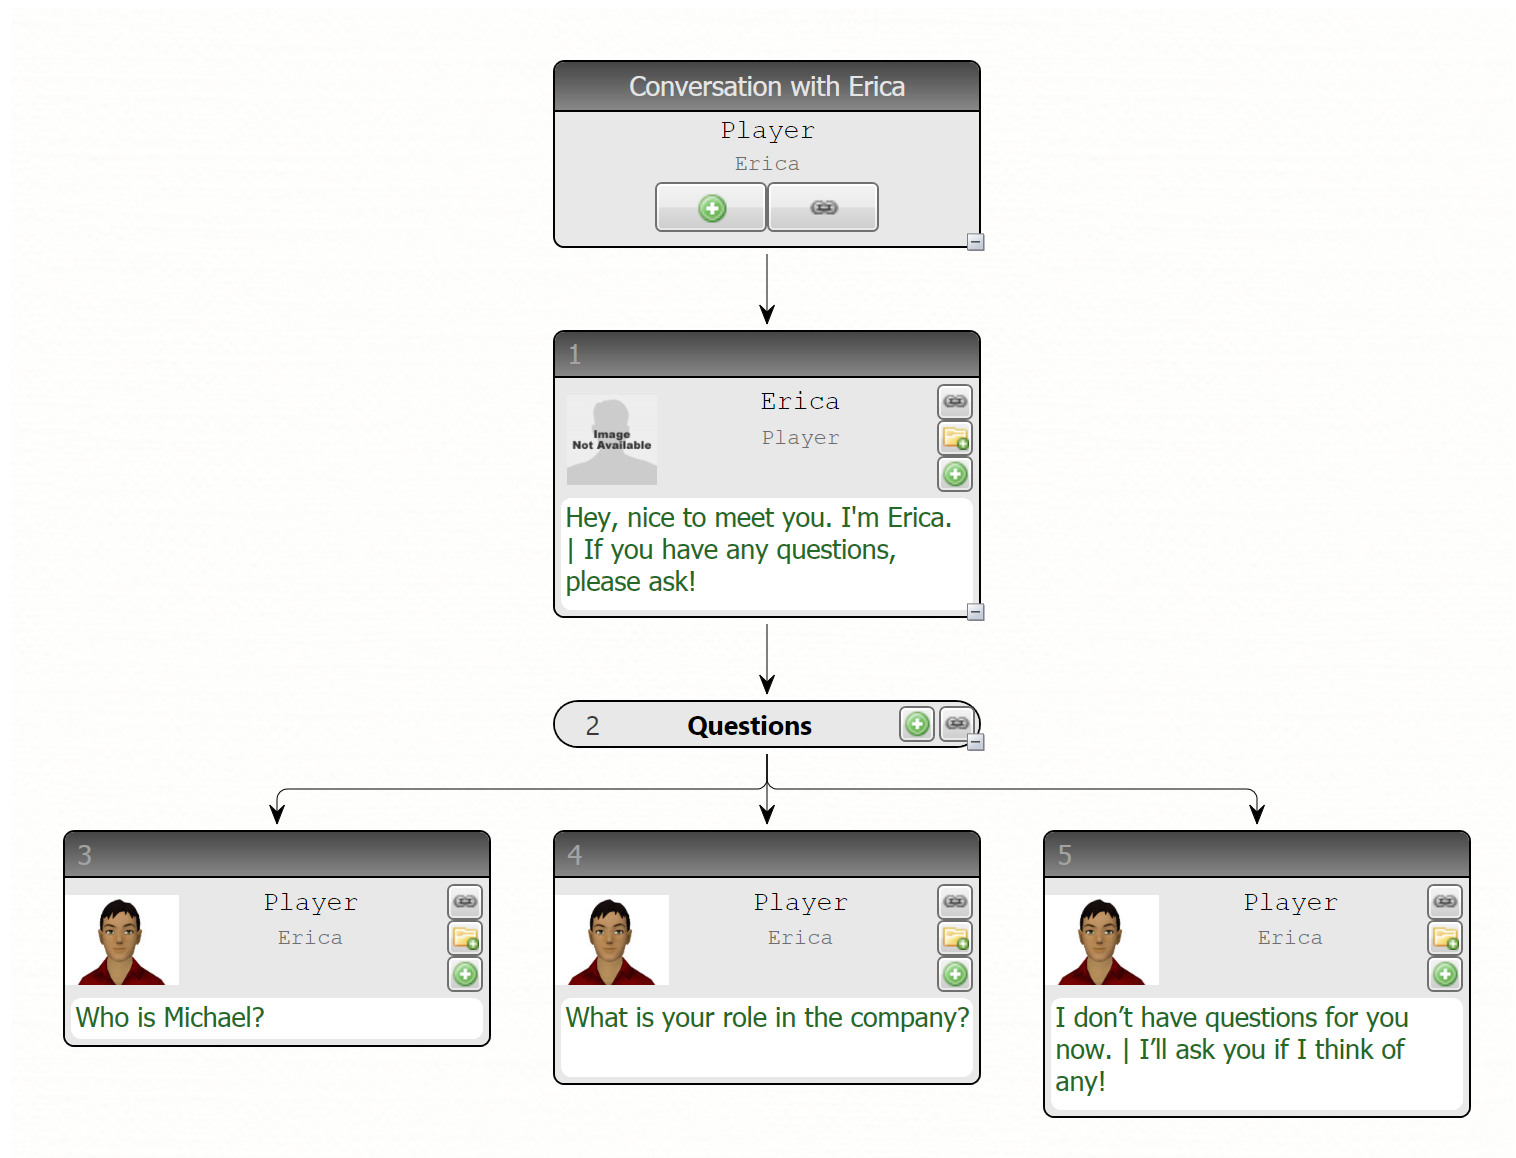
Now we’re going to add in a branch with 3 options, and to make it a little neater we’re going to add a “Group node”, a special type used purely for, well… grouping nodes together, thus allowing for some very useful tricks we’ll explore in the next section.
To add a group node, click on the small folder icon on node [1].
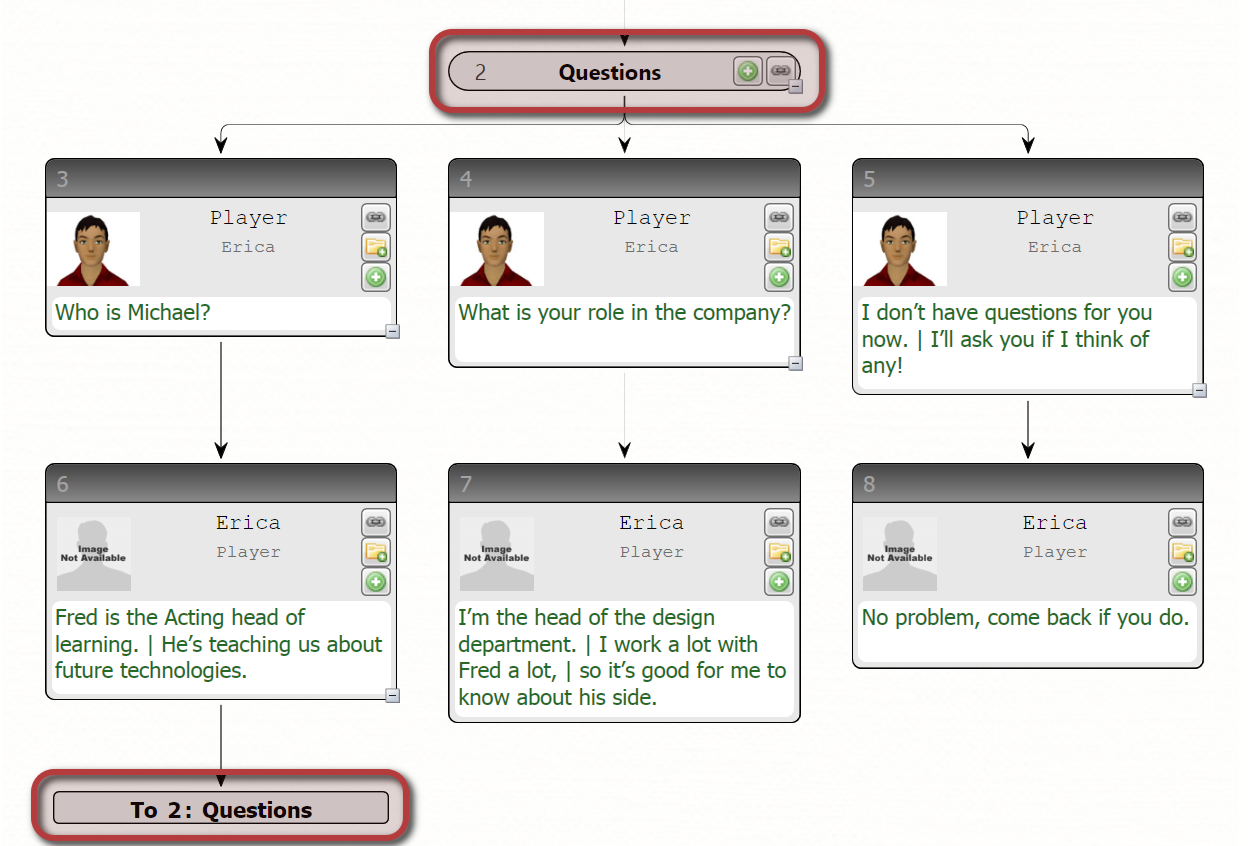
In the Properties pane, rename the group “Questions”, and then add to it three children nodes with the usual method. You should paste the following text in them:
- Node [2]: “Who is Michael?”
- Node [3]: “What is your role in the company?”
- Node [4]: “I don't have questions for you now. | I'll ask you if I think of any!”
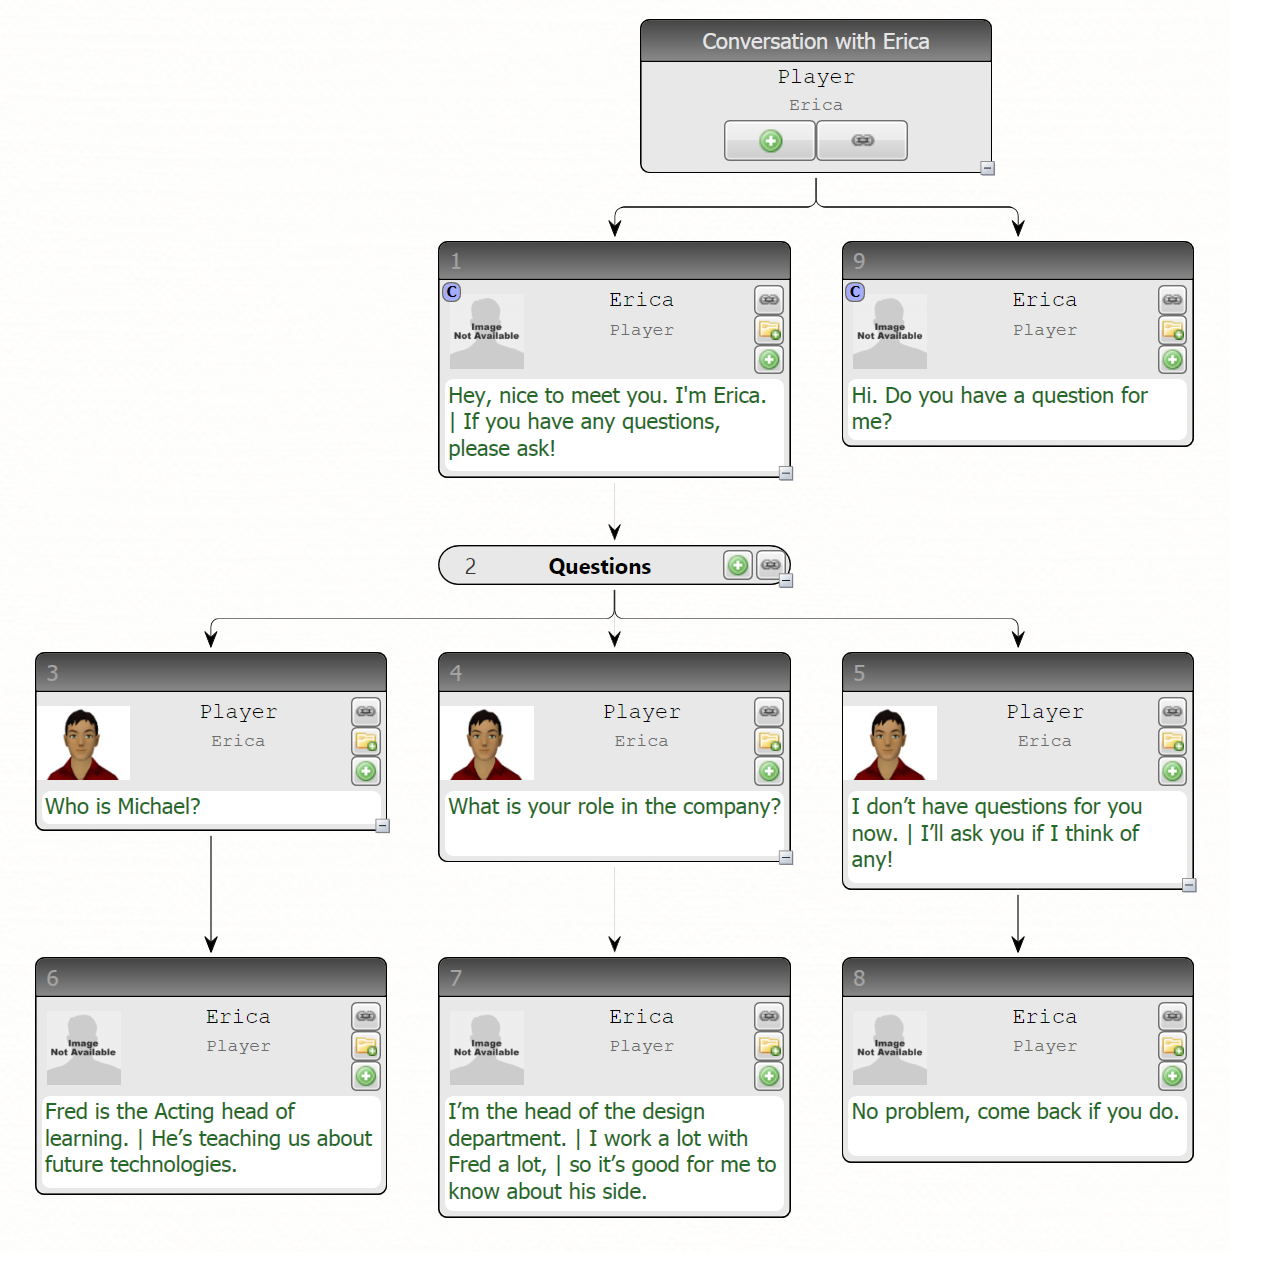
Then add new dialogue nodes leading on from nodes [3], [4] and [5] and paste this text in them:
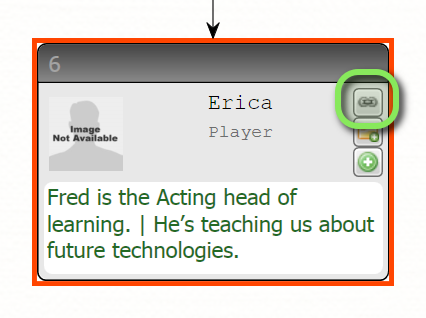
- Node [6]: “Fred is the Acting head of learning. | He's teaching us about future technologies.”
- Node [7]: “I'm the head of the design department. | I work a lot with Fred a lot, | so it's good for me to know about his side.”
- Node [8]: “No problem, come back if you do.”
Finally, click on the root node, add a new dialogue node ([9]) and paste in “Hi. Do you have a question for me?”, add a “Display only once” condition to node[1], and a “Dialog SimStaus condition” to node [9] (remember to edit the node ID in the condition so that it reads Dialog[1].SimStatus ~= "WasDisplayed")
Adding loops
In Erica’s conversation, each of these questions causes us to exit the conversation. However, It would be better/more natural if we could stay in the conversation and ask another question, “linking back” to the group of questions once one of them has been answered.
To do this, click on the chain button in node [6] – notice the red outline of node [6] and the whole central window, which indicates you are in “node linking mode”.
Hovering over any other node while this is active will outline them in red as well, hinting at the connection that will be created. Click on group[2], and notice that the red disappears and an arrow appears under node [6], meaning that after node [6] plays, we’ll be taken back to group 2 (letting us ask in turn another question).
Let’s do the same for node [7], but remember to leave node [8] without a link (because you have no questions). Finally, add a link to group [2] on node [9] as well.

To make them easier to see, we can change the color of nodes (and groups). For example, let’s highlight group [2] in purple. Click on group [2], then select purple in the 7 colored circles in the top toolbar.

When changing the color of a node, all links to that node will change color as well (see image above) |
Setting autoplay
Very often you will want a particular conversation to start as soon as the scene loads. This can be done by setting “Autoplay” for a single conversation.

In this template, conversation 1 (“Conversation with Jane”) is already set to autoplay, and doing it for your own projects is quite easy: simply select the conversation you want to turn it on for, and check the “Autoplay” checkbox.
Step 5. Launching Your New Scenario
Alright! You’ve come a long way in a very short time. Congratulations 🙂
Now, it’s finally time to take a look at how your Scenario is shaping up. The good news is that you’ve literally already done the hardest part – all that’s left for this is exporting the JSON file with all of our conversations, and then importing it in the Dashboard.
If you’ve been reading along but didn’t create the scenario, no worries! You can download the full CMPKG file here.
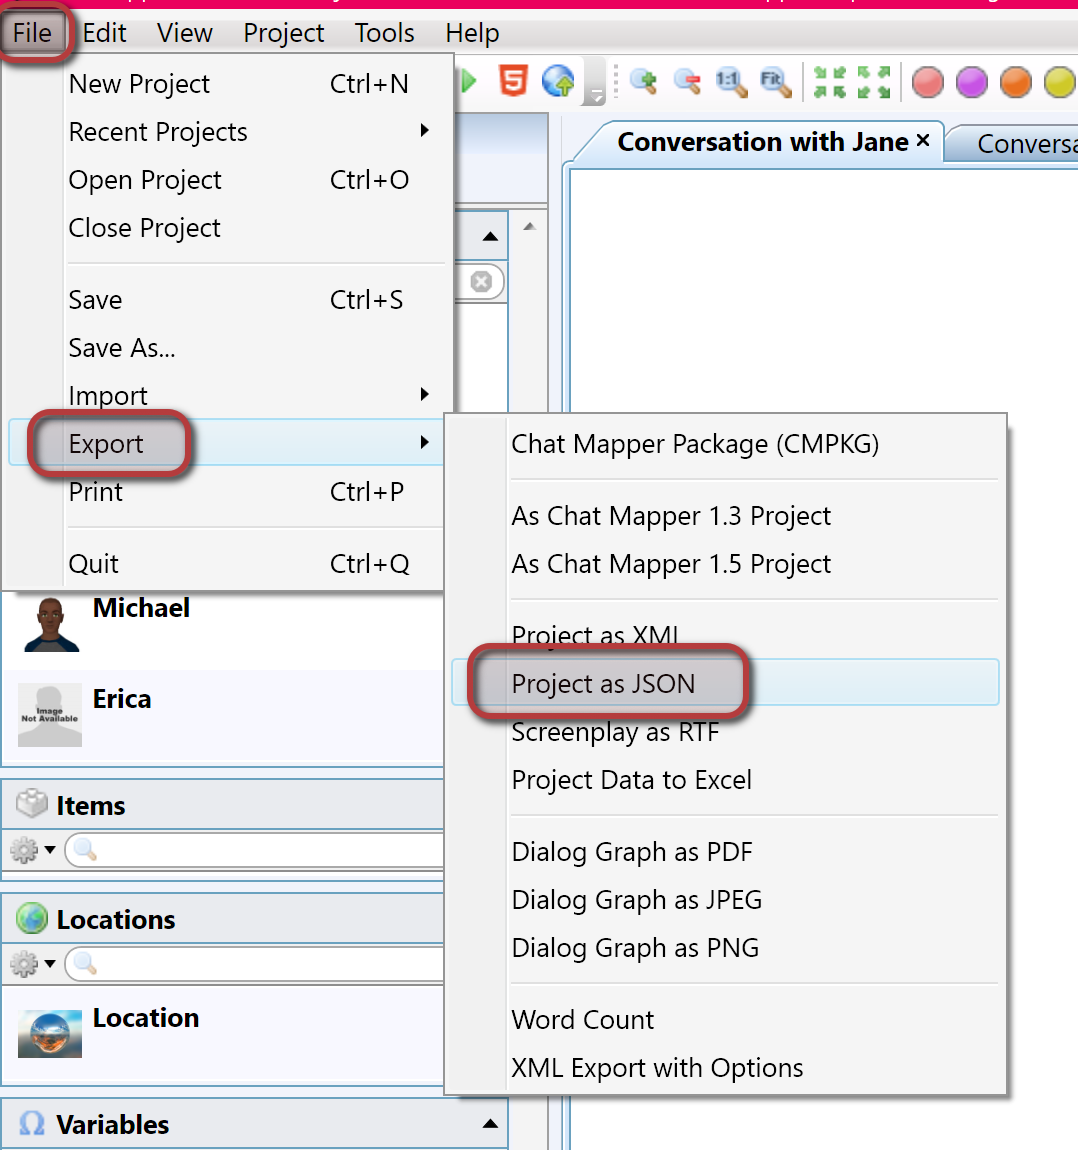
With the project file open in ChatMapper, click File > Export > Project as JSON. Choose where you want to save the file and then give it a name you can remember.
Now let’s jump over to the LearnBrite Dashboard for a quick tour. The first thing you’ll see after logging in will be your list of spaces.

Across the top, you’ll see links to help you move between the main areas of the dashboard. For now let’s focus on “Spaces”.
The first thing we’re concerned about for launching your new Scenario is, well, creating a Scenario here in the dashboard!
Here’s a quick blurb about understanding Spaces & Scenarios as we define them.
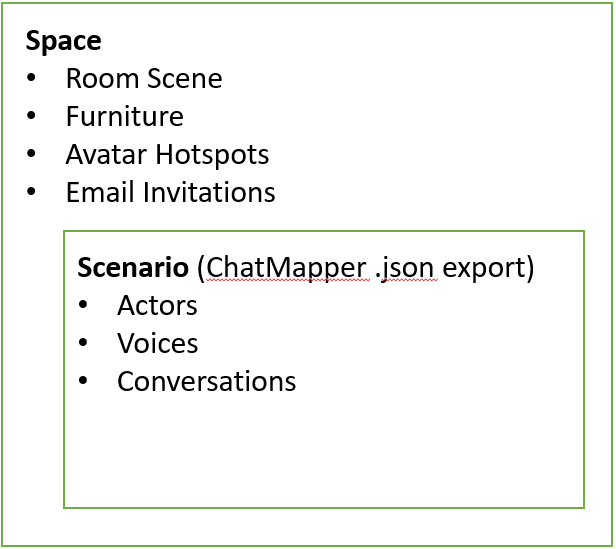
- A Scenario is the definition of an experience created in ChatMapper, which you can think of as the “conversations” the user will have in the experience.
- A Space is the customized 3D location the Scenario will be played in.
- To play a scenario you will always be visiting a Space, because the Space contains a Scenario
Now that we cleared that up, click on Scenarios, then click on the “Create scenario” card (or just click here to create one automatically).
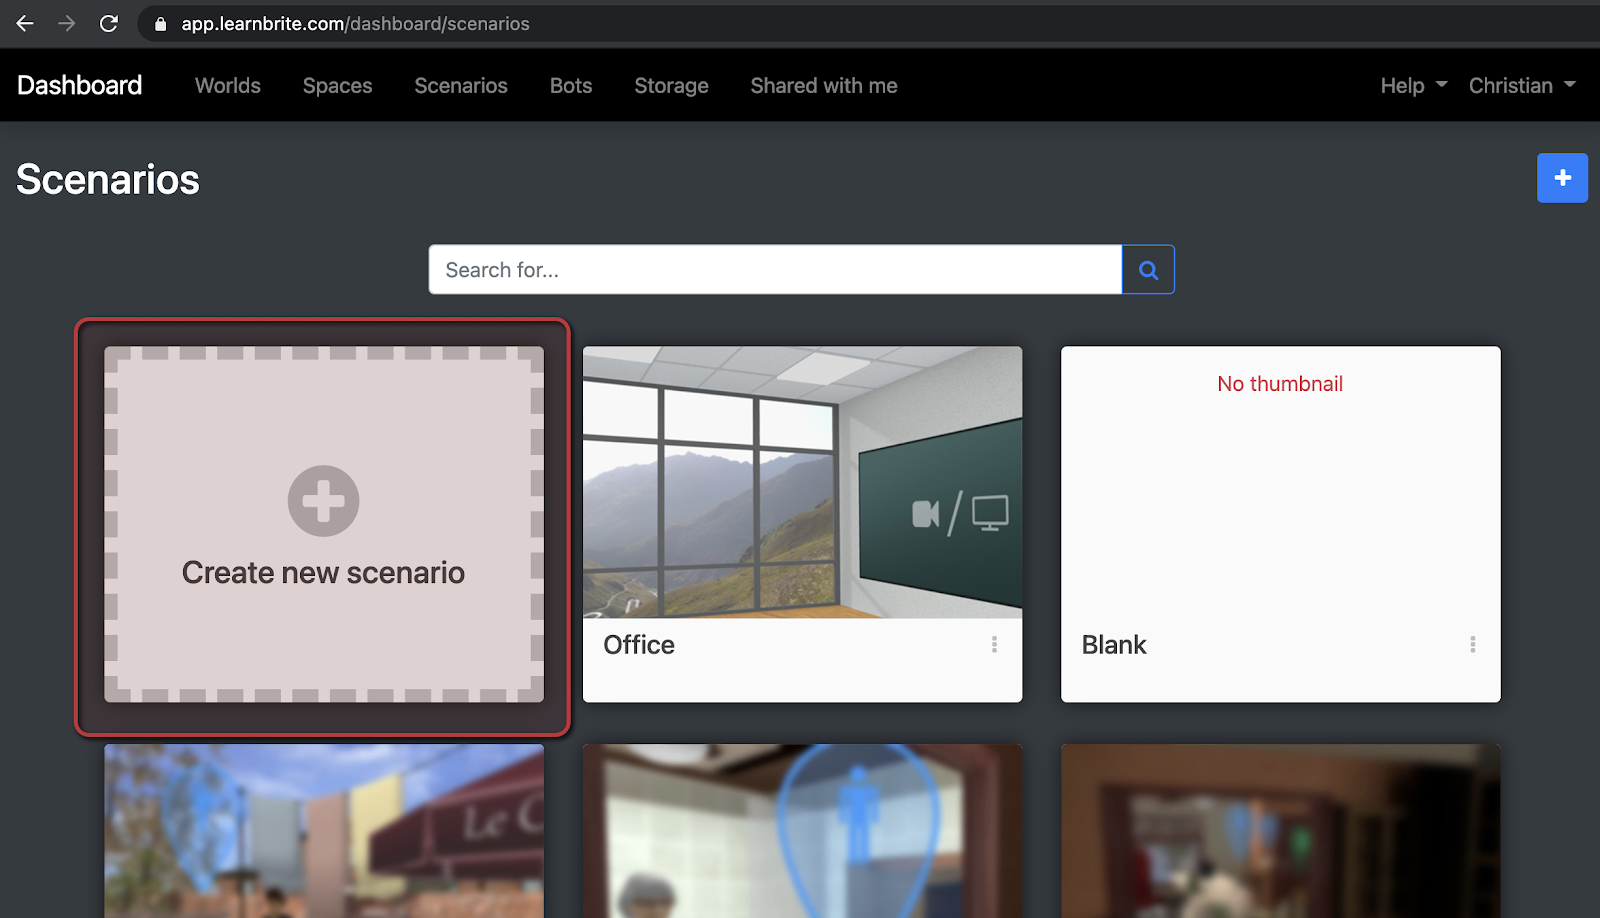
In this new page, give your Scenario a name (that you’ll remember), then click the Choose File button, and in the file chooser popup select the JSON you just exported. Remember to click the Save button afterward!

Above we talked a bit about the relationship between Scenarios and Spaces.
- A Scenario is the definition of an experience created in ChatMapper.
- A Space is the customized 3D location the Scenario will be played in.
- To play a scenario you will always be visiting a Space, which contains the Scenario.
Now that we have our Scenario ready to go. We need to create a Space to turn it into a visitable 3D location so our learners have somewhere to go.
That means we have to head over to the Spaces section of the Dashboard by clicking “Spaces” in the main menu at the top. Just like we did for the Scenario we created before, click on the “Create space” card to the right of your screen to bring up the Space creation interface.
To proceed (see image below):
- Select a template (for this tutorial we recommend the Office template if you want some objects already in the space, or the Blank template if you want a clean slate),
- Scroll down to write a name
- Make sure the “Virtual meeting room” toggle is off (grey), and then
- Tap or click on the green “Create Space” button

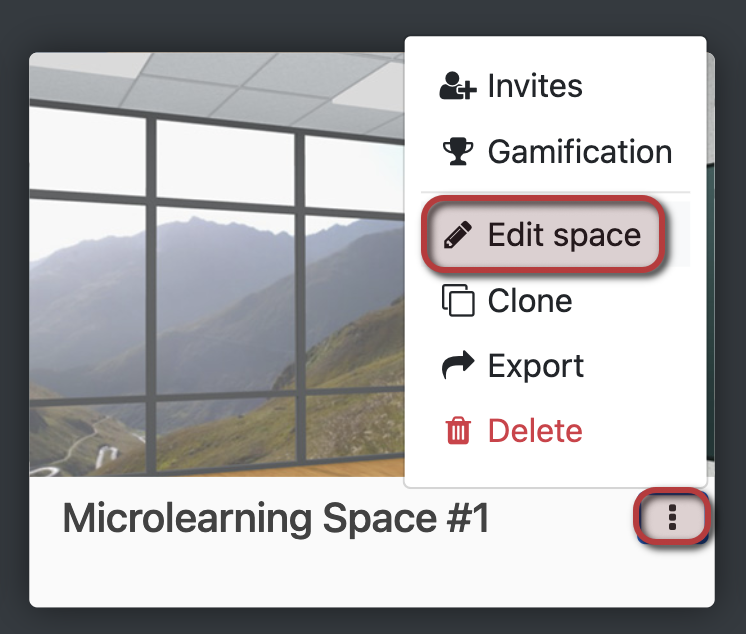
You will now be in the list of spaces again. It is time to assign the Scenario you created to the new Space. Click on the three vertical dots in the space’s card, then on Edit space.
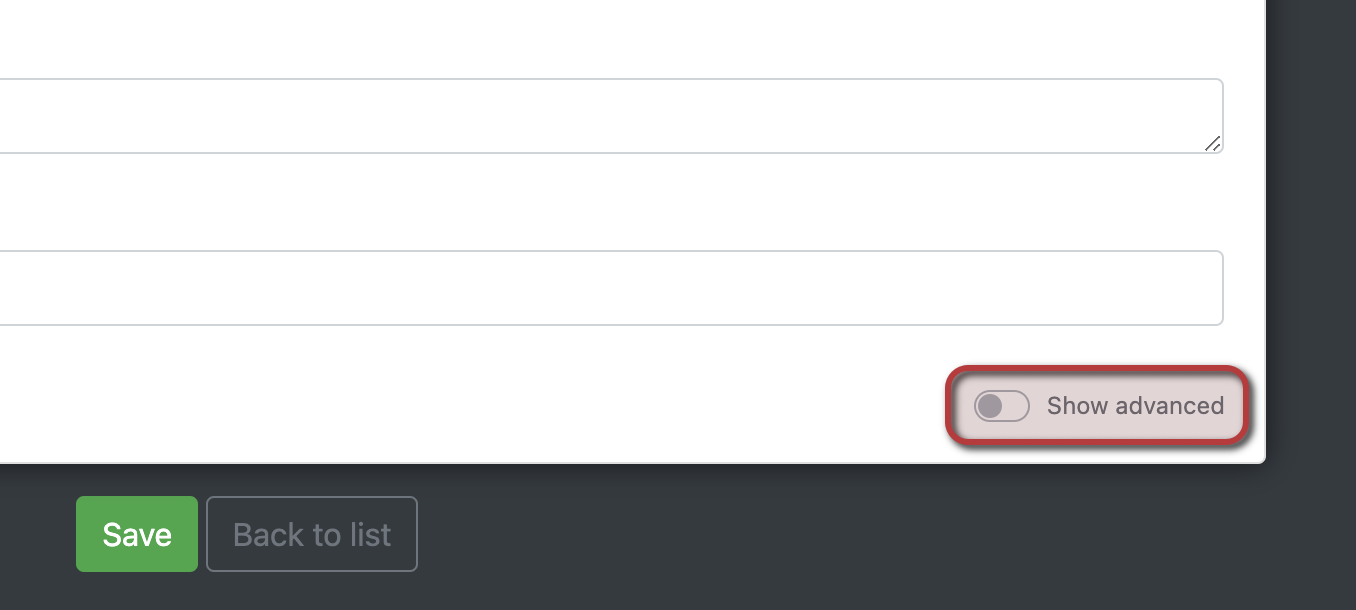
In this page you can modify your space in a variety of ways. Most importantly for this guide, you can change the associated Scenario.
- Click on “Show advanced”
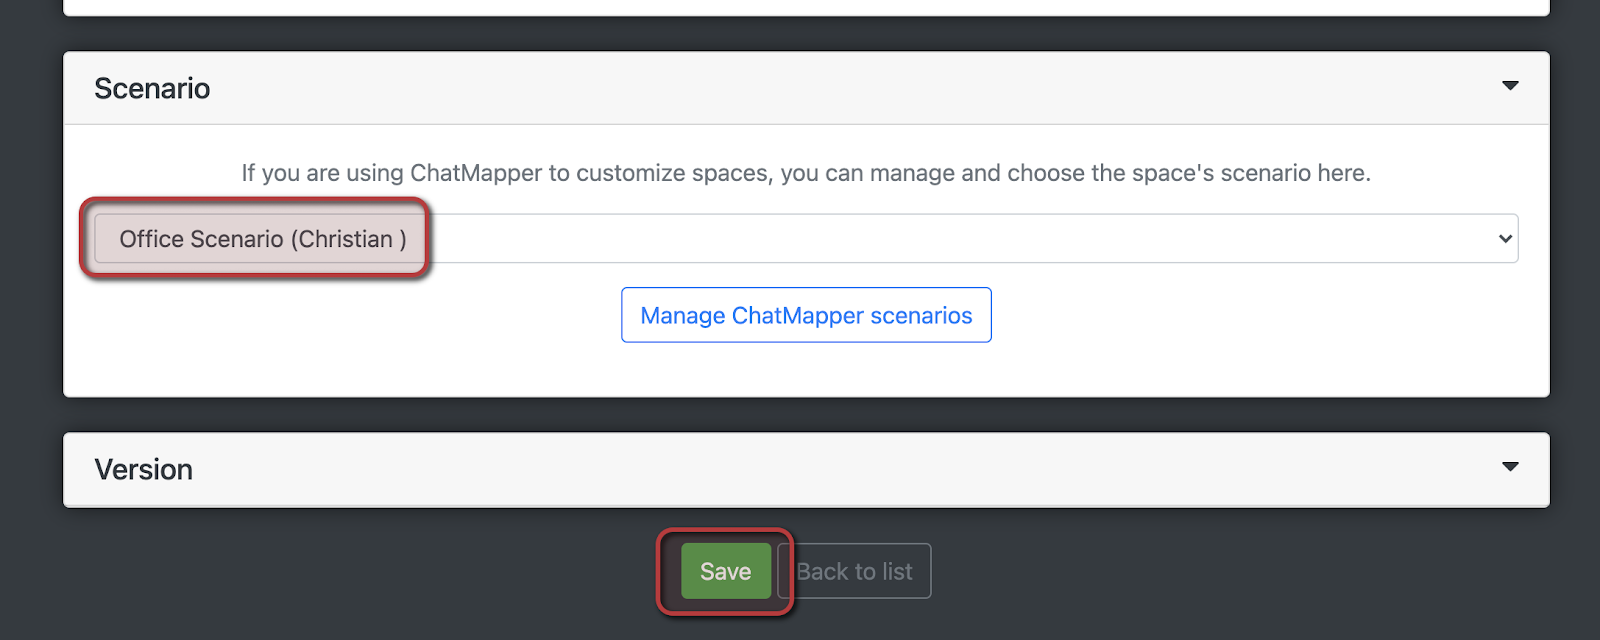
- Scroll down and click on the “Scenario” header
- Choose the scenario you previously created from the dropdown (don’t click on Manage scenarios – that will bring you to the scenarios page)
- Click “Save” at the bottom of the page

Guess what… you’ve just created your first fully functional 3D/VR-Ready micro-learning experience!
Not bad for just clicking around and jotting down a couple of lines of dialogue right? But don’t stop now! In the next lesson, you’ll visit the Space & learn the basics of 3D decorating.
Step 6. Personalizing Your Space
First things first: you need to launch your Space from the Dashboard in order to enter the 3D editor. If you’re following along, then you probably already have the Spaces page open. If not, click here to do so now. Once you’re there, simply click on the space we just created and it will launch in your browser.
Adding your first item
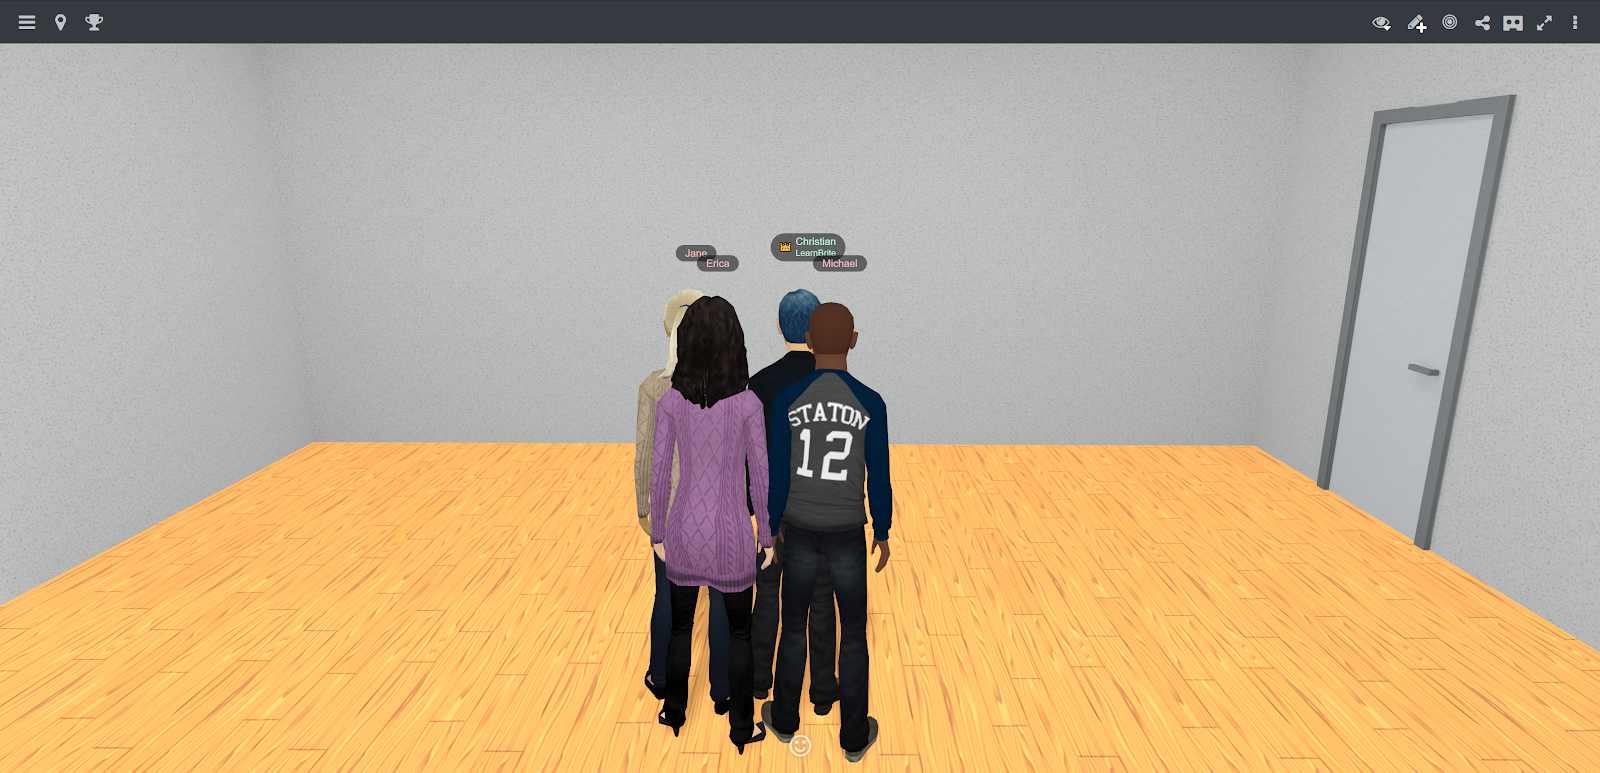
When you open up your scene, Jane’s conversation will immediately play, and you can get out of it by clicking on “Exit conversation” at the top left.
After that, this is what you will see – everybody’s standing in the same place and there’s no furniture!
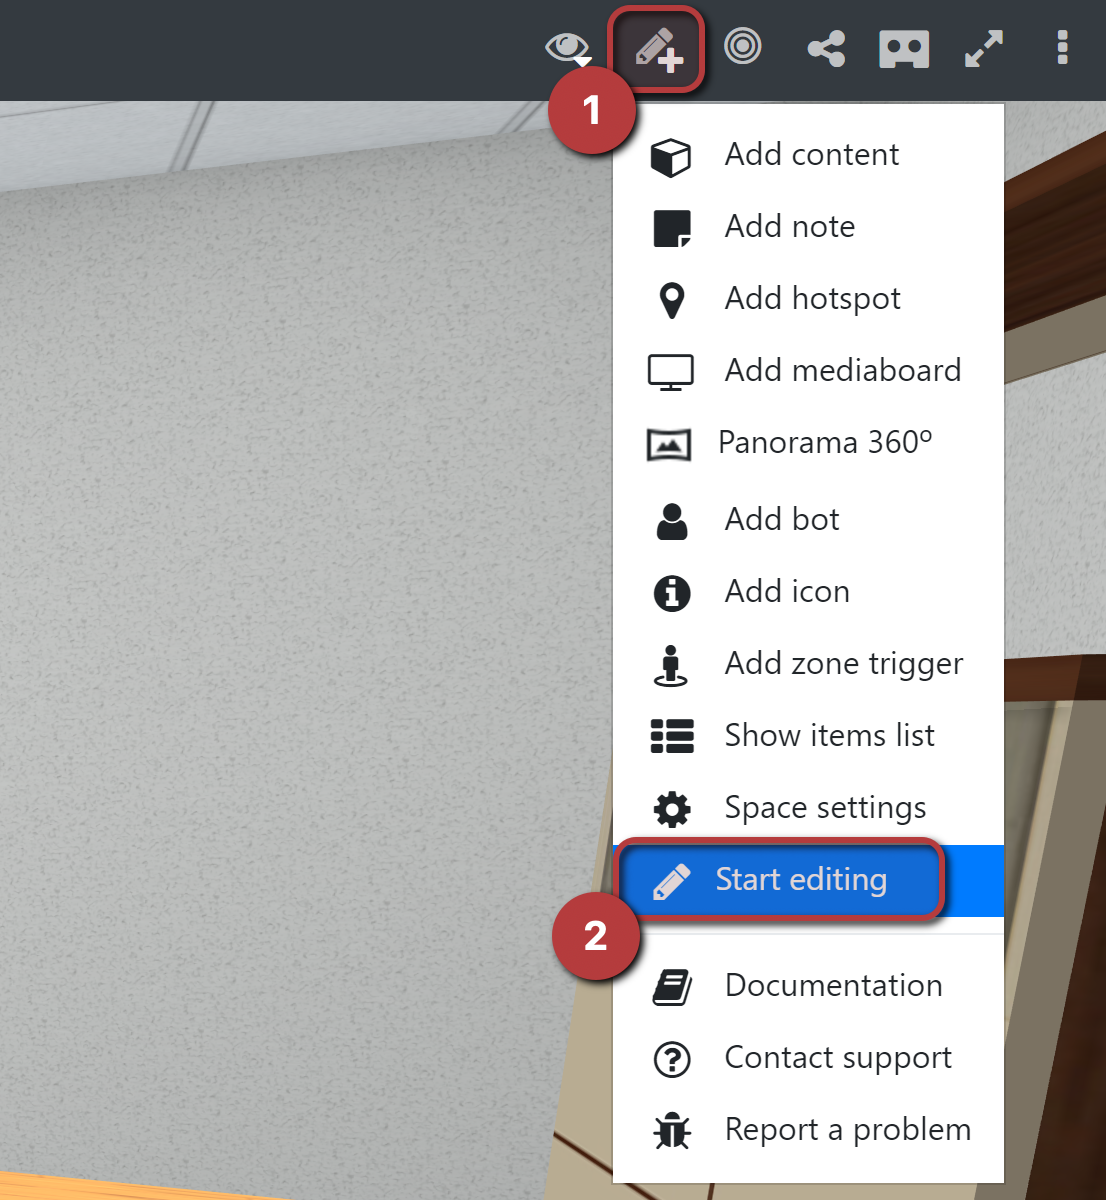
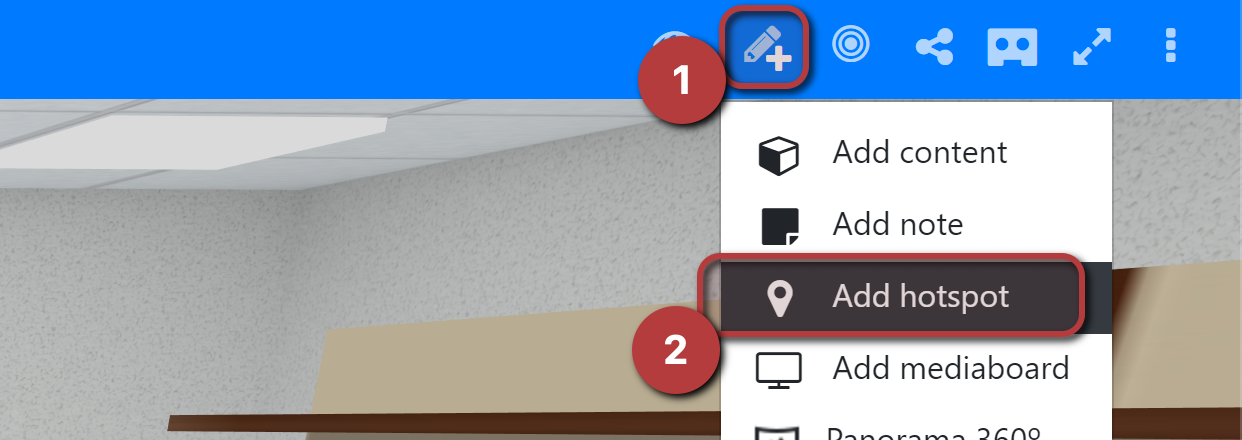
To start editing the scene, click on the pencil button at the top right, which opens the “Edit menu”, and select “Start editing”
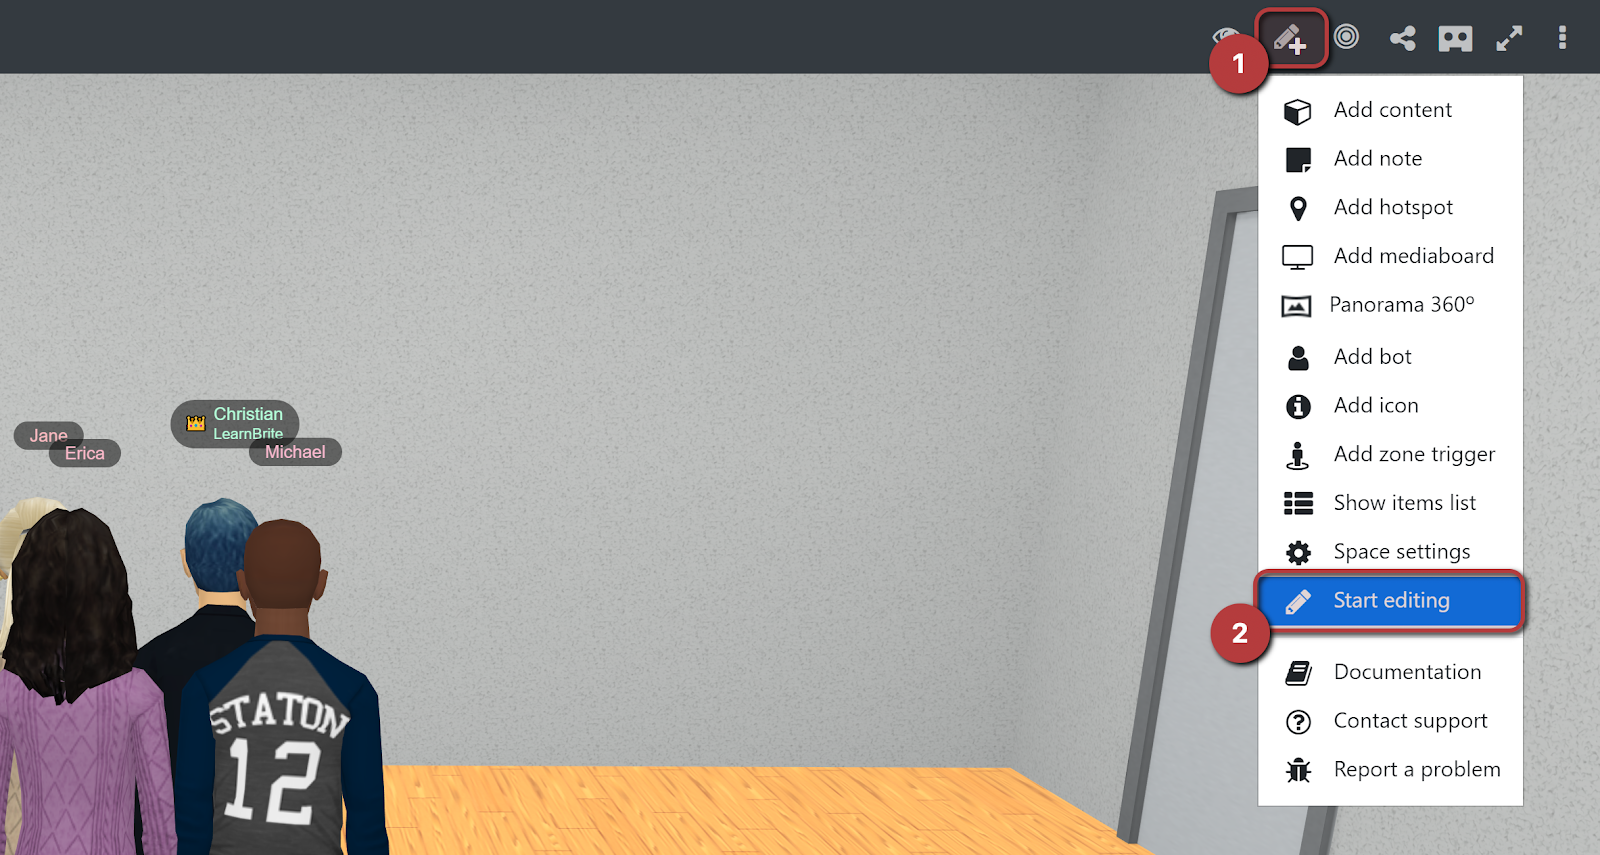
3D editing within LearnBrite is very powerful, but for now we’ll limit ourselves to 4 options:
- Red: exit edit mode
- Blue: add 3D items and other content
- Green: add hotspots
- Purple: add mediaboards

You can rotate the camera by clicking and holding the right mouse button and moving it around |
Let’s add some drawers! Choose the “Add content” in the edit menu, which will open the content browser. In there,
- Type “Drawers” in the search box
- Select the “LearnBrite” filter
- Click on the result to add it to the 3D scene

Now the drawers are in the room, and you’ll see a blue box surrounding them, with which you can do a few things:
- The corner cubes allow you to scale the object
- The spheres at the sides allow you to rotate the item
- The crossed arrows button allows you to exit “move mode” (only visible when hovering over the object)
- The cog button opens the object’s properties (only visible when hovering over the item)
- Clicking and dragging anywhere on the object that is not one of these “special” spots will allow you to move it around
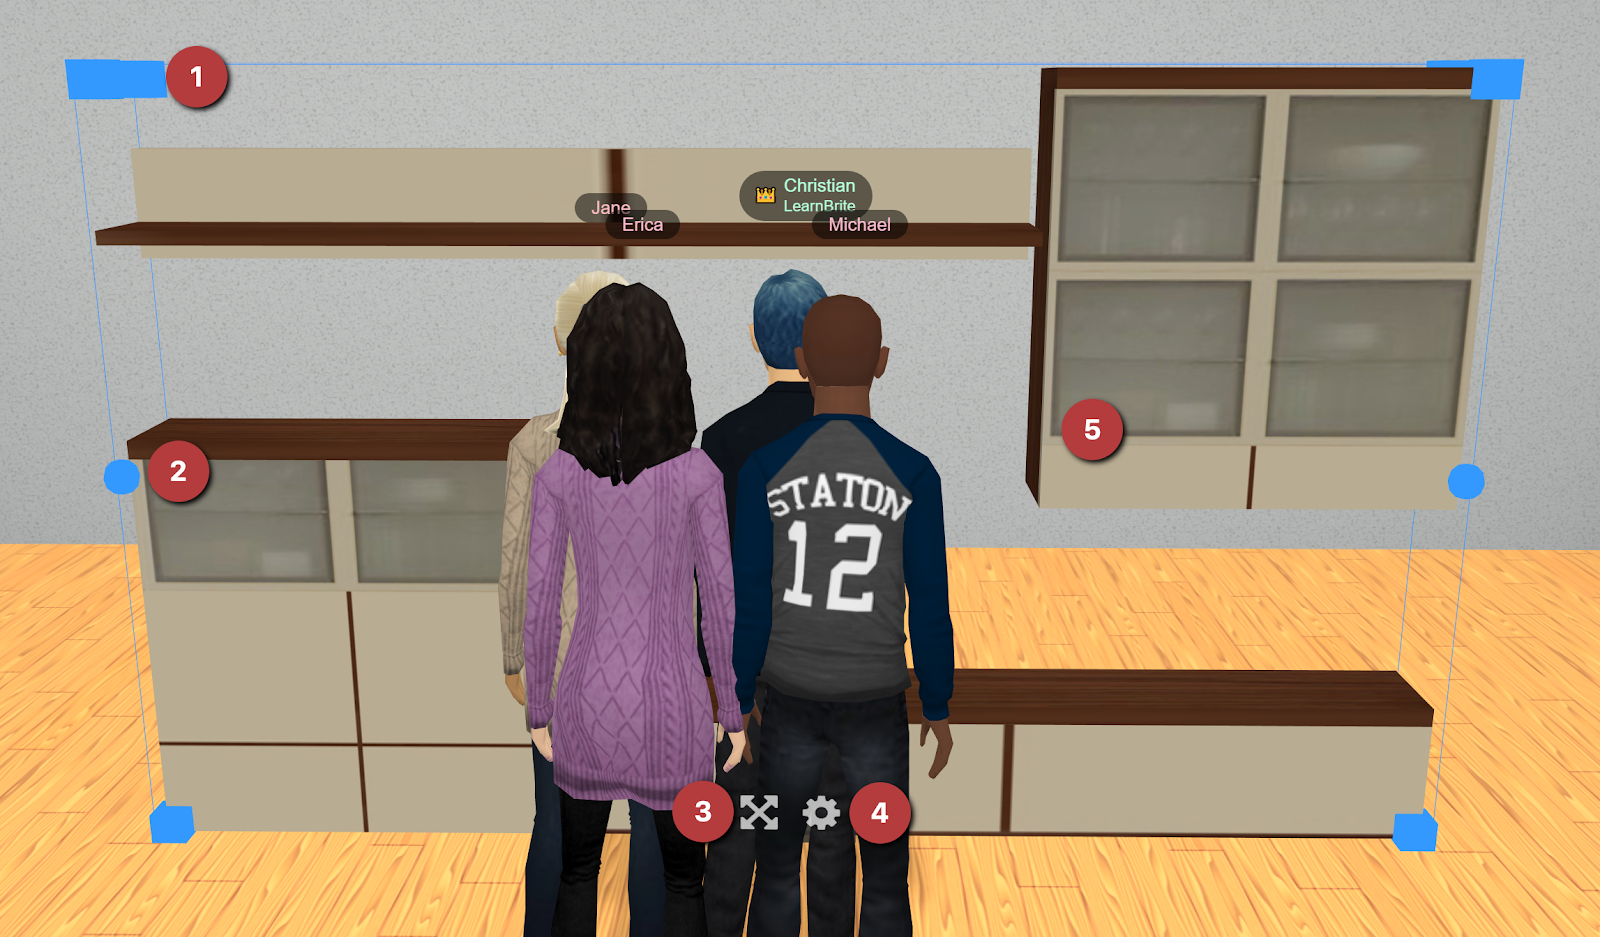
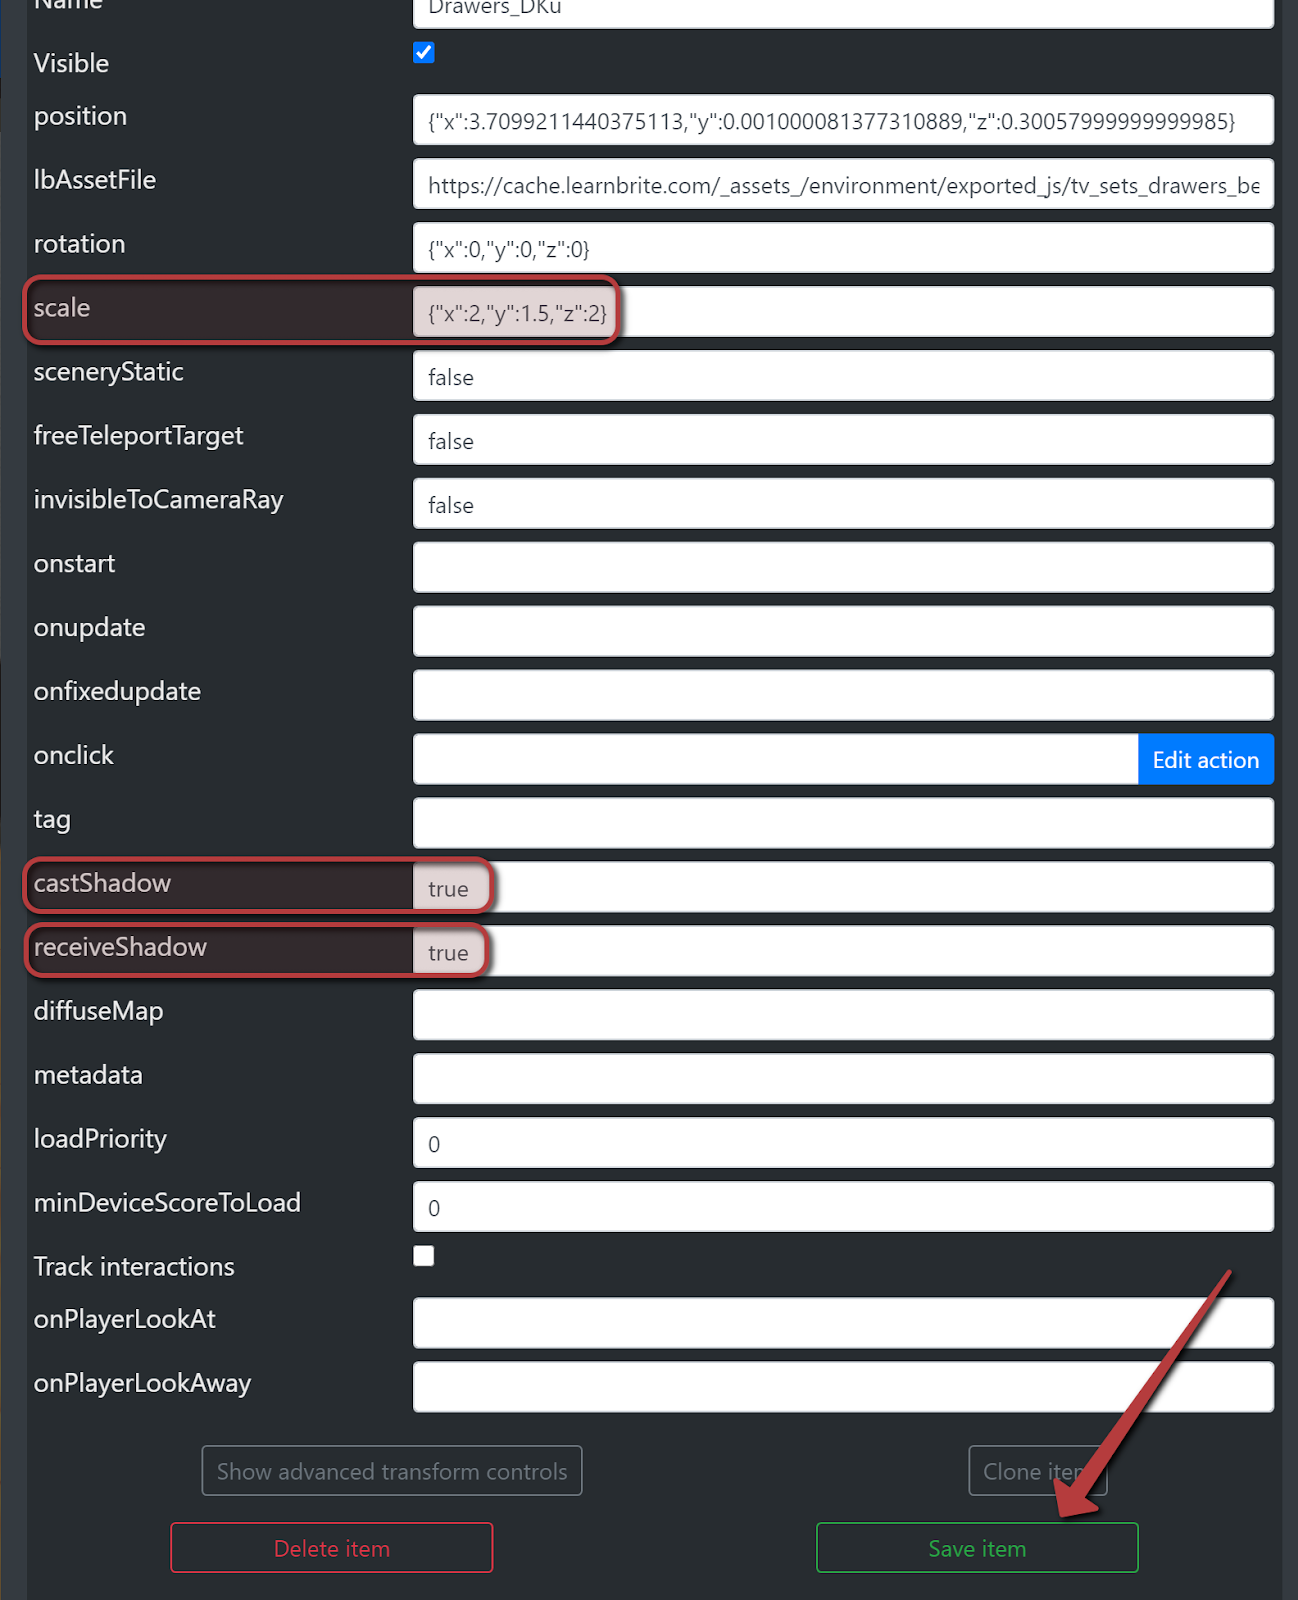
We’re going to make the drawers a bit bigger, and make them cast some shadows so that they look better. Hover over them and click on the cog icon once it appears, paste {"x":2,"y":1.5,"z":2} in the “scale” field, then write true in the castShadow and receiveShadow fields, and finally click “Save item”.
If the popup is too high for your screen and you don’t see the Save button, remember you can scroll down to see it! |
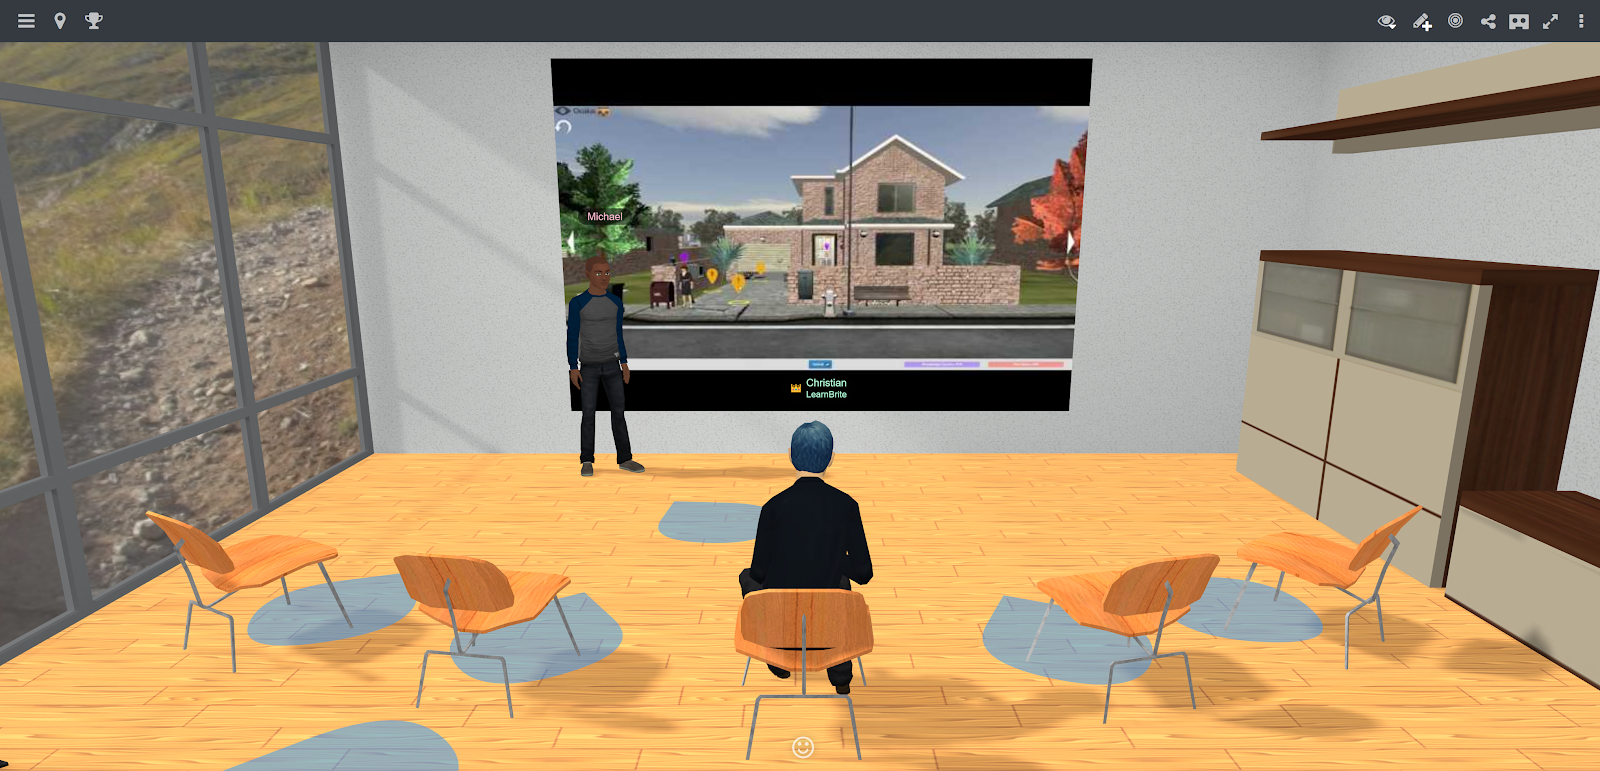
Now we have our drawers, levitating and all – click and drag on the body of the 3D object, to place them against the wall and as close to the door as possible. This is how it should look:

Adding hotspots
Hotspots are special objects on which users can click in order to teleport there. They can also be used to position actors.
Click on the “add hotspot” button, and a new hotspot will be created in front of you. Open its settings (through the cog icon, same as with the drawers), fill in the spotTag field with “hotspot1”, click “Save item”, and then move the hotspot to the side, close to the door, by clicking on it and dragging it, like you did for the drawers.
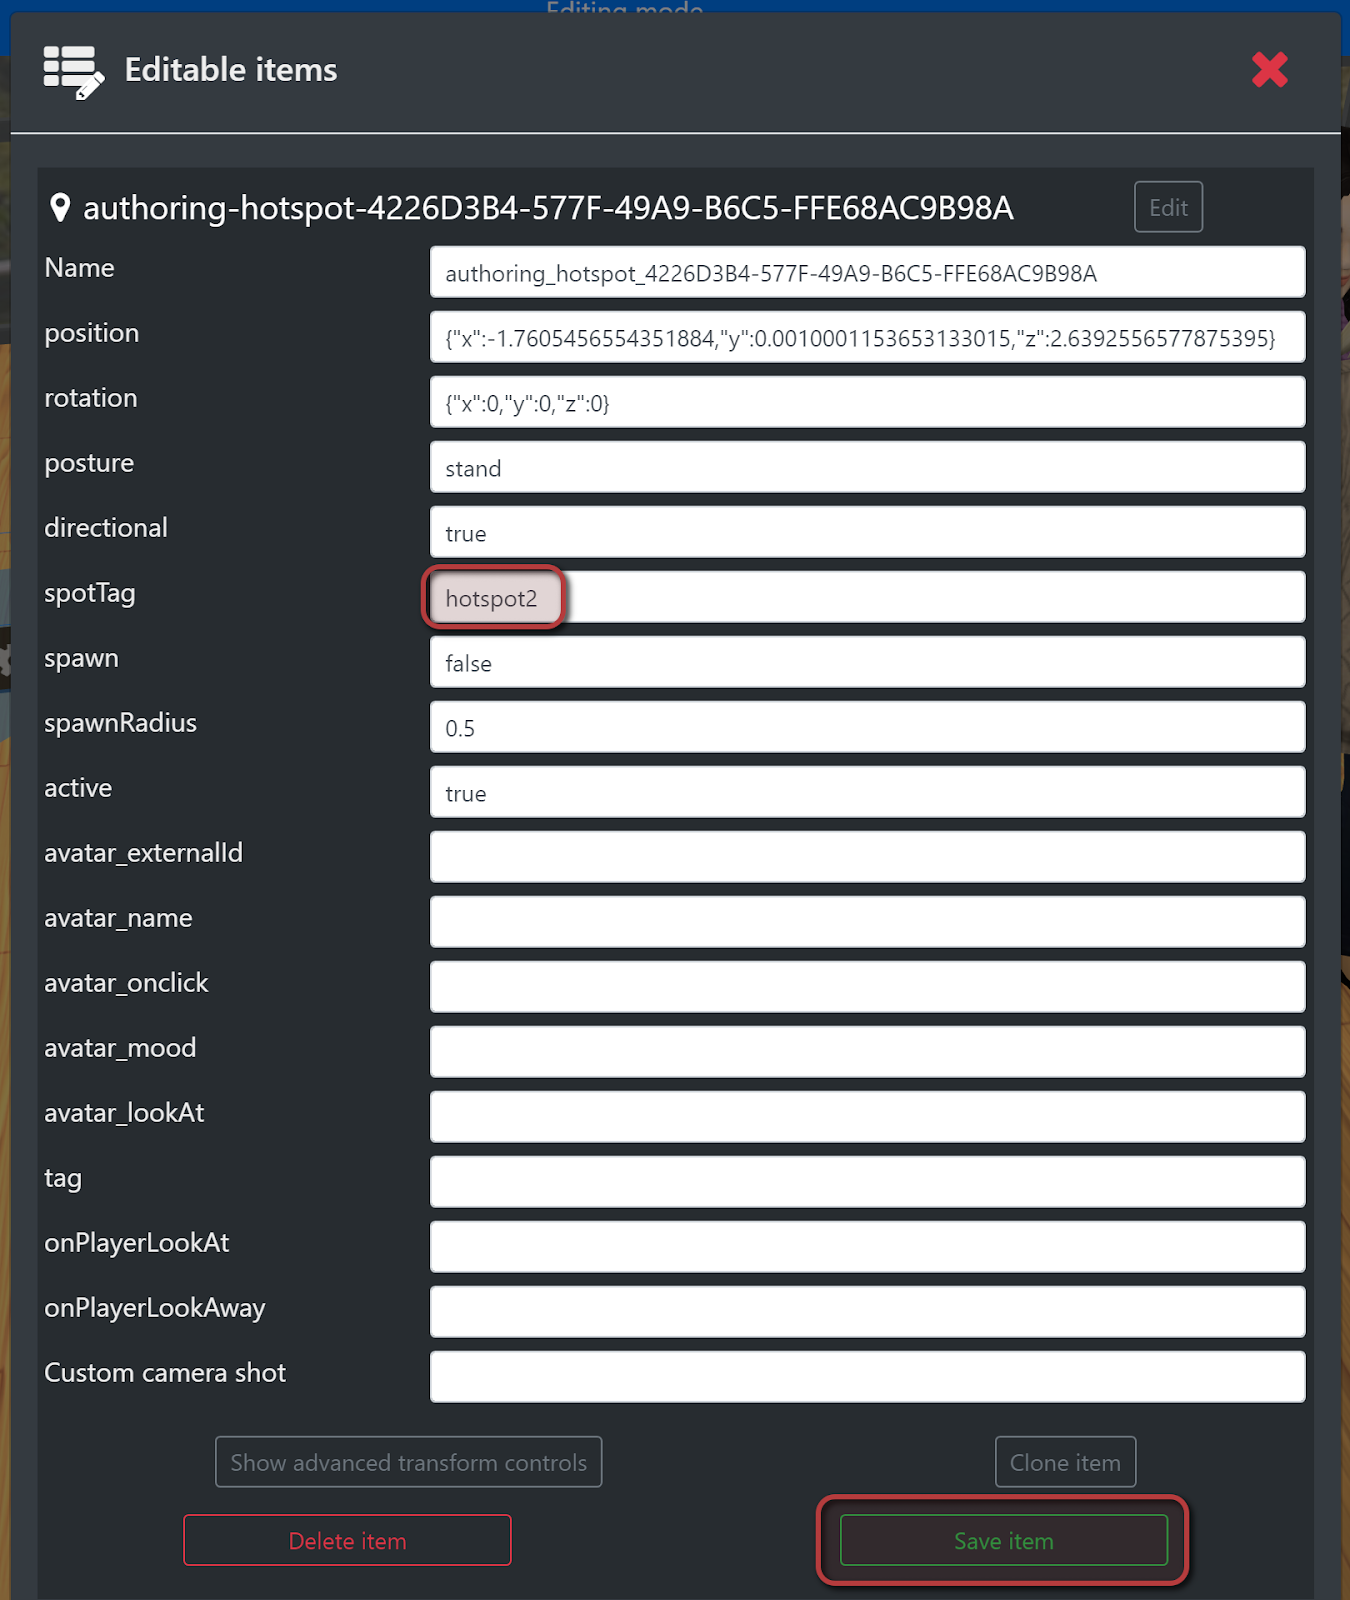
After that, do it twice more (using “hotspot2”, and “hotspot3” in the spotTag field) so that you have 3 hotspots in total. You should place hotspot2 opposite the door, and hotspot3 in front of the windows.
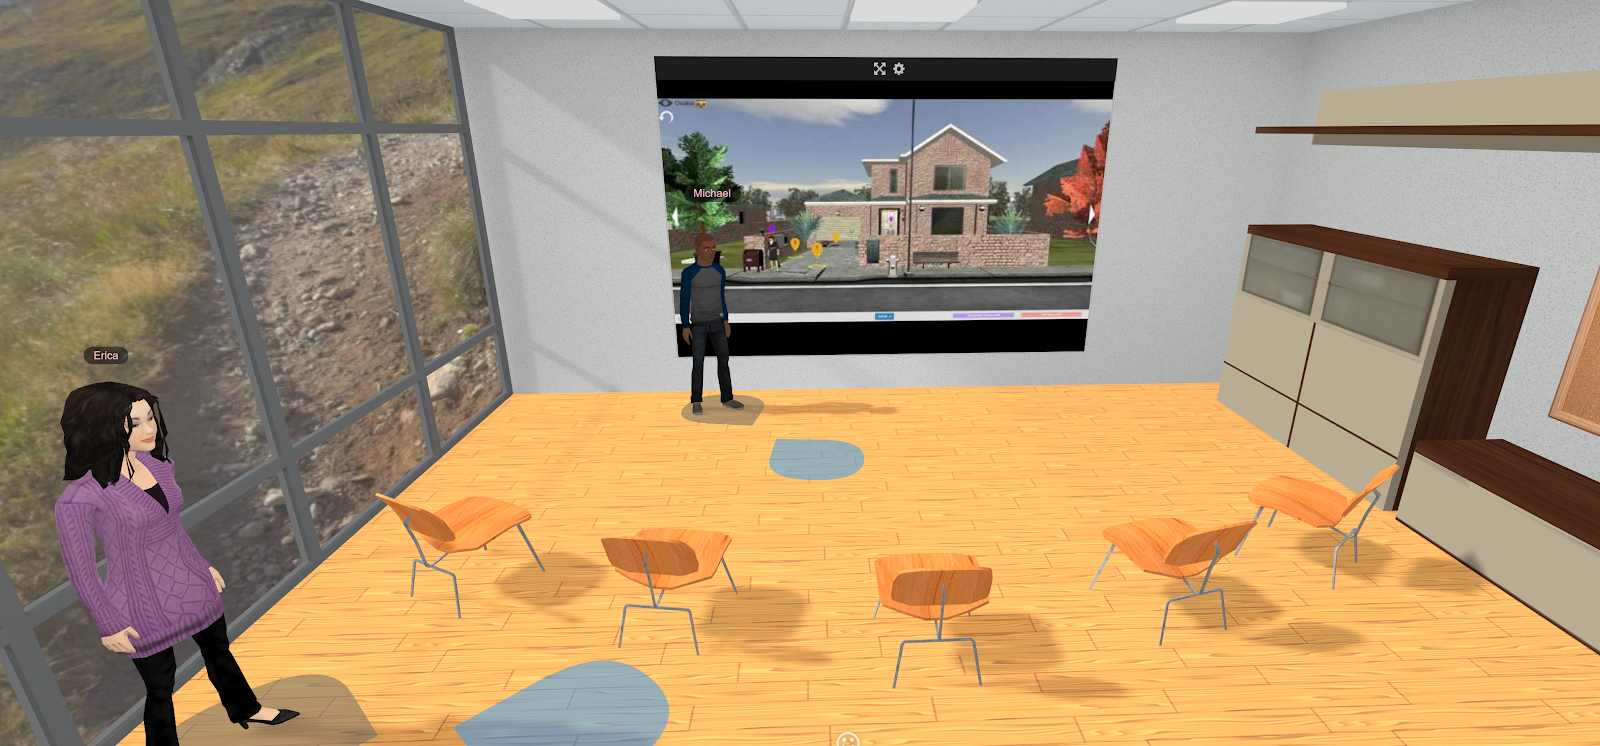
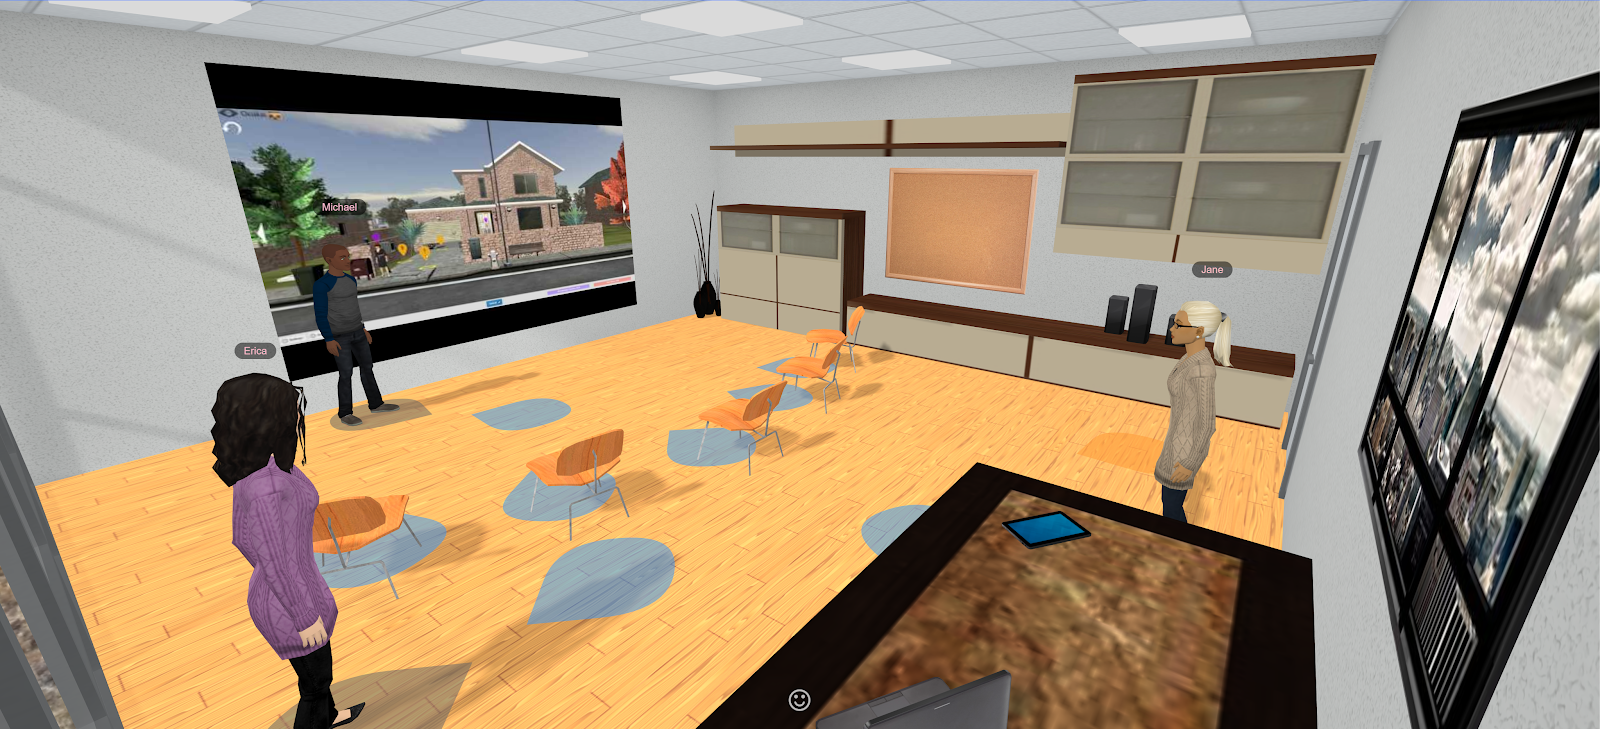
After that, add 3 more hotspots (without anything in the spotTag field) and rotate/position them so that they are facing the first three. The final layout should be similar to the following screenshot (if you reload, each actor will be in their assigned hotspot).

If you reloaded, remember to enter edit mode again for the next steps! You can do so by clicking on “Start editing” in the edit menu
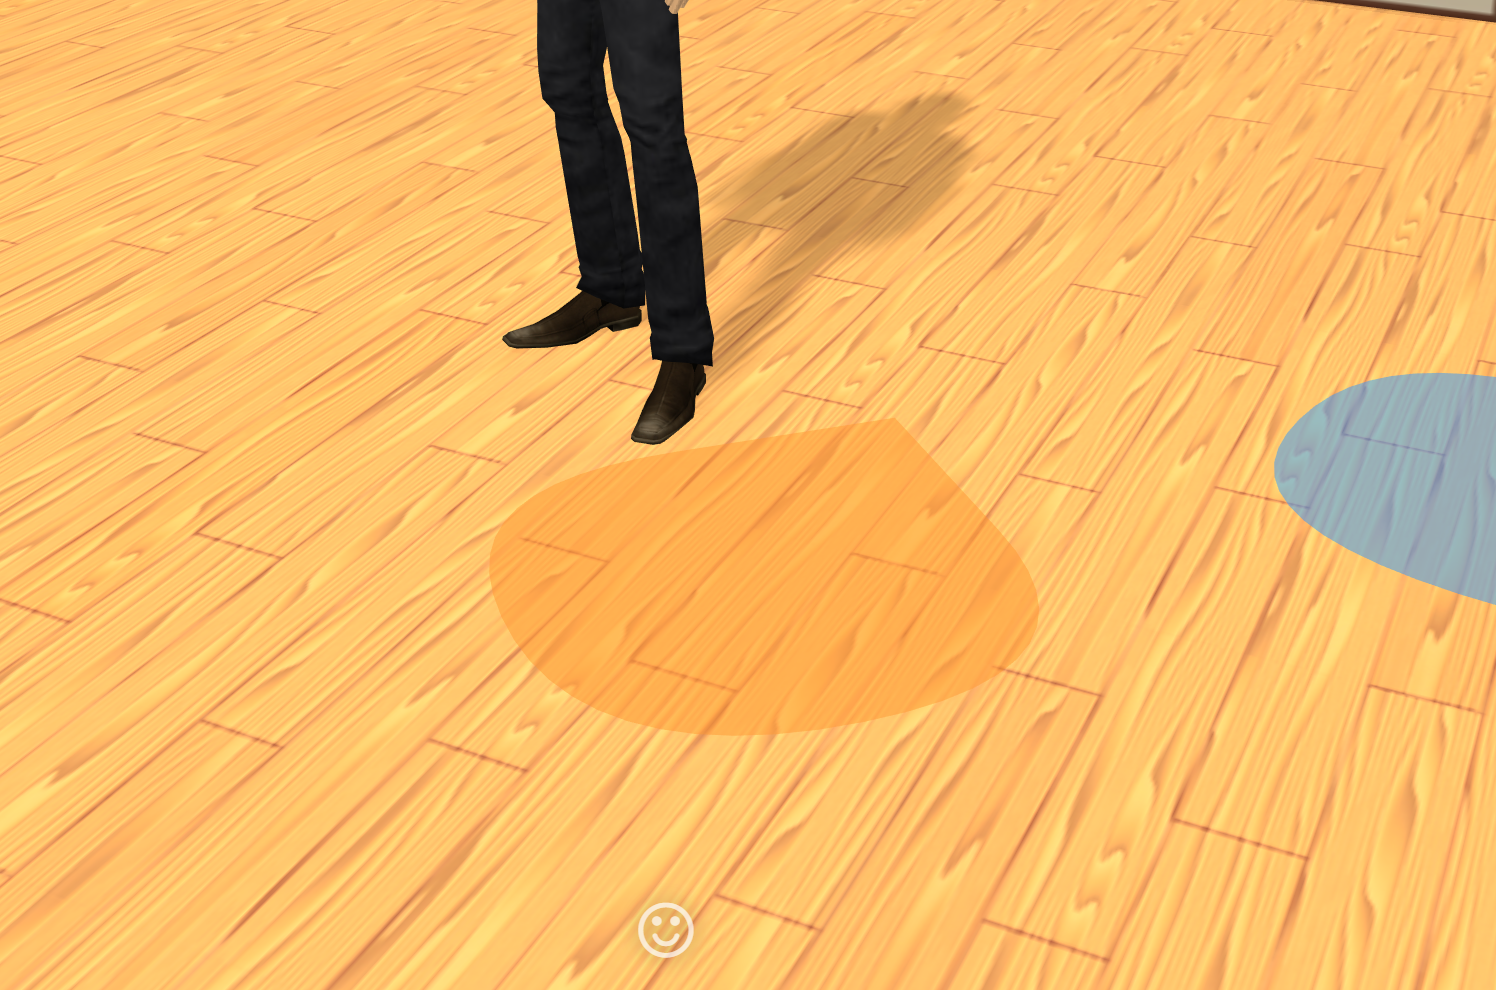
While in edit mode, you might notice an orange hotspot. That is the “spawn” hotspot, and is where users start. It can be moved around like other hotspots, let’s put it close to the door, next to Jane
Adding your first mediaboard
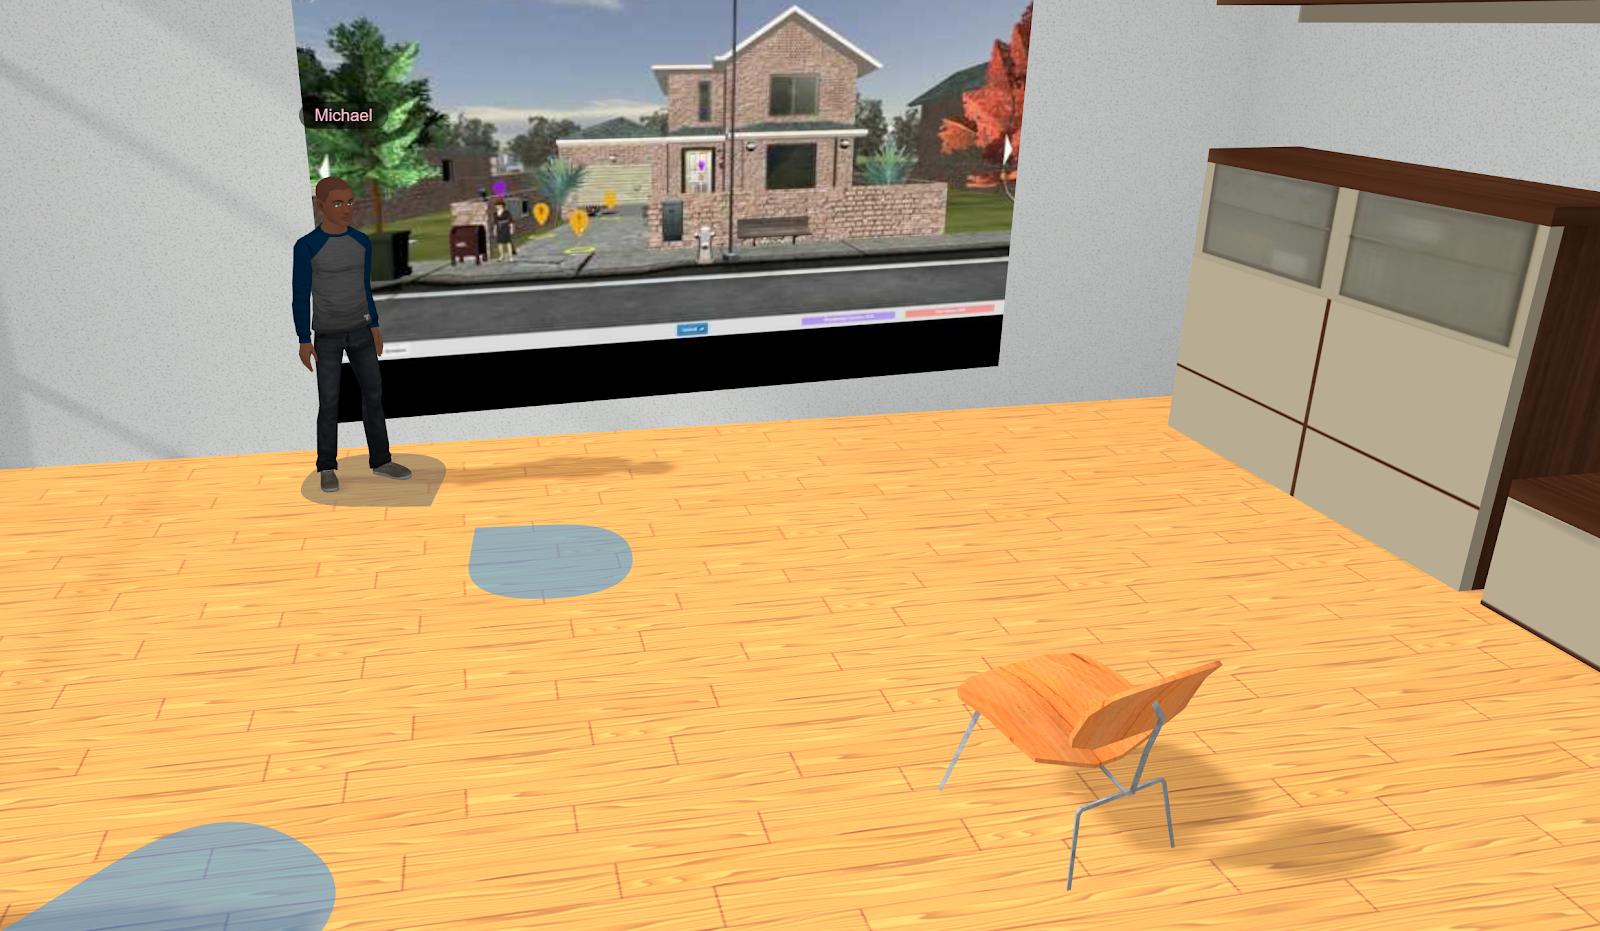
Mediaboards allow you to embed content from outside the platform in the 3D space – and now we’re going to embed a YouTube video.
Rotate the camera in so that you’re facing Michael, open the edit menu and click on “Add Mediaboard”.
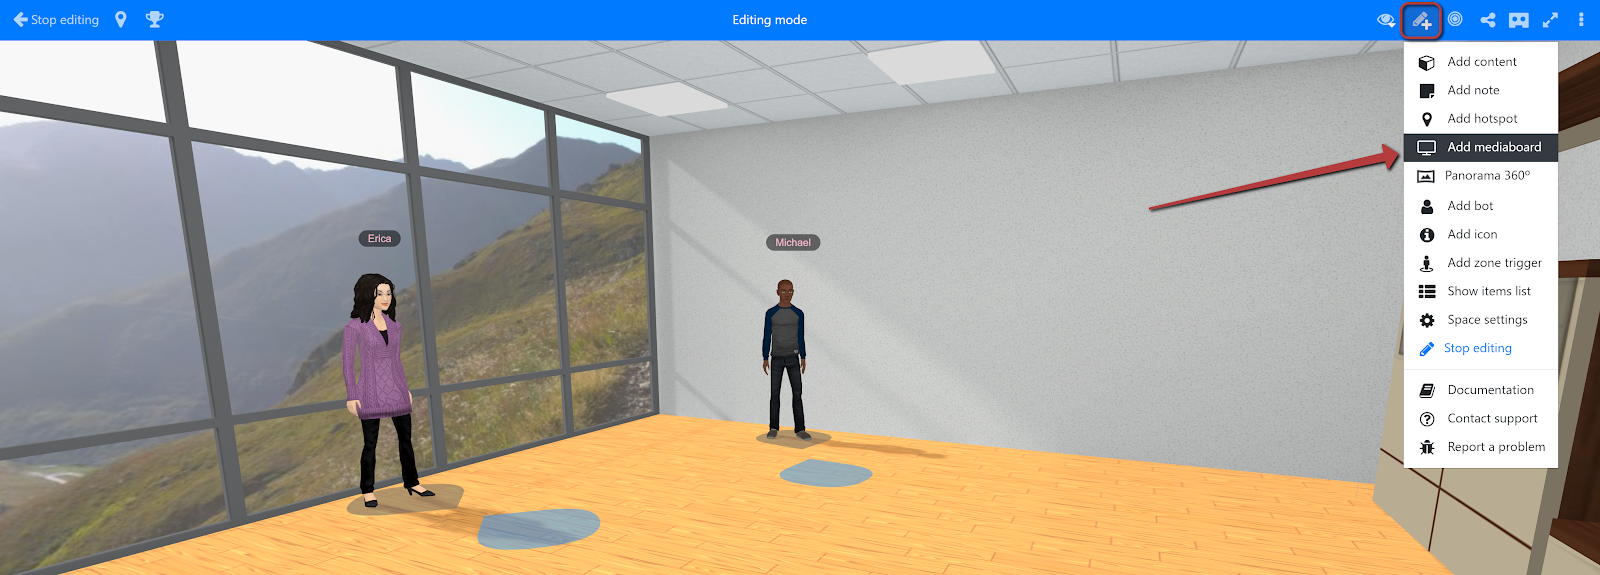
There are a number of options, but if you’re unsure about what to use you can simply leave the default, “URL” (as a rule of thumb, 90% of the time the default selection is the way to go).
Paste https://www.youtube.com/watch?v=l0q7nweJ8i8 in the input box, then click “Create”

The mediaboard will appear in the 3D environment soon after, and it can be positioned, scaled and rotated like other 3D objects. As a matter of fact, it’s a bit small for a presentation, so drag on the cubes at the corners to make it bigger, then place it on the wall beside Michael.

Locking an item in place and using the “All items” list
Before we add the next two mediaboards, we’re going to “lock” the drawers in place.
If you look towards the centre of the drawers, there’s a space where we can place a mediaboard, but this can be tricky when there are many items in a small space, or if you want to place an object “inside” the volume occupied by another. That’s when you want to lock an item.
Hover over the drawers and click on the cog icon, then set the sceneryStatic field to true (and then click “Save item”, as always).
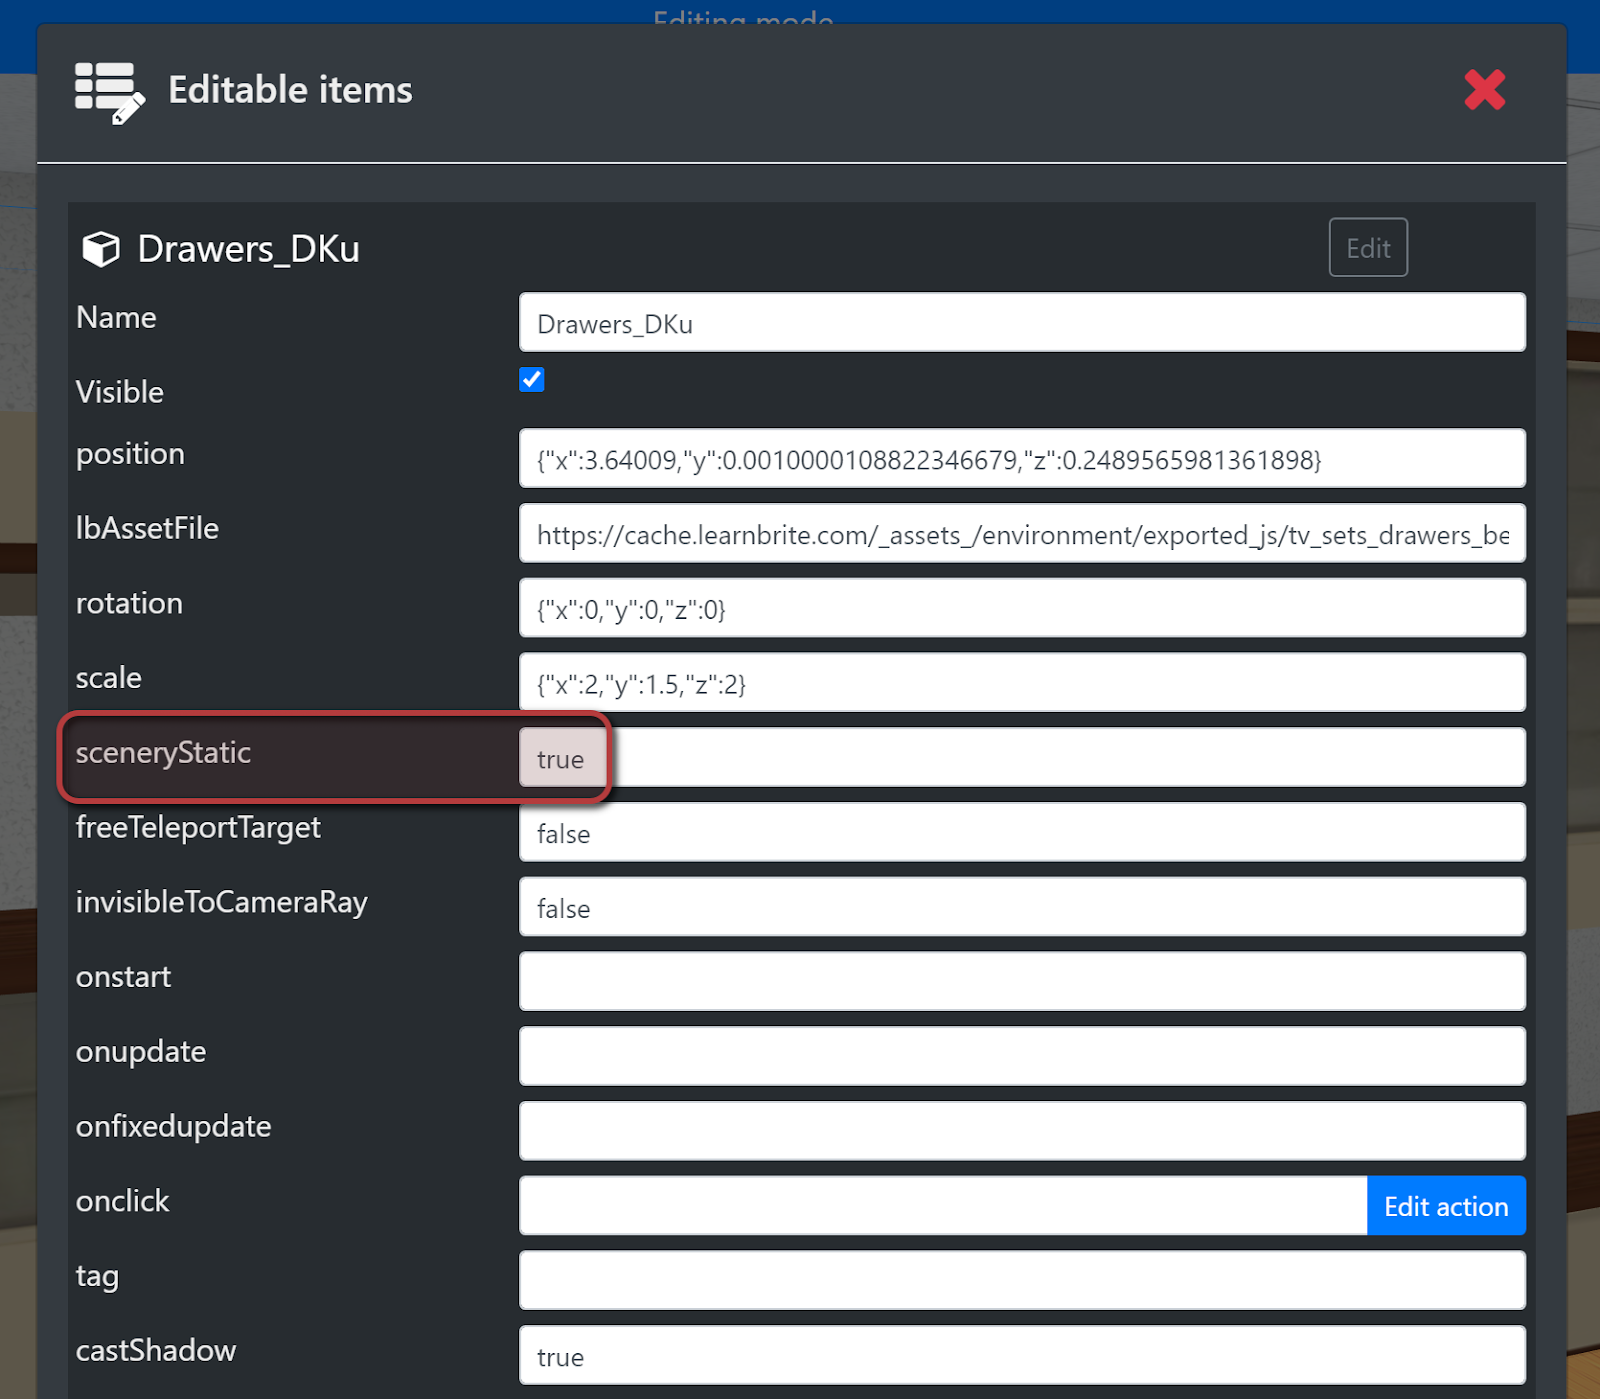
Now the drawers are not editable anymore, and you will only be able to modify them from the full list of editable items, which can be accessed from the edit menu.

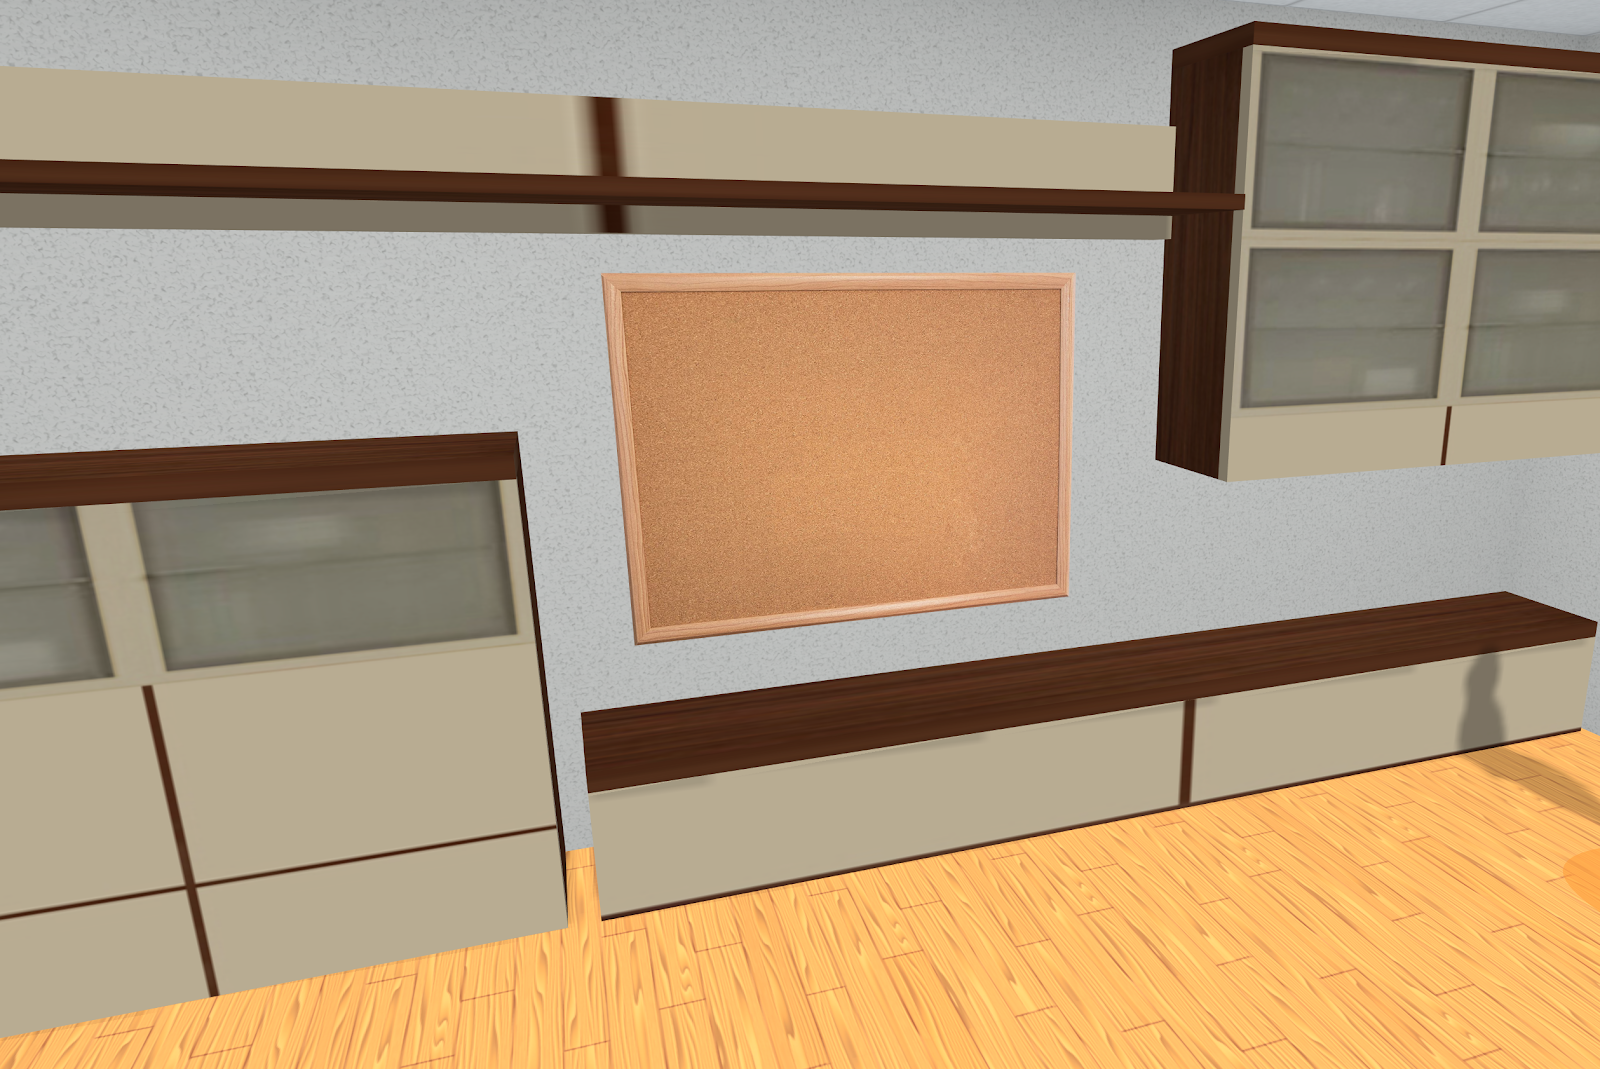
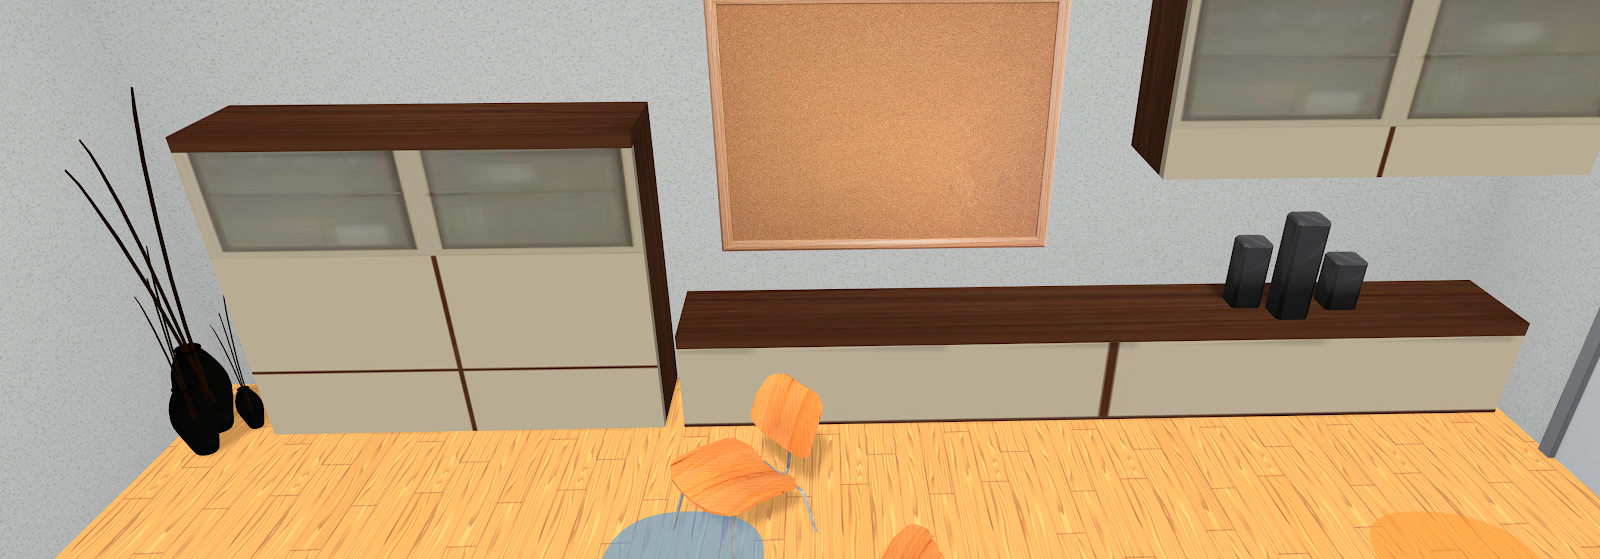
Anyway, let’s add a second mediaboard – this one will be the image of a corkboard and will sit in the central space of the drawers.
Click on the “Add Mediaboard” button, and paste https://cache.learnbrite.com/_assets_/img/corkboard.jpg in the input field,then click “Create”.
When it’s added to the scene, resize it to your liking and place it in the empty space outlined by the drawers – and as an additional exercise, remember to change both castShadow and receiveShadow to true!
Adding and cloning items
Since we are standing next to Jane, let’s add in a few items behind her.
We’re going to add in 4 things:
- a photo on the wall
- a table
- a laptop (on the table)
- a tablet (on the table)
- 5 chairs
For the photo, add it like any other mediaboard until now: you can use the following URL:
https://cache.learnbrite.com/_assets_/img/skyline.jpg |

Now let’s add the table – the process is the same as when we added the drawers:
- Open the edit menu
- Click on “Add content”
- Set the “LearnBrite” filter on the top left
- Write “Table antique” in the input box
- Click on the table that comes up

The dimensions of this table don’t really fit the scene, but by dragging on the corners we can only scale it uniformly. There is a way to do it (see “Introduction to Editing > Moving, rotating and scaling objects”) – in this case we’ve done the legwork and you can simply open the properties of the object and paste the following in the Scale field
{"x":3,"y":0.85,"z":3} |
Remember to set castShadow and receiveShadow to true, click “Save item”, and the position the table below the picture. After you’re happy with its placement, open the table’s settings again and change sceneryStatic to true as well so that we can place other objects on top of it.

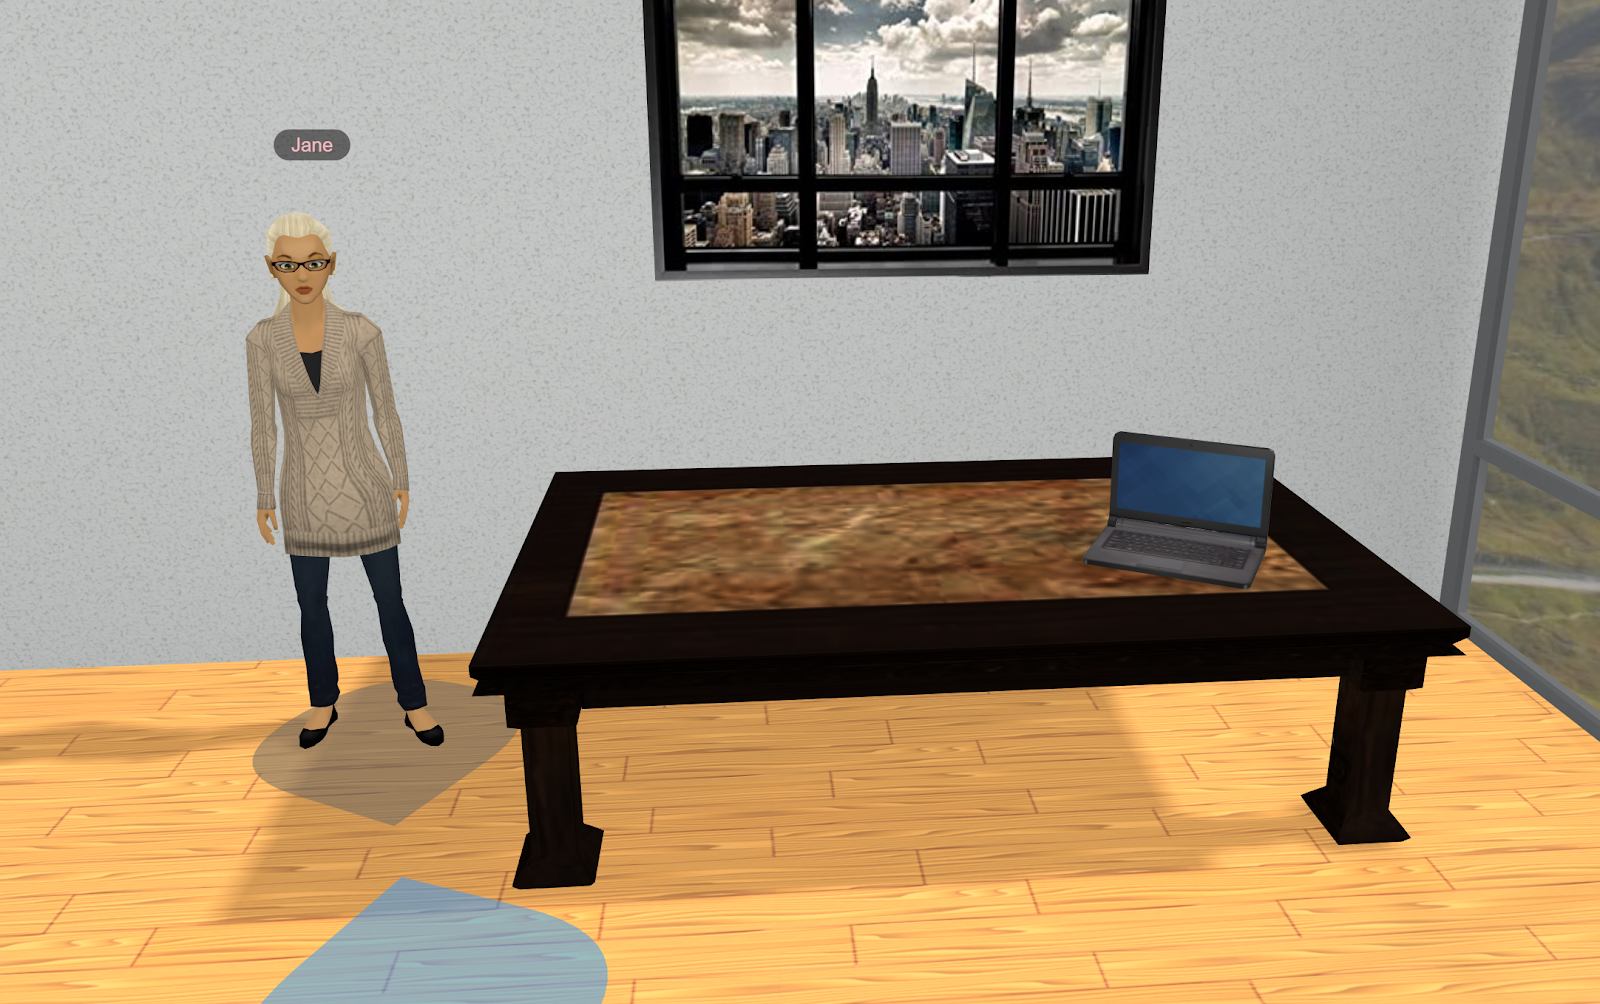
Now for the laptop, which is added in the same way as the table, only this time after turning on the “LearnBrite” filter you can search for “Laptop” and choose “Laptop (brandless)”
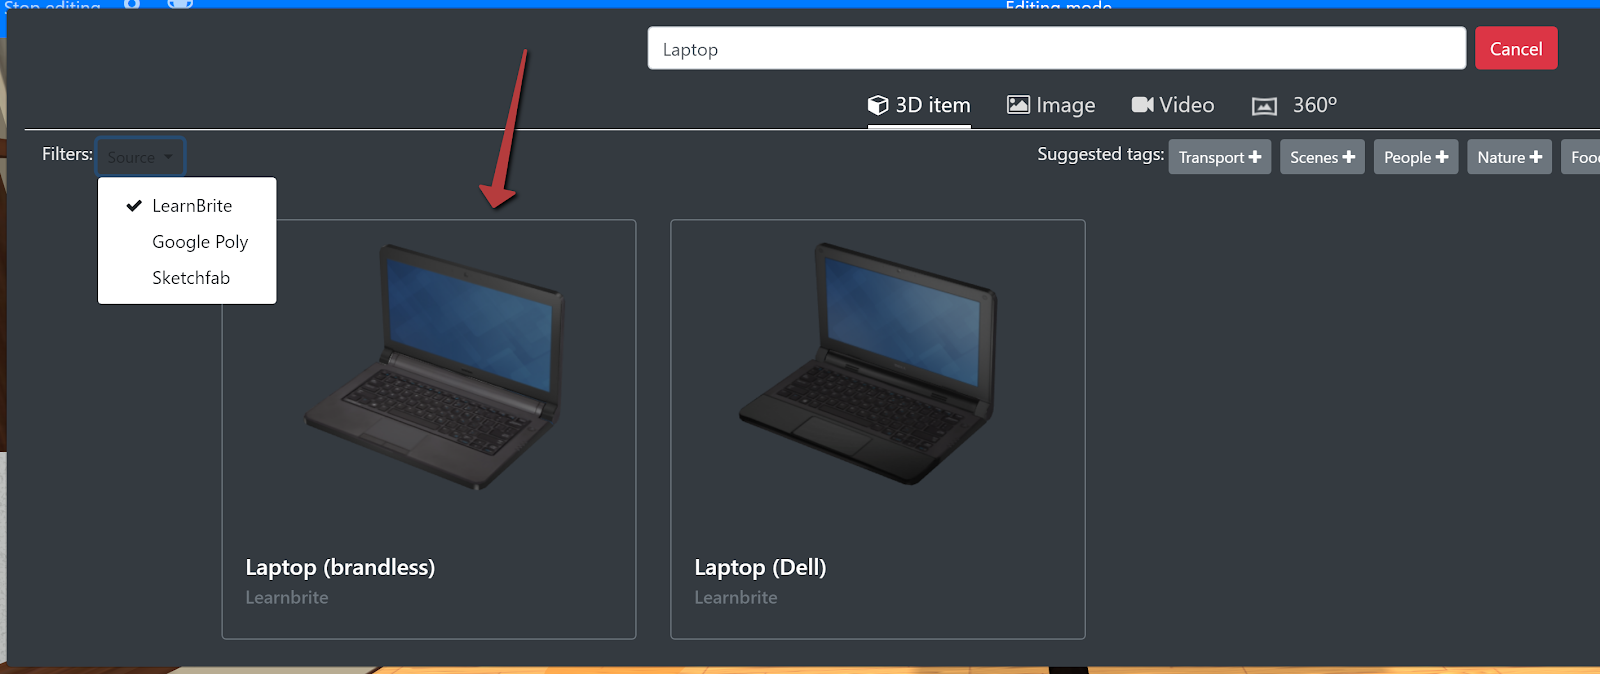
As always, turn on castShadow (the laptop is quite a small object, so it won’t be noticeable if we leave receiveShadow off to save a bit on performance) and place it on the table.
The last object we’ll place on the table is a tablet, which can be found by looking for “Tablet” in the LearnBrite catalogue.

Finally, the chairs. You can get your preferred chair from the LearnBrite catalogue in the Add content menu (in this guide we will use “Eames Chair” on page 2 of the results after filtering for LearnBrite objects, but you are free to choose the one you prefer). As usual we turn on castShadow and receiveShadow, and then we place it in front of Michael.
Do we really need to do that 4 more times?
Of course not! One of the most important features when decorating a space is cloning an object, which will create a copy of the object in the space, including its settings (i.e. in our case, the shadows will stay on).
To clone a 3D item, simply open its properties and click on the “Clone item” button at the bottom

A copy will be created, and by doing this you can quickly fill up a room
Adding Sitting Hotspots
Wouldn’t it be nice to have a seat? Hotspots can be set to “stand” or “chair”, allowing you to stand or sit depending on the needs of your scene.
The first thing to do is lock each of the chairs in place with sceneryStatic. You cannot make hotspots static so it’s easier to set the chairs up, lock them in place and then add in the hotspots.
Then we want to add in five new hotspots. You can do so by opening the edit menu and clicking on “Add hotspot”
Once you’ve added them, place them under each seat like you did with other objects:
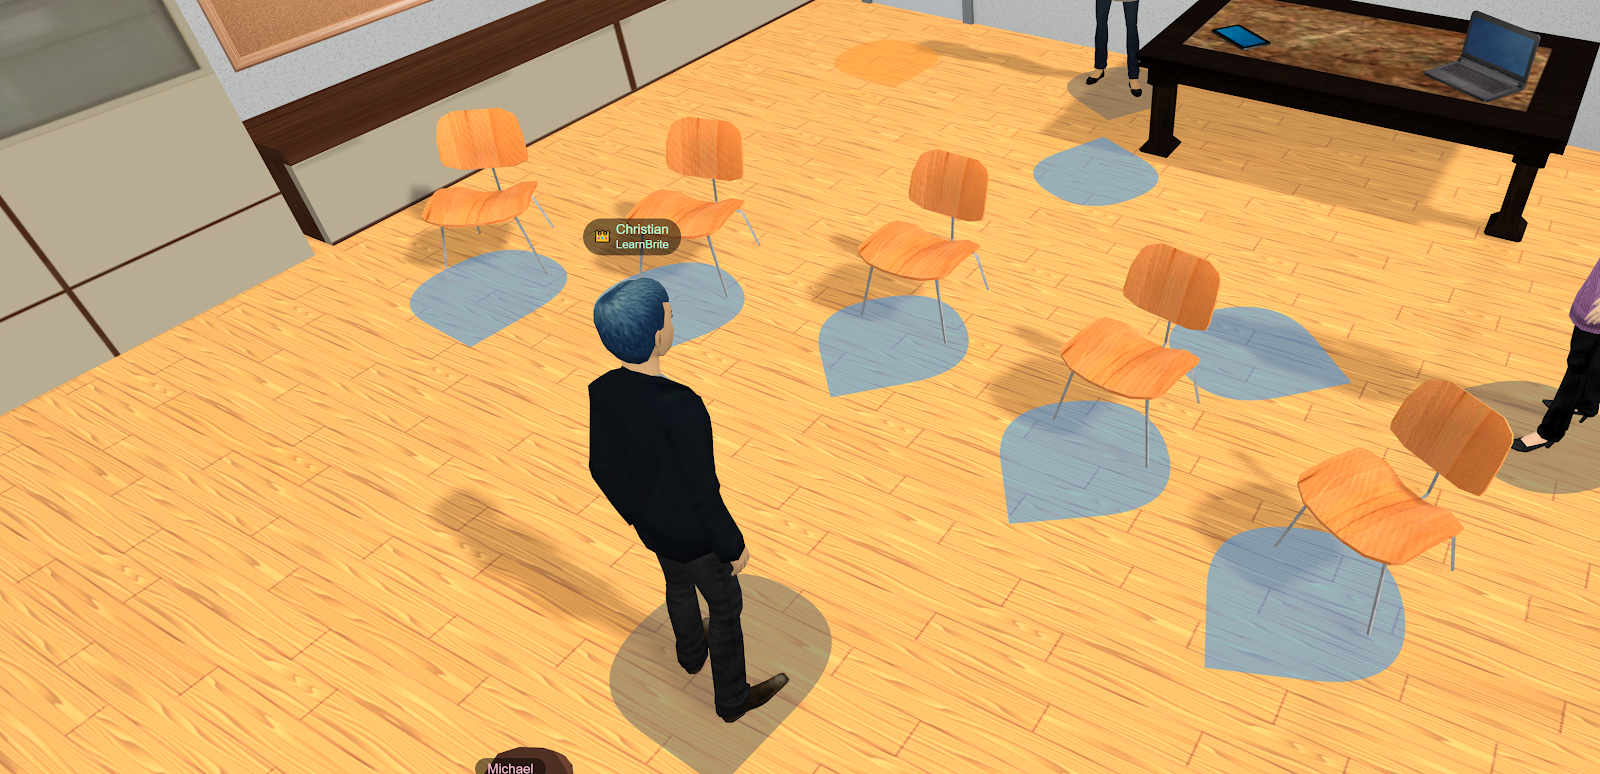
Finally, open the properties of each of them and change the posture field from “stand” to “chair”

Try them out to make sure that everything is working well!
Placing Items on the Cupboard
For a final touch, we’re going to add something to the drawers so that they look a little less bare. Move over to the hotspot near Jane and enter edit mode. We’re going to add two small items:
- a vase
- a sculpture
By now you should be familiar with how to add items (if not, you can refer to “Adding your first item”, the first section in step 6 of this guide), so we will just give the hint that you can look for “Vase” and “Pedestal” in the content browser.
You’ve just built your very first, fully-functioning microlearning Scenario in LearnBrite, congratulations! 🎉
And since this was the last step in editing this space, feel free to modify it as you wish!
Step 7. Inviting Your Learners
We’ve made it to the end! Now you have a functional micro-learning Scenario that’s ready for people to experience, and by building it you have the basics of using the platform under your belt too!
The only thing that’s left is to learn how to invite people to your space, which can be done from either the 3D environment (see “How do I… → Invite other users to a space/world from the 3D environment?”)
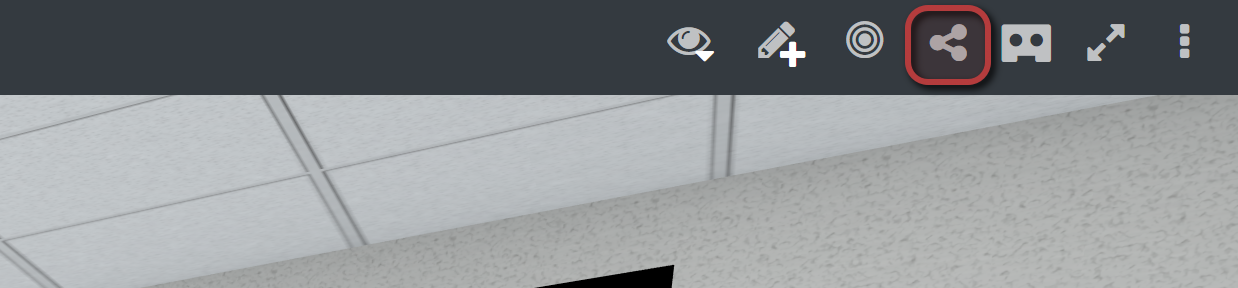
Or through the Dashboard (see “How do I… → Invite other users to a space/world from Dashboard?”)
And that’s it!
Hopefully you’ve enjoyed your first foray into the world of LearnBrite enough to keep building new and exciting Scenarios to take your training materials to the next level. If you ever have any questions, feel free to reach out to support (lbhelp@learnbrite.com) or to explore more of the training library for help on specific features. Don’t hesitate to get in touch, as we can help you find your way very quickly if you’re stuck, and it also gives us valuable feedback on what we can improve for you, our user!
So, what’s next? Go ahead and start building your own Scenario, or if you’d like to set up some meeting rooms, be sure to check out the Multiuser Quick Start Series.