Jump to:
Adding Tasks to an Existing World or Space (aka a Property)
Using Trophio in the conversation editor
Example: using Trophio to show a dialogue node only once
Simple question with one choice only
Multiple choice question, or question with more than one correct answer
When using a requestInput action
What’s the difference between creating a task in a space and a task in a world?
How can I make a task only complete once a certain object has been collected?
How can I make a task appear as a progress bar in the achievements menu?
How can I allow a user to complete a task in any space within a world?
Trophio
What is Trophio?
Trophio is a service that allows for seamless integration of gamification tasks into the Hyperspace Metaverse Platform.
It includes:
- Analytics – such as time spent in a conversation, in a space, or number of times a form has been opened
- Achievements- which are configurable in a variety of ways and can be triggered at any point during an experience and based on a number of factors
- Reporting – visualizations of analytics and achievements data
Trophio is also compatible with SCORM and LTI.
Adding Tasks to an Existing World or Space (aka a Property)
From the dashboard
- Click on the triple dot icon on any World or Space
- Choose Gamification from the menu
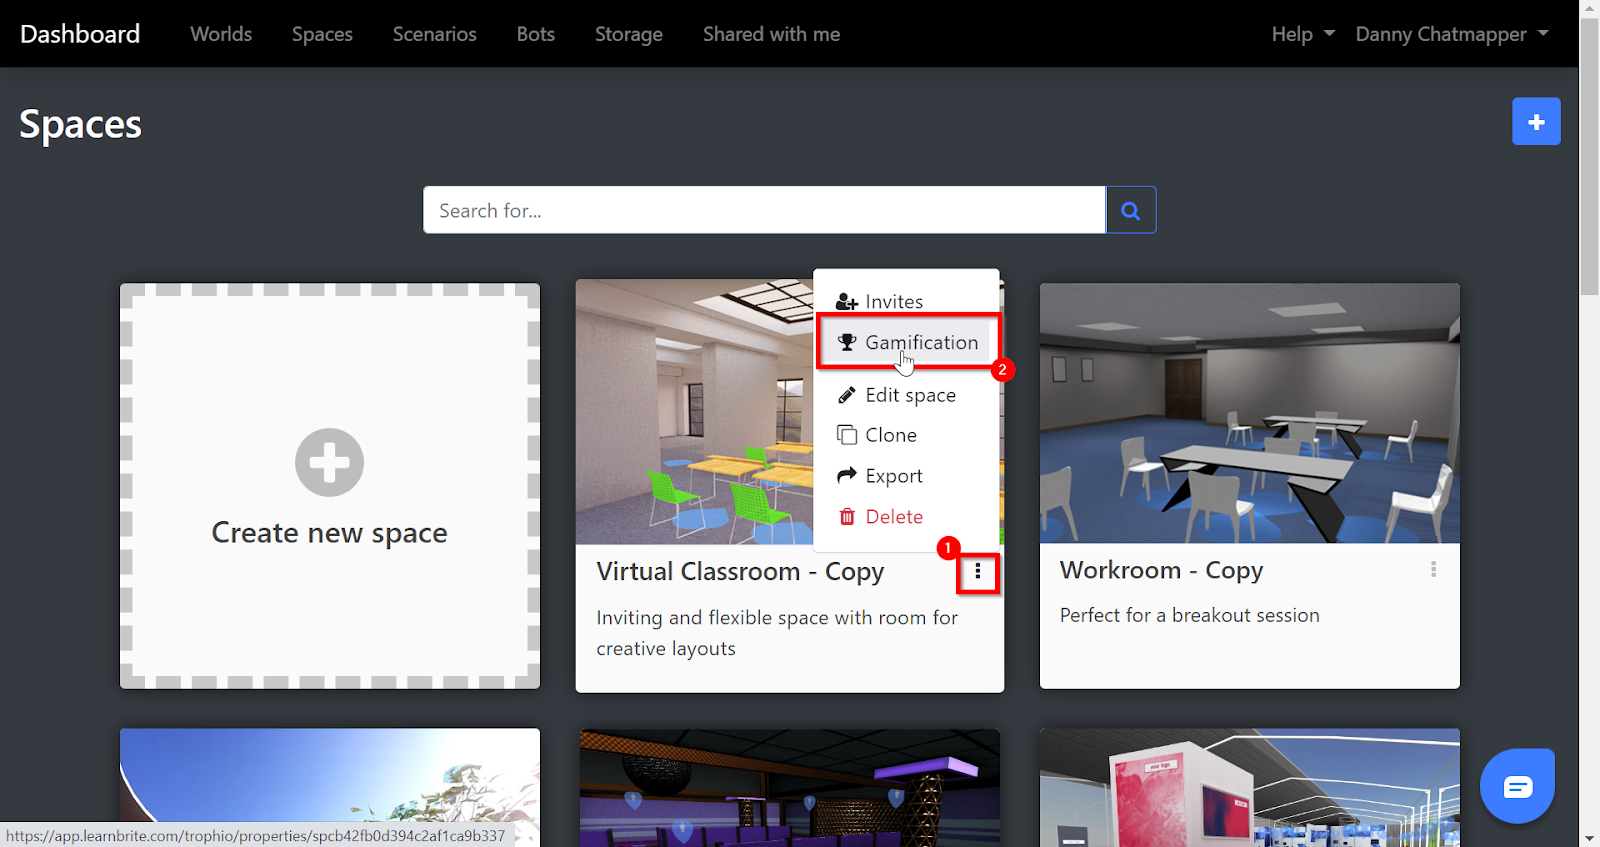
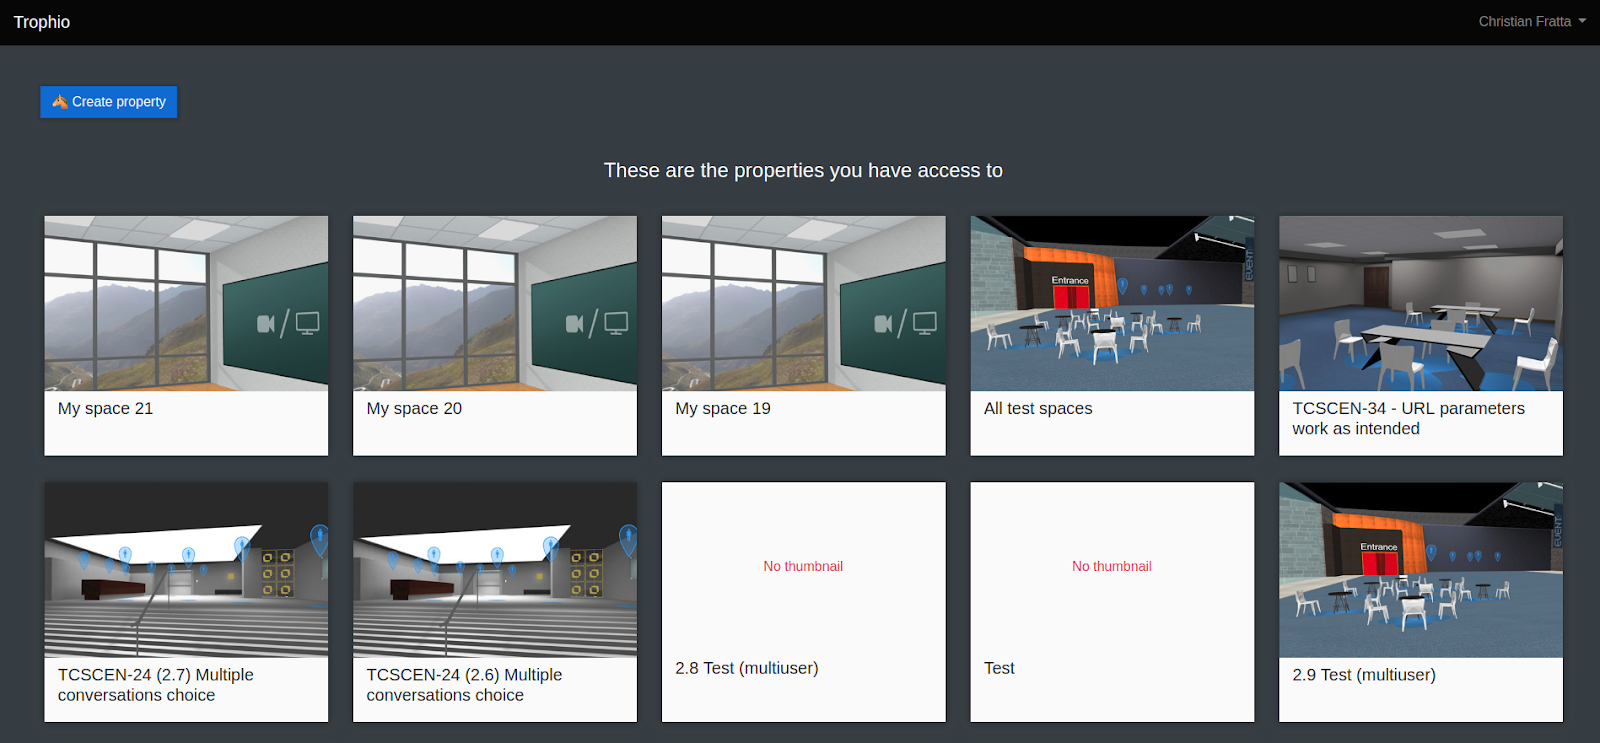
By default, Trophio will query Dashboard to get a list of the logged in user’s properties (the spaces and worlds they own). This list can be accessed here: https://app.learnbrite.com/trophio
Creating a task
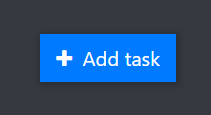
To create a task, navigate to the property in which the task should be created and click on "+Add task" button on the right.
A form with several sections will appear.
Task details
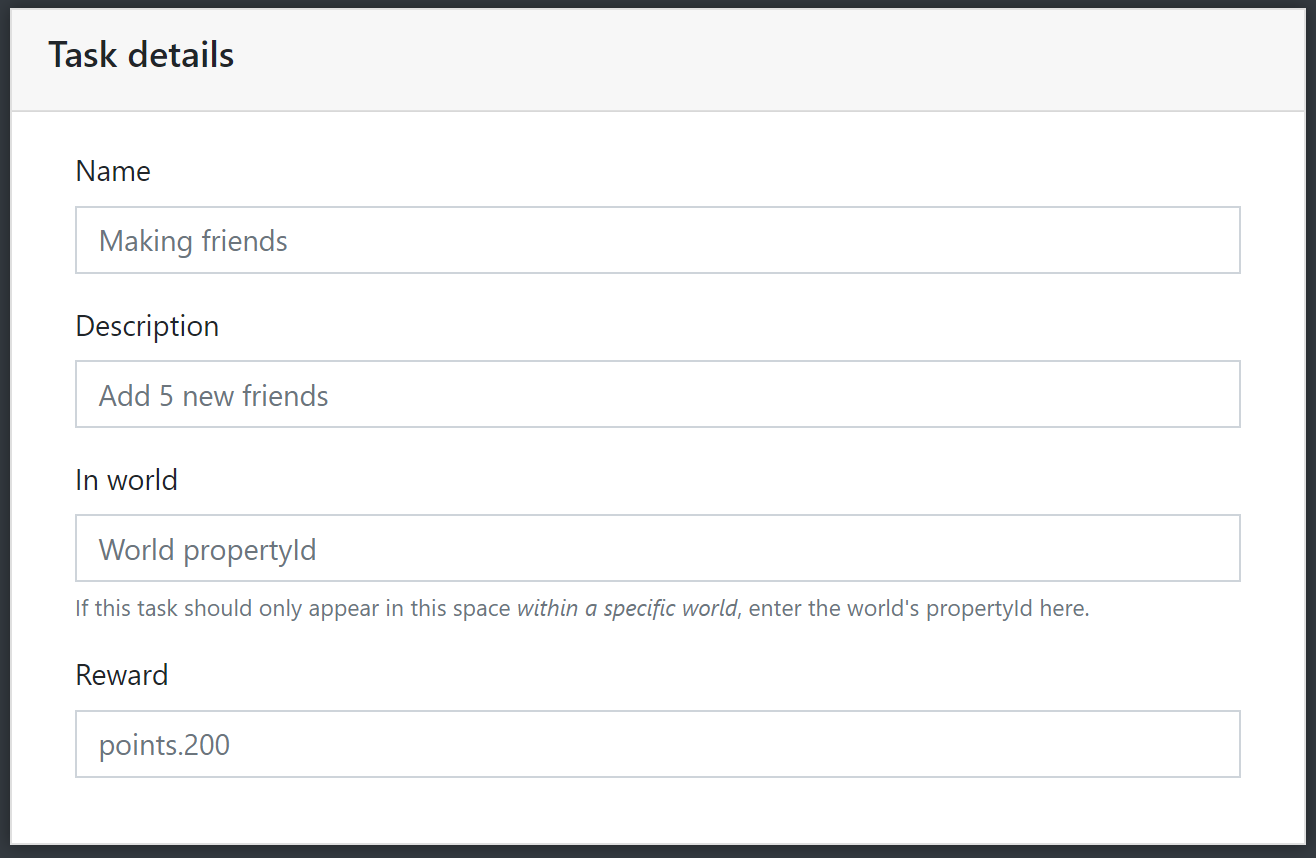
- Name: the task’s name (will be visible to the user in Scenario)
- Description: a short description of the task, max 255 characters (will be visible to the user within Scenario)
- In world: tasks can appear for a space, for a world, and also for a specific space within a world. To make a task only appear for the current space within a world, the worldId should be inserted in this field.
- Reward: the reward to be bestowed upon the player when the task is completed. This is formatted as key.value, where the following are valid options for key:
- points: will give the user points. Any numeric value is valid. E.g. points.200 or points.-50
- openUrl: will open the url in another tab. E.g. openUrl.google.com
Task repetition
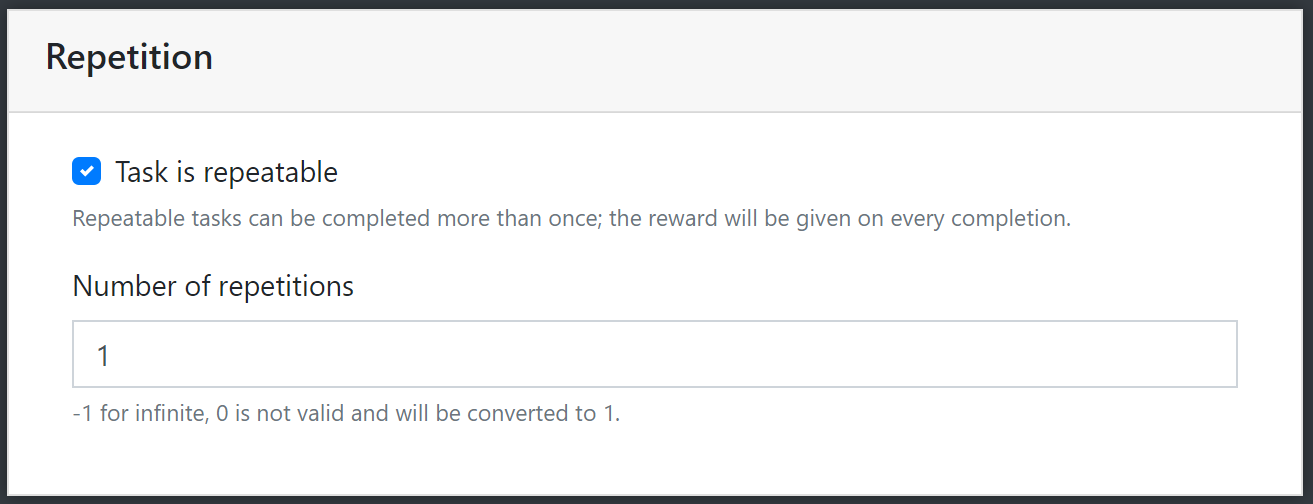
- Task is repeatable: whether the task can be completed more than once or not.
- Number of repetitions: how many times the task can be completed (the reward will be given every time the task is completed). If a value of -1 is used, the user will be able to complete the task infinitely many times.
Notifications
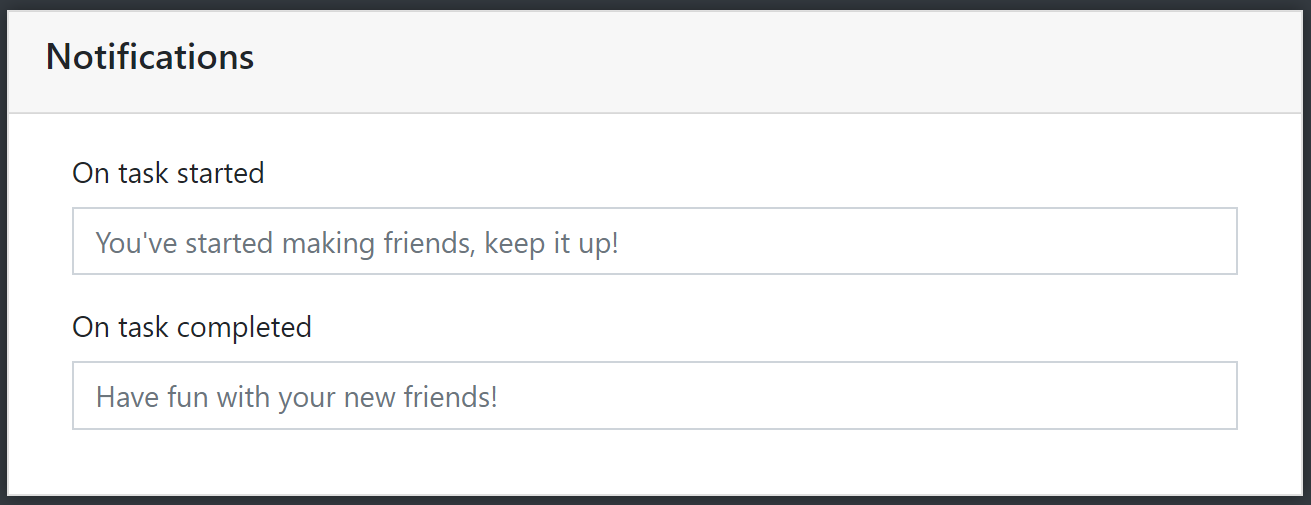
- On task started: the text to be included in a notification when the task is marked as started. Can include HTML.
- On task completed: same as above, but shown when the task is completed. Can also include HTML.
Other settings
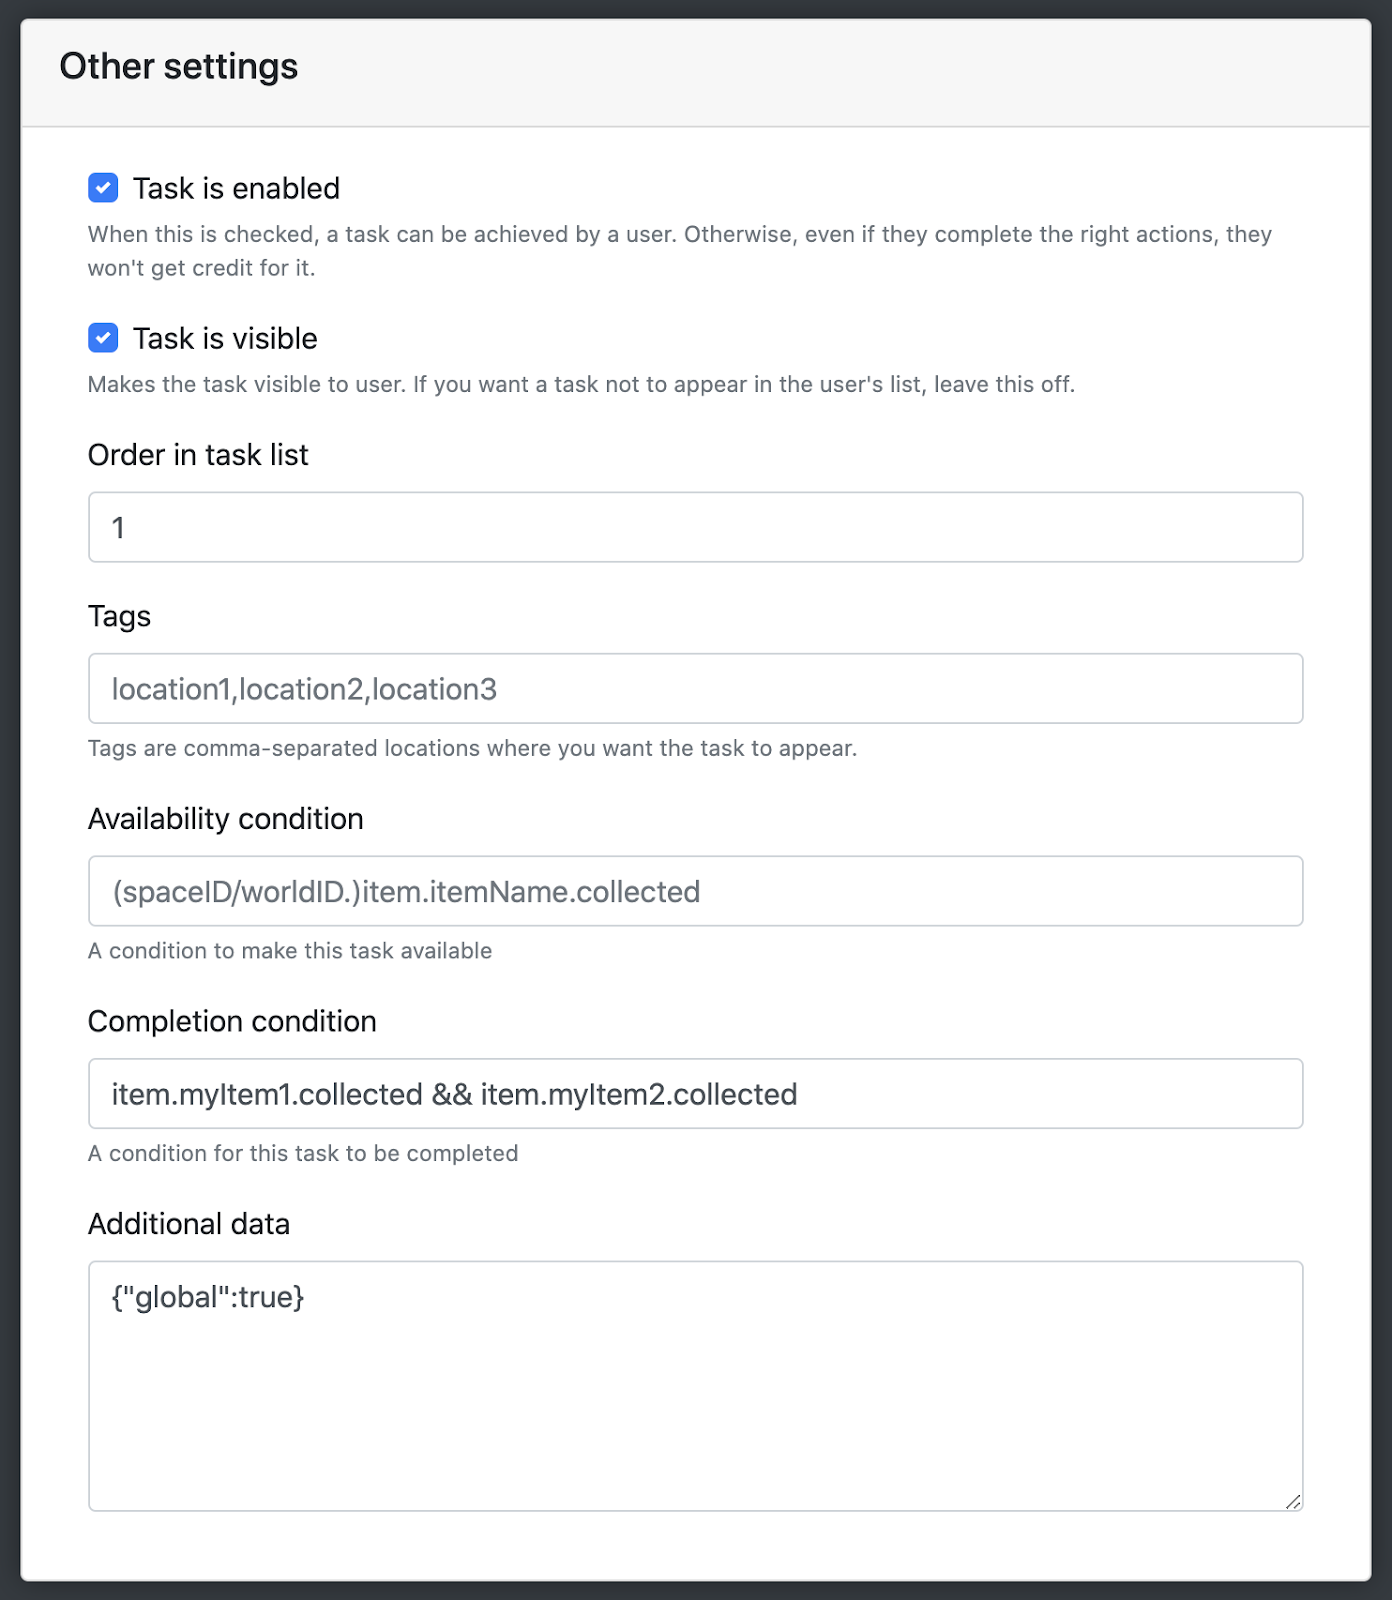
- Task is enabled: whether the task can be completed.
- Task is visible: decides if the user can see the task in the achievements list.
- Order in task list: the position of this task in the achievements list.
- Tags: used in conjunction with a Spaces setting for the property (Achievements – filter by tag), will filter out achievements that don’t have the tag in a space, no matter the other settings. The Spaces setting is off by default. Note: if you are not using this feature, make sure that the setting is off for the space, otherwise you won’t see any achievements in the modal within Scenario!
- Availability condition: the condition (or set of conditions) which, once fulfilled, allow the task to be completed.
- Completion condition: the condition (or set of conditions) which, once fulfilled, will automatically complete the task.
- Additional data: additional data for the task. Only a single option is currently available in this field, "global", which allows a task to be completed in any space within a world (see "How can I allow a user to complete a task in any space within a world?" in the FAQs section)
Using conditions
It is possible to set conditions to either mark the task as available (i.e. "completable", for instance only unlocking a certain task once a set of "hint" items has been collected) or to complete it outright (for example completing a "Puzzle" task once all puzzle pieces have been found).
For instructions on how to collect items or complete tasks, see the "Trophio and Scenario" section below. Note: If you are using a single collected item as a Completion condition, the task will have to be started first, before the item is collected. |
Conditions can be set in the task’s details, visible when first creating the task or when editing it.

A condition is made of four parts
propertyID.type.name.status |
- propertyID is the only optional part, and is the spaceID in which the condition can trigger. For example, in the case of items, adding a propertyID indicates that the item must be collected in that specific space
- type is either item or task. If item, the condition will refer to the status of the item (i.e. collected or not); if task, the condition will refer to the status of the task (i.e. not started, started, or complete).
- name is the name of what we’re checking for the condition. In the case of tasks, it is the shortcode, whereas in the case of items it’s the name of the item itself.
- status is, finally, the status of what we’re checking in the condition. If it’s a task, it can be not-started, started, or complete; if an item, it can be either collected or dropped
If you are using items in conditions, make sure that the name has NO spaces in it (either in the condition, or in the "collectItem" action). We generally suggest to use underscores in place of spaces |
Let’s demonstrate with two examples, one omitting the propertyID and the other including it.
// Without propertyID – condition is not restricted to a specific space |
A condition can be negated by adding an exclamation mark before it. In the example below, the condition will evaluate to "true" only if fakeGear has not been collected
!item.fakeGear.collected |
It is possible to chain multiple conditions together:
- If the conditions are connected with && (meaning "and"), the overall condition will evaluate to "true" only if both conditions are true
- If the conditions are connected with || (meaning "or"), the overall condition will evaluate to "true" if either of the conditions is true
In the following example, the condition will be true if either the task "hints-hunt" has been completed, or if the item "passKey" has been collected in a certain space.
task.hints-hunt.complete || spc1a2b3c4d5e6f7g8h9i10j.item.passKey.collected |
Now let’s check the implementation of a potential "collection"-type task, to complete which we must collect three different items anywhere within a world.
item.puzzle1.collected && item.puzzle2.collected && item.puzzle3.collected |
Reports
A number of reports are available to extract useful information from the raw data collected by Trophio. Note that the Collected items report relies on some custom configuration that cannot currently be set by normal users (all relevant information will appear in the Full report, however).

Creating a report is only a matter of clicking on the property to examine, and selecting the time frame in the form that appears. Clicking on "Create Report" will use the selected dates, whereas clicking on "Create report (all dates)" will include all available data.
Achievements
A complete report of the achievements of all users (the status and how many times they completed each).
Analytics
A report detailing the analytics data of each user. What follows is a list of potential columns (some will be shown/hidden depending on available data).
Number of attendees
The number of rows in the analytics table. Note that if guest access is allowed, a person loading the space/world on two different browsers will create two guest accounts (reloading on the same browser will not create a new guest). Provided these users set their name when reloading, you will be able to identify duplicate users by ordering the table with the "email" or "name" columns.
Name/Email
Normally containing the user’s If the user fills in their profile information, that is what will appear here (also applies for guest users, which are normally completely anonymous).
Contacts
The number of contacts of this user. This includes the contacts a user added, as well as the users that added the user as a contact.
World visited/time
The number of times a world was visited, and the number of seconds the user cumulatively spent in the world.
Conversation visited/time
The number of times a certain conversation was initiated, as well as the time spent in it (in seconds). Note that adding behavior to objects or bots through the "Edit action" button is actually creating a conversation, hence interactions with that object will count as "Conversation_XXX_visited", where XXX is the ID of the conversation, which you can find within the 3D environment, in the properties of the interactive objects

Public Messages Sent
Number of chat messages sent by the user in a space. A cumulative value is provided when looking at the analytics of a world.
Whispers Sent
The amount of private messages sent by the user.
Announcements Sent
The number of announcements sent by the user (note that announcements are only available to Presenters and Editors, see the "User Roles" guide)
Calls joined
How many times a user has joined a conference call while in the world (does not take dial-in into account, as dial-in users are not part of analytics)
Q&A asked/Q&A answered
Number of questions the user asked (and answered) within the Q&A functionality.
Interactions with item
If the option to "track interactions" has been turned on for a 3D object, the number of those interactions will be shown as a column in the report.
Collected items
A report that allows seeing both the detailed data about item collection, and graphs examining the ratio of correct/wrong/missed answers on "answerable" items (both by item and by user), along with the collection ratio of "collectible" items.
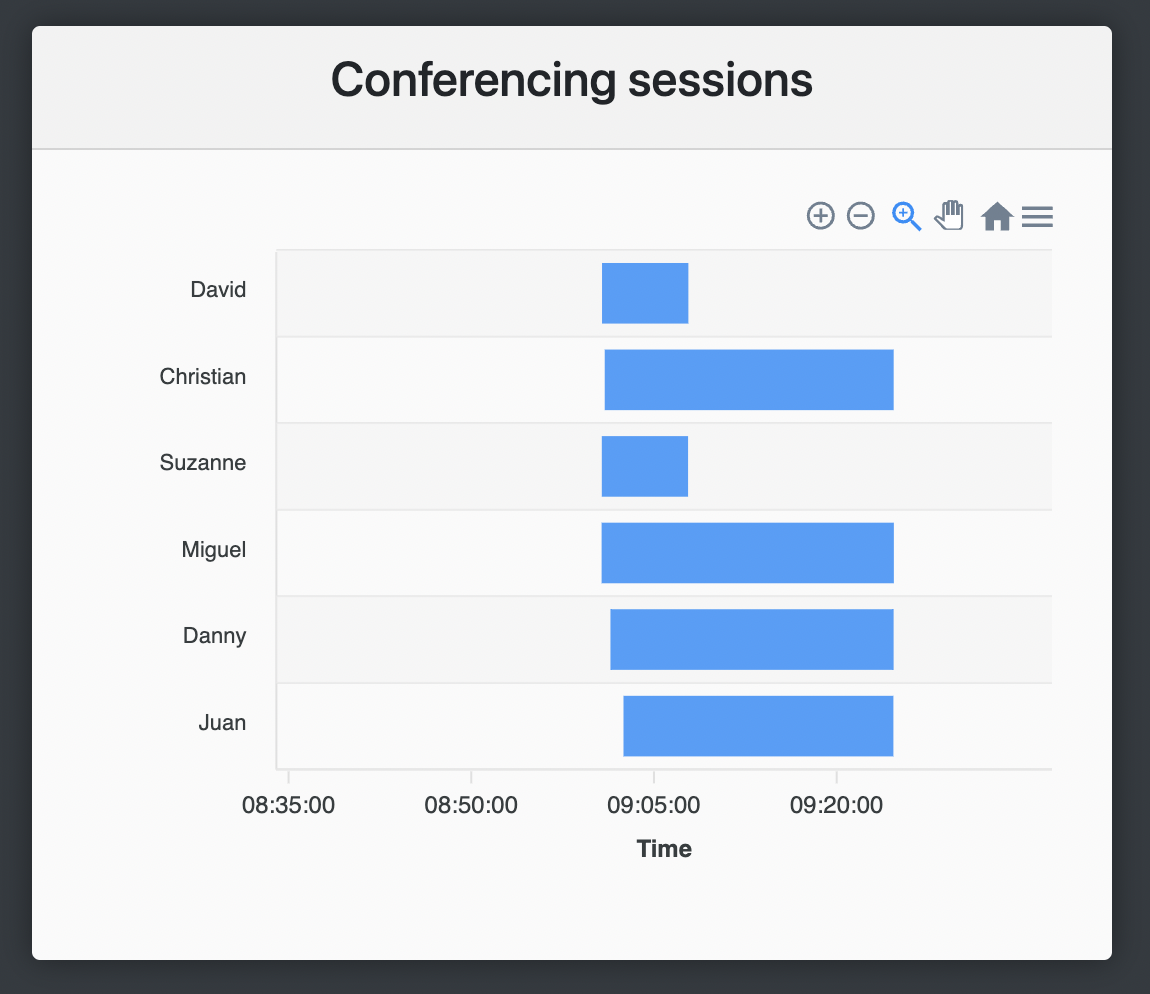
Conferencing
This report allows seeing the duration of each user’s conference call within a space within a certain timeframe. This does not currently include audio zones.
The conferencing report shows times in UTC |
Using Trophio in a Space
Using Trophio in the conversation editor
It is possible to add conversations directly from the space, using the conversation editor. This also allows to trigger gamification updates (such as starting or completing a task, or collecting an item) at any point in the conversation.
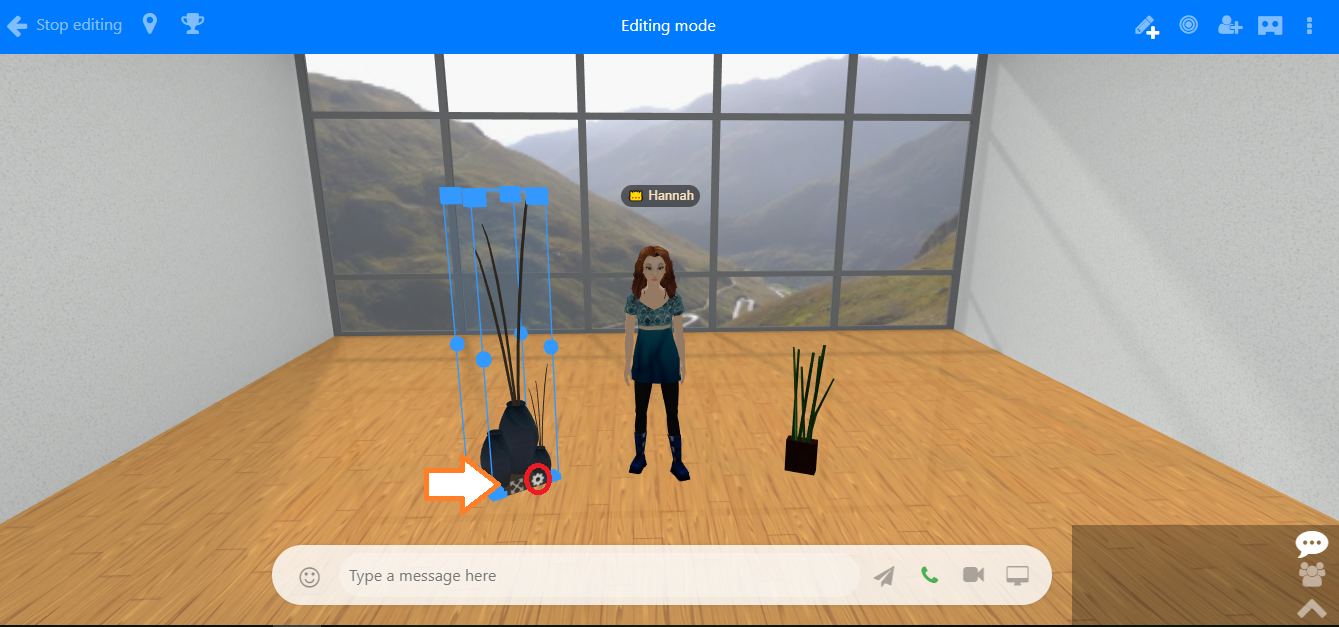
To enter the conversation editor, enter "Edit mode" and choose the desired bot to add a gamification task to.
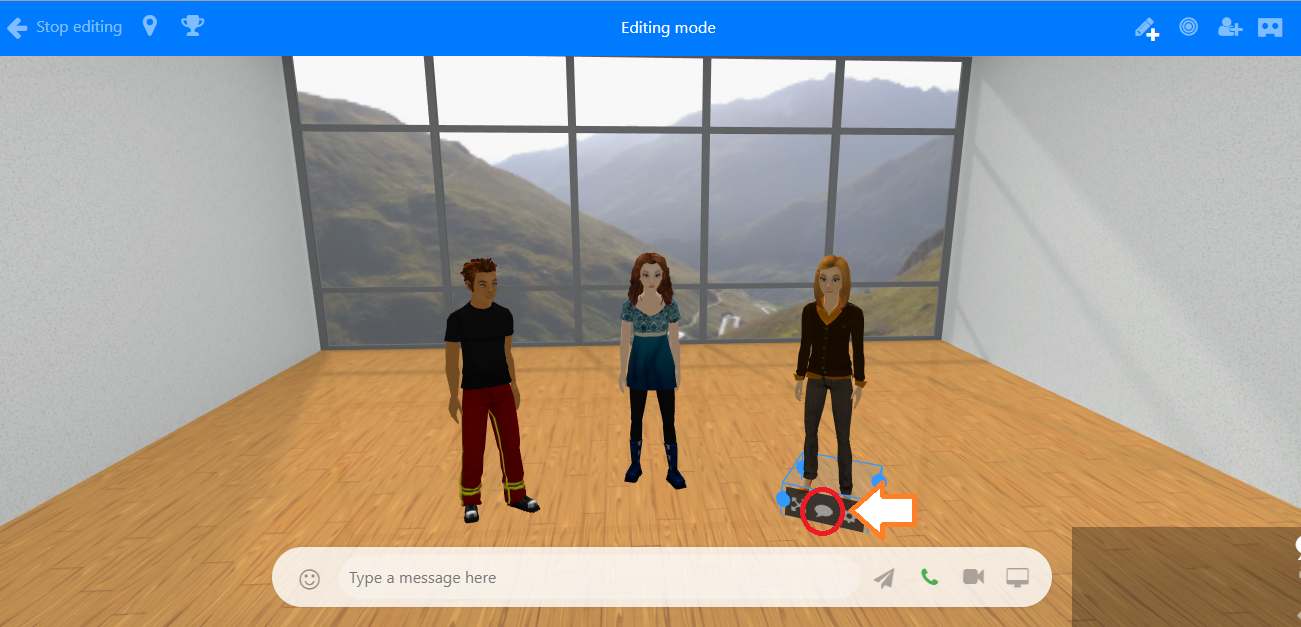
Hovering over a bot’s feet (or tapping on them) will show a blue or gray wireframe box with three icons. To open the conversation editor, click or tap the middle one (with a speech bubble icon).
To add Trophio tasks, click on "More": the conversation editor will pop up. It is a script that allows speech and conversations to be added to bots in a space.

This will show all actions that can be added through the conversation editor. In the bottom right corner there is a "Gamification" section.
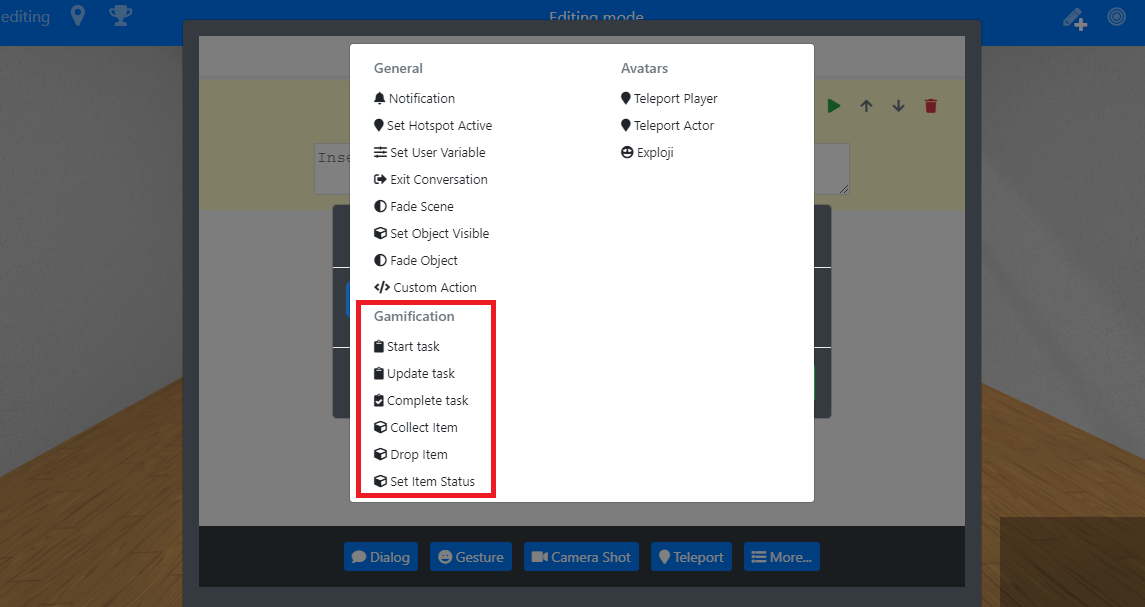
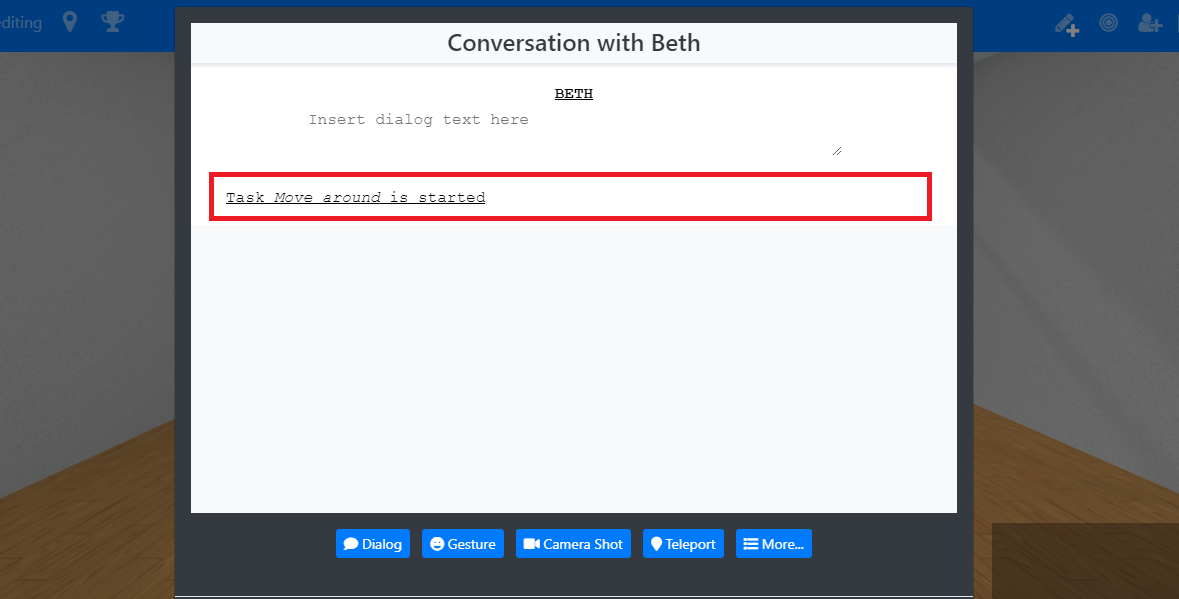
By clicking on any of them, a small popup will appear to fill in some detail (in the example, "Start task" was chosen).
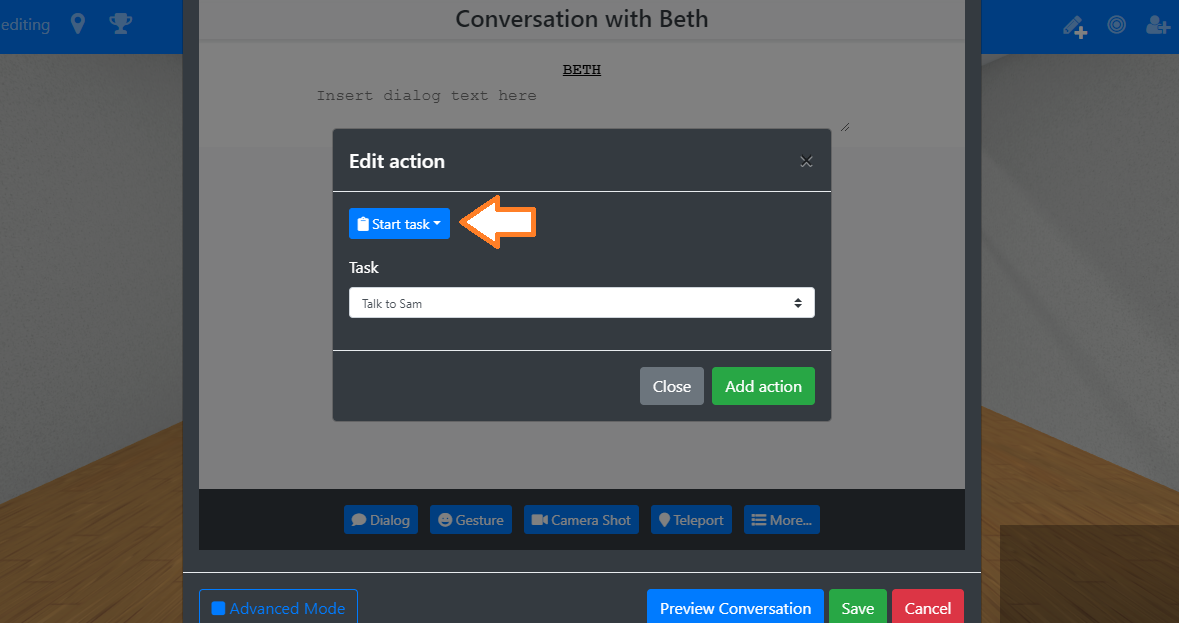
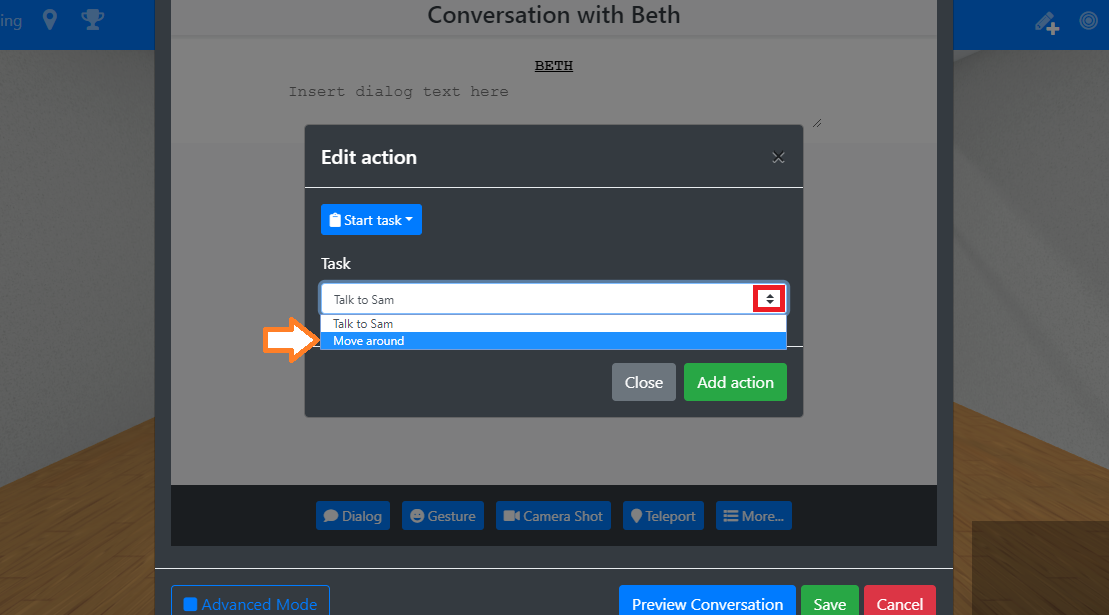
The gamification task used referenced in the action (which will be set to "started" in this case) can be selected in the "Task" dropdown, from the list of available ones. After choosing a task, this action can be saved by clicking on the green "Add action" button.
Note: If no tasks appear in the dropdown, check that they were added in Trophio first. If they were, try reloading the Space or World. Any tasks added to Trophio after a space has loaded will only display once the space is reloaded.
The result is now visible in the conversation editor. Make sure to click "Save" in the conversation editor afterwards, or your changes will not be saved!
Adding Trophio tasks to items
It is also possible to add trophio tasks as onclick actions to objects.
Instead of clicking on the speech bubble like in the previous section, the cog icon should be clicked instead. A popup will appear
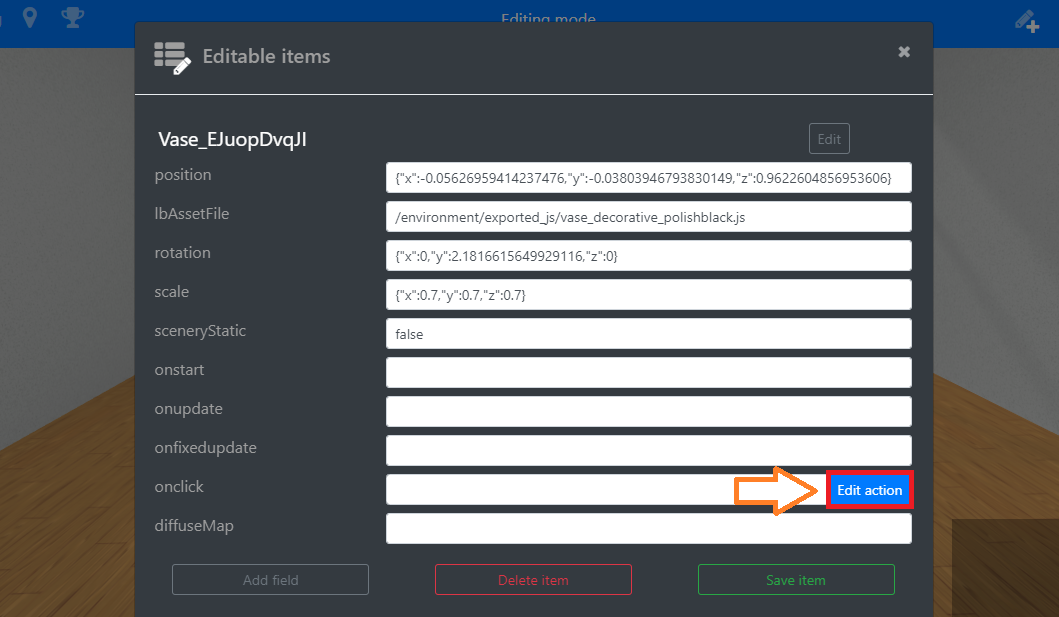
In the "onclick" field, click on the "Edit action" button. This will open the conversation editor for this object. Notice that the example is titled "Conversation with Player" and therefore it will also include actions related to the player (or user). From here, the steps detailed in the previous section can be followed.
Using Trophio in scripts
For any of these, "task" can be either the task’s shortcode or the propertyId, and "item" is the item’s name.
Tasks
- Trophio.startTask(task)
Sets the status of the task to "started". - Trophio.completeTask(task)
Sets the status of the task as "complete" and reward the player. - Trophio.getTaskStatus(task)
Will return a string with the status of the task. Can be any of "not-started", "started" or "complete" - Trophio.setTaskStatus(task, status)
Allows to set any status to a task. Mostly useful when the status is determined programmatically.
Items
- Trophio.collectItem(item)
Will add the item to the user’s inventory, with a status of "collected" - Trophio.dropItem(item)
Will set the status of the item to "dropped", but will not remove it from the user’s inventory. - Trophio.checkIfCollected(item)
Returns "true" if the item has a status of "collected", false otherwise. - Trophio.getItemStatus(item, type)
Returns the status of the item. - Trophio.setItemStatus(item, status, type)
Allows to set an arbitrary status for a specific item.
Example: using Trophio to show a dialogue node only once
With ChatMapper, it’s possible to only show a certain dialogue node once (for example a "Start" node at the beginning of a bot interaction, see ChatMapper Cookbook → Only showing the Start node the first time). This approach has a big limitation, however, in that if the user reloads the entire conversation state resets, which in many cases is not ideal.
That restriction can be lifted using Trophio, by saving a certain step the user took as an item, which will then be loaded every time a certain space/world is opened.
The first step is to select the node(s) which shouldn’t repeat. In our example we will use a "Start" node which we only want to show once.

If the "displayed" state of this node were stored in a ChatMapper variable, we would add a script to this node like the following:
Variable["StartButtonClicked"] = 1 |
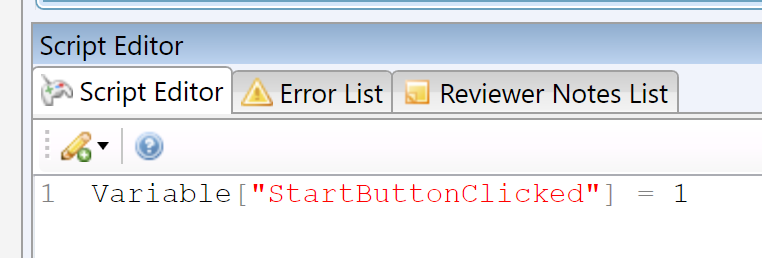
And also add a condition to the same node checking for the variable we previously set, so that the node wouldn’t play if the conversation was triggered again.
Variable["StartButtonClicked"] == 1 |
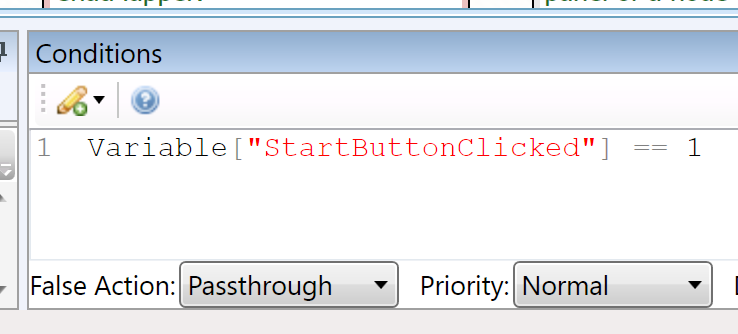
For information about the "False Action" setting, see ChatMapper Cookbook → False actions |
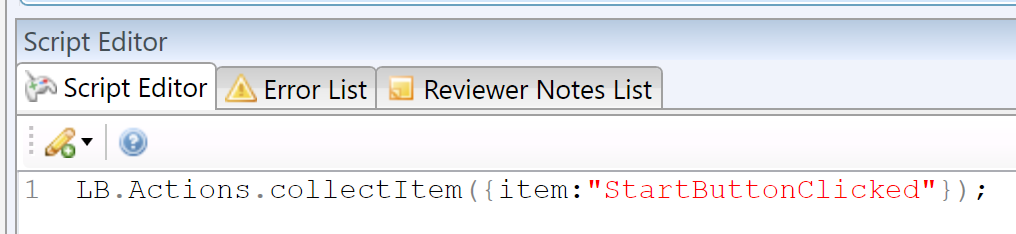
With Trophio, the principle is the same:
1. Collect an item with a specific name when first going through our dialogue node
LB.Actions.collectItem({item:"StartButtonClicked"}); |
2. In the same node, check whether the item was or wasn’t collected as a condition
LB.Actions.getItemStatus({item:"StartButtonClicked"}) != Trophio.status.collected |

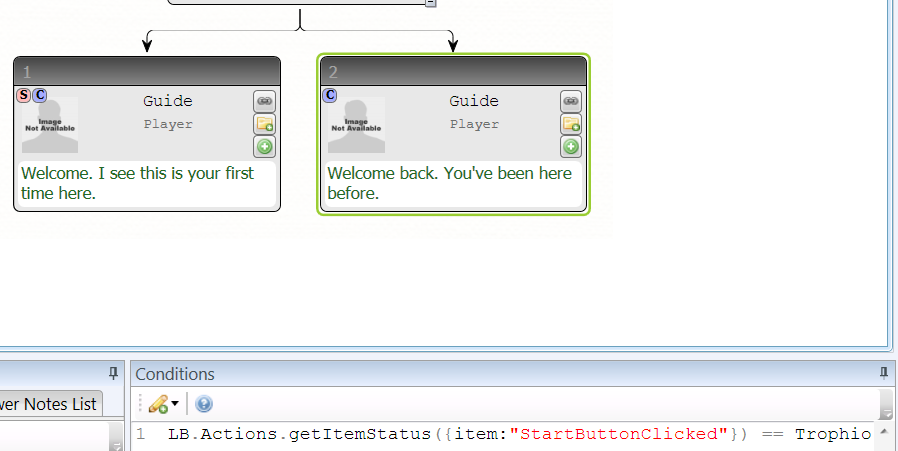
3. If using to branch into a separate dialog: In the sibling node, check that the item was collected as a condition
LB.Actions.getItemStatus({item:"StartButtonClicked"}) == Trophio.status.collected |
Capturing player responses
With Trophio, it’s possible to capture player responses to questions asked within a scenario. The methods differ depending on the type of question presented to the player.
Simple question with one choice only
For a simple question with one choice, place the following line of code into the Script Editor of each Answer Node.
LB.Actions.setItemStatus({item_type: 'item', itemId: 'questionTitle', status:'response'} |
- item type
“item” is the correct setting - itemId
Identifying label for the question. The ID will appear as a column header within the Trophio report, so it’s best practice to keep it brief. - status
The answer itself
Example:


Within the Script Editor for the node (“Yes” response shown):

Multiple choice question, or question with more than one correct answer
For a multiple choice question, or a question with multiple correct answers, first create a new variable within ChatMapper.
For information on how to create a variable in ChatMapper, see ChatMapper Cookbook → Variables and operations |
The variable’s Initial Value should be set to “[]” (left square bracket and right square bracket) as it needs to store an array.

In the Script Editor of a node preceding the Question Node, make sure the variable is set to empty.


Place the following line of code within the Script Editor each answer node.
Variable["yourVariable"].push('response'); |
response being an answer to the posed question

Place the following line of code in the node directly after the answer node.
LB.Actions.setItemStatus({item_type: "item", itemId: "questionTitle", status:Variable["yourVariable"].join(',')}); |
- item type
“item” is the correct setting - itemId
Identifying label for the question. The ID will appear as a column header within the Trophio report, so it’s best practice to keep it brief. - status
The ChatMapper variable you created.

When using a requestInput action
For information on the requestInput action, see Scenario Actions → requestInput |
Modify the requestInput action as shown in the following line of code:
LB.Actions.requestInput({id:"Example", title:"Title", text:"text text text text text", inputLabel:"inputLabel", inputType:"textarea", storeInGamification:true, saveAnswerTo: "answerLabel"}); |
The parameters specifically needed for recording player input are:
- storeInGamification
should be set to “true” - saveAnswerTo
Identifying label for the question. This will appear as a column header within the Trophio report, so it’s best practice to keep it brief.

To view player responses, visit the Collected Items report (see above).

Trophio and LMSs
It is possible to integrate Scenario and SCORM-compliant LMSs through either Articulate Storyline or Adobe Captivate. Please refer to this guide to set up score tracking with Articulate Storyline, and to this guide to set up score tracking within Adobe Captivate.
To report the user’s score in the LMS, first make sure that the combined task rewards (e.g. "points.200") do not exceed the maximum score for the LMS module. Submitting the user’s result to the LMS consists of first obtaining the user’s current score, and then posting it to the LMS, like so:
var userScore = LB.gamificationController.getScore().status; |
FAQs
What’s the difference between creating a task in a space and a task in a world?
A task created in a space will be available only in that space, whereas a task created for a world will be visible in all spaces within that world.
I have created a task in a space, but it’s not showing up when accessing that space as part of a world!
Tasks created in a space will not be visible when accessing that space as part of a world. In order to make them so, you should fill the "In world" field of the task with the world’s ID.

How can I make a task only complete once a certain object has been collected?
In order to do this, you need to fill in the "Completion condition" field of the task. Instructions on its formatting can be found in the "Using conditions" section below.
How can I make a task appear as a progress bar in the achievements menu?
There are two requirements for this:
- The task must have some condition in the "Completion condition" field. See the "Using conditions" section in this guide.
- The "Achievements – progress bar collections" setting must be enabled for the space/world (it’s enabled by default). The setting is in the Basic settings section of the space/world,see "How do I… → Change the settings of a space/world in Dashboard").
How can I allow a user to complete a task in any space within a world?
Certain tasks (e.g. collections of items), due to their non-linear nature, could be completed in any space within a world. In order to allow these tasks to be completed no matter in which space the user is, create a task for the world and set its "Additional data" field to the following:
{ "global":true } |