V2 VR Scenario – Integrating ChatMapper with Adobe Captivate and SCORM 1.2

ChatMapper and Adobe Captivate can be integrated quite quickly by using some Javascript as a bridge.


This brief guide will take the user through the process of correctly setting up a ChatMapper scenario, integrating it in Captivate, and then reporting back to a SCORM environment with a sample project.
The exported SCORM module is standard-compliant, and has been tested over time on many different Learning Management Systems, both large and small. If you would like to test the integration yourself, please refer to Appendix III. |
Table of Contents
1.3. Communicating with Captivate
Appendix I: adding Scenario to an existing .cptx
Appendix II: Sending a score from Captivate to Scenario
Appendix III: Testing the SCORM integration
The ChatMapper scenario
Scenario creation in ChatMapper has been detailed in various places already, like the documentation, the introductory videos, and the helpdesk. For this reason, this guide will only cover the integration process to make ChatMapper communicate with Captivate and the SCORM environment.
1.1. Setting up the project
For the integration to work well, it is advised to use two Custom Asset Fields (which can be added by going to Project → Project Settings → Custom Asset Fields, and selecting the element we want to extend):

Fig 1. The Project Settings with CAFs already defined.
Autoplay
- Tab: Conversations
- Title: Autoplay
- Type: Boolean
This should be set to true in the conversation we want to automatically start, and false everywhere else.
1.2. The scoring variables
Since the aim of this guide is to also integrate with a SCORM environment (in this case SCORM Cloud), the need for score tracking presents itself. This is something done routinely with ChatMapper e-learning projects through variables.
In ChatMapper, create a new user variable (CTRL+SHIFT+U) with a name of your choosing and an initial value of 0.

Fig 2. Creating a user variable.
The same variable can also be created directly in code, by writing the following line in the Script Editor of the conversation’s first node.
Variable["CMScore"] = 0
The variable is thus declared and initialized (i.e. given an initial value), and can be then used during the scenario to record the learner’s progress, for instance by increasing it every time a correct answer is given.
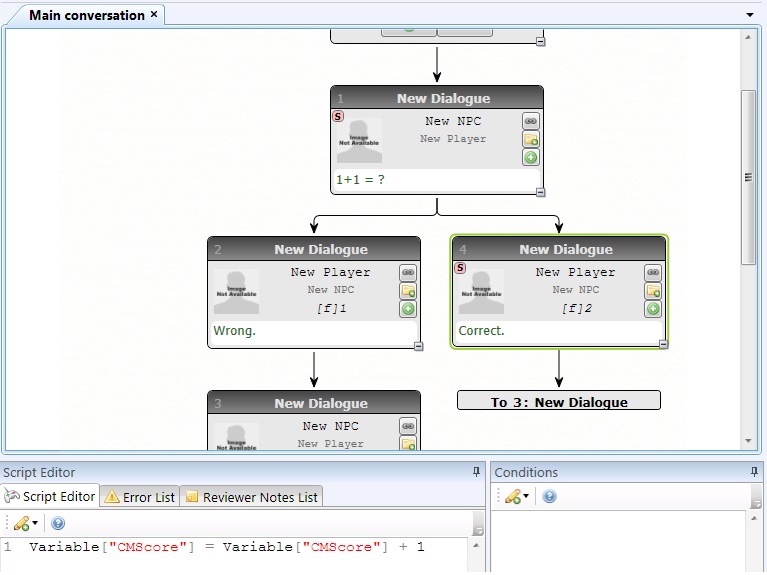
Fig 3. Note how the CMScore variable is incremented by one in the Script editor of the “correct answer” node.
In this case, we’re increasing the CMScore variable by 1 for each correct answer, which can be done like so:
Variable["CMScore"] = Variable["CMScore"] + 1
Please keep in mind that any number of variables can be created for all sorts of purposes – this is just a proof of concept, and is for this reason kept simple.
1.3. Communicating with Captivate
There is one last step in ChatMapper, which is to communicate the scenario’s outcome to Captivate. This can be done as easily as anything else, by including the following two lines in the last node of the scenario:
var CMScore = Variable["CMScore"]
LB.Lms.submitScore(CMScore);
Where Variable["CMScore"] will of course be the name of your variable, if it is different.
1.4 Publishing
Now that the work on the scenario is done, it can be published. A series of video guides that go through the process step-by-step can be found here: https://learnbrite.com/vr-scenario-academy-scenario-authoring/. On a high level, this process consists of :
- Publish the scenario (will create a .json file)
- Create a new Scenario (https://app.learnbrite.com/dashboard/scenarios/create) and Upload the .json file
- Create a new space (and select the Scenario created in the previous step during creation).
- Visit the space (and copy the URL for the next section)

Fig. 4. Copying the URL
The Captivate project
For deploying your first Scenario as a SCORM we recommend you use our pre-built Captivate template, which you can download from here. To add a Scenario to an existing Captivate project please see the appendix.
2.1. Adding Variables
Now that the ChatMapper project is set up, open the provided template with Captivate. For the integration to work, it is required to add a variable to the Captivate project. This can be done by clicking on “Project” in the menu bar, and then selecting “Variables…”.


Fig. 5. Opening the list of variables
A new window will open, containing the list of variables. Adding a new one is as simple as clicking on the “Add New” button in the top right. The interface will change slightly, and the fields will be emptied (this is normal). The fields should be filled with:
- Type: User
- Name: ScenarioURL (capitalization is important!)
- Value: the URL of your space. For instance the one included in the template is https://app.learnbrite.com/scenario_2.8/?spaceId=spcb2ce8bdbfc14a7499cf3e0da8
If you are going to keep your space up-to-date with our platform, a different URL is better suited for the task.
For spaces:
https://app.learnbrite.com/dashboard/spaces/visit/{SPACE_ID}
https://app.learnbrite.com/dashboard/spaces/visit/spcb2ce8bdbfc14a7499cf3e0da8 |
For worlds, the URL is similar. Note that in this case {SPACE_ID} is the ID of the space you want the user to “land” in.
https://app.learnbrite.com/dashboard/spaces/visit/{SPACE_ID}?worldId={WORLD_ID} Example with spaceId “spcb2ce8bdbfc14a7499cf3e0da8” and worldId “wrl1hhat23q92t3tqhl3”: https://app.learnbrite.com/dashboard/spaces/visit/spcb2ce8bdbfc14a7499cf3e0da8?worldId=wrl1hhat23q92t3tqhl3 |
To save the variable, click “Save” on the top right (where “Add New” was before)

Fig. 6. Creating a new variable
When the score is submitted from Scenario, the Captivate wrapper will automatically pick up on it and submit it to the LMS.
2.2. Exporting to SCORM
The only thing left is to export the project so that it can be uploaded to the SCORM environment of choice. This can be done by clicking on the “Publish” button on the right side of the toolbar, and select “Publish for Devices”.
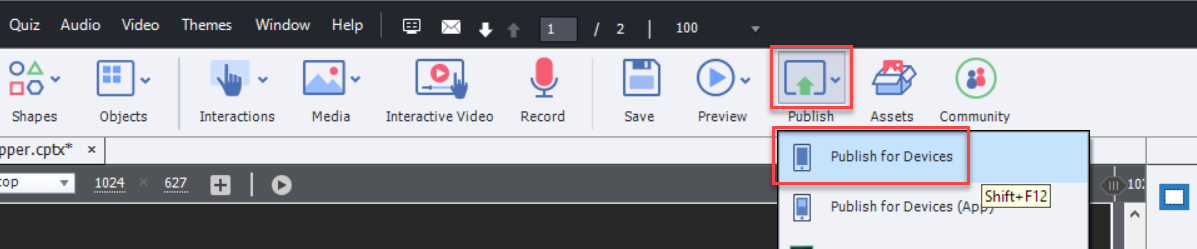
Fig. 7. Publishing the module
This will open a new window, in which various fields and options can be selected. Here are the settings for the sample project. Note: you should export to SCORM 1.2.

Fig 8. The Publish window.
Make sure that:
- “Zip files” is checked
- “Mobile gestures” is set to No
- “eLearning output” is set to SCORM 1.2
To change the last two, click on the blue link and a window will pop up. Here are screenshots of the template project for reference
Mobile Gestures

Fig.9. Mobile Gestures settings
eLearning output

Fig.10.eLearning output settings
After changing any settings, click on the Publish button in the main publishing window and Captivate will export your project to a SCORM-compatible format. That’s it! The project is now ready to be uploaded to your SCORM server!
Appendix I: adding Scenario to an existing .cptx
Scenario can be included within any Captivate project. To do so requires following 3 steps.
- First, create a new, empty slide where Scenario will be loaded, then single-click on it to select it.

Fig. 11. Selecting a slide
- The “Properties” panel should appear on the right. If it does not, click on the “Properties” button in the upper right.
- Afterwards, select “Execute Javascript” from the Action dropdown and click on Script_Window. Make sure that “Continue Playing the Project” is disabled.

Fig. 12.The Properties panel
- In the window that opens, paste the following, then click “OK”
var scenarioUrl=window.cpAPIInterface.getVariableValue("ScenarioURL","");if(!initialized)var isInitialized=SCORM_CallLMSInitialize();var iframeHtml='<iframe src="'+scenarioUrl+'" allow="vr;geolocation;microphone;camera;midi;encrypted-media;autoplay;fullscreen;gyroscope;accelerometer;" id="captivateScenarioFrame" width="300" height="150" frameborder="0" scrolling="no" style="overflow:hidden;border:0;position:absolute;padding:0;margin:0;width:100%;height:100%;z-index:100;" />';function initMessagingWithScenario(){window.addEventListener("message",function(e){var i=JSON.parse(e.data);if(-1!==i.indexOf("SCEN|events_onInitEnd")){var a=window.location.hostname+window.location.pathname,t=SCORM_objAPI.LMSGetValue("cmi.core.student_id"),n=getAvailableName(),l="LMS|init|"+t+"|"+a;n&&(l+="|"+n),document.getElementById("captivateScenarioFrame").contentWindow.postMessage(JSON.stringify(l),"*")}else if(-1!==i.indexOf("SCEN|ScormScore")){var o=i.split("|")[2];if(SCORM_CallLMSSetValue("cmi.core.score.max",cpQuizInfoTotalQuizPoints),SCORM_CallLMSSetValue("cmi.core.score.min",0),SCORM_CallLMSSetValue("cmi.core.score.raw",o),o<window.cpAPIInterface.getVariableValue("cpQuizInfoQuizPassPoints",50)?SCORM_CallLMSSetValue("cmi.core.lesson_status","failed"):SCORM_CallLMSSetValue("cmi.core.lesson_status","passed"),!initialized)SCORM_CallLMSInitialize();SCORM_CallLMSCommit(),SCORM_CallLMSFinish();document.Captivate.cpEISetValue("rdcmndExit",1)}})}function getAvailableName(){var e=GetStudentName(),i=e.split(",");if(e){if(i[1])a=i[1];else a=i[0];a=0===a.indexOf(" ")?a.substring(1):a}else var a="";return a}$("body").append(iframeHtml),initMessagingWithScenario(); |
- The last step is to set the variable required to integrate Scenario and Captivate (there are instructions on how to do that in section 2.1 of this guide).
Appendix II: Sending a score from Captivate to Scenario
It is also possible to embed one or more Captivate modules within Scenario, and have Scenario receive a score from Captivate. This is useful when including multiple quizzes in a single room as mediaboards, to report back a unified score to the LMS.
The Captivate side
First, each quiz will need a variable in which to keep track of the score itself. One can be created by following section 2.1 of this guide. We will call the example variable “ExampleScore”.
Then, to trigger the communication from Captivate to Scenario, a new button is required, with an “Execute Javascript” action. To create a new button, click on “Interactions” and then “Button”
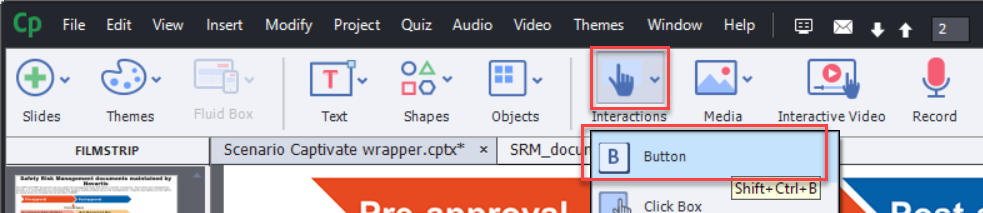
Fig. 13.Adding a button
When adding the button, the “Properties” panel should appear on the right. If it does not, click on the “Properties” button in the upper right.
Afterwards, select “Execute Javascript” from the Action dropdown and click on Script_Window.
Fig. 14.The Properties panel
In the window that opens, paste the following, then click “OK”
var objCP = document.Captivate; parent.postMessage(eventName + eventBody , "*";); |
That’s it! You can publish the project (see section 2.2) and when the user clicks on the button just created a message will be sent to Scenario with the score.
The ChatMapper side
In ChatMapper, a listener is required to receive the score and trigger the appropriate actions. It is advisable to set this up in the first node of the first conversation the user goes through, to ensure the event listener is registered.
The code to add in the “Script editor” of that node follows; here is a handy image to show where the script editor is in relation to other ChatMapper interface elements (in the lower left).

Fig. 15.The ChatMapper Script Editor
And here is the script
window.addEventListener("message", function (event) { |
A few things to note about this snippet:
- Note 1: eventName (“SCEscore” in the example) must match eventName in the snipper right before this one, in the “The Captivate side” section.
- Note 2: the actions to be triggered when the score is received (in the case of this example, to be triggered only if the score received is higher or equal to the passing grade score, set as 60) are arbitrary: a full list of actions can be found in our Scenario Actions guide.
- Note 3: “task_code” is the task’s shortcode, and can be found in Trophio. If you are not familiar with that part of the LearnBrite ecosystem and wish to introduce gamification within your experiences, please refer to our guide to Trophio.
A note on scoring: if more than a single Captivate module is included in a Scenario, their score will need to be reduced to a single one (Scenario can only submit a single score to the LMS). It is therefore recommended to have a consistent scoring system (such as, for 5 different modules, having each of them contribute a maximum of 20 points to the score).
The Scenario side
For the last part of the integration, some sort of trigger to show the Captivate module is required within a space – usually clicking or tapping on a mediaboard. Including it is quite straightforward:
- Go to the space that should include the module (make sure to be logged in and of having editing permissions – a crown 👑 will appear next to your avatar’s name, but it’s exact appearance will vary depending on the platform).

Fig. 16.Crown besides the avatar’s name
- Click on the “Edit menu” button, and then on “Add mediaboard”

Fig. 17. The edit menu
- Select “HTML”, and paste the following in the input box.
Make sure to put the URL of your captivate module in the code where “YOUR_CAPTIVATE_MODULE” is
<iframe width="200" height="113" src="YOUR_CAPTIVATE_MODULE" frameborder="0" allow="vr;geolocation;microphone;camera;midi;encrypted-media;autoplay;fullscreen;gyroscope;accelerometer;" style="width:100%;height:75vh"></iframe> |

Fig. 18. Creating a mediaboard
- Click the green “Embed” button in the popup: a mediaboard will be created in front of the avatar, and is movable by clicking and dragging over it.
And that’s it – any Captivate module can be integrated within Scenario in the same way.
Appendix III: Testing the SCORM integration
The easiest and quickest way to test that a score can be submitted by the platform to the chosen LMS is to create an object in the space, and call submitScore from it.
- In the edit menu, select “Add content”, then add any model (for instance you can search for “cube”)
- After the model loaded, enter edit mode, and click on the gear icon

- In the onclick field, click on “Edit Action”

- Click on “More” (the rightmost of the blue buttons at the bottom)
- Select “Custom action” from the dropdown
- Fill it with the following parameters:
- Action Name: callFunction
- name: LB.Lms.submitScore
- parameter: 100

- Then click or tap on “Save action”, then “Save” at the bottom of the previous popup.
- Exit edit mode.
By clicking on the item now, a score of 100 will be submitted, and you can check that it’s reported correctly in your LMS of choice.
© 2020 LearnBrite – Commercial In Confidence
Trademarks & Copyrights are property of their respective owners. Pictures are indicative only & may not reflect final production.